Making Natural Weed Water for Your Garden

How to Make and Use Weed Water for Your Garden

Weed water is an eco-friendly, nutrient-rich solution made from common garden weeds. It provides plants with essential nutrients and improves soil health without the need for chemical fertilizers.

Making weed water is simple, but does take some time and you can experiment with your own recipes.  The table below will provide you with some insight on which weeds are most beneficial for various needs in your garden as well.

Common Weeds and Their Benefits

Weed Key Nutrients Provided Additional Benefits
Nettle Nitrogen, iron, magnesium, calcium Stimulates plant growth, improves soil fertility
Dandelion Potassium, calcium, iron, copper Promotes strong root development, deters pests
Comfrey Nitrogen, phosphorus, potassium Accelerates composting, boosts flowering plants
Chickweed Potassium, magnesium, zinc Enhances seed germination, promotes leaf growth
Yarrow Potassium, phosphorus, calcium Increases disease resistance, improves soil structure
Lamb’s Quarters Nitrogen, calcium, potassium Boosts overall plant health, enhances soil quality
Borage Potassium, calcium, magnesium Improves flowering, attracts pollinators
Plantain Calcium, magnesium, iron Enhances seed germination, boosts soil aeration
Mullein Potassium, calcium, magnesium Improves soil structure, supports root development
Thistle Nitrogen, potassium, magnesium Enhances growth of root vegetables, improves soil aeration
Horsetail Silica, potassium, magnesium Strengthens plant cell walls, improves resistance to pests
Cleavers Nitrogen, potassium, calcium Enhances soil fertility, boosts overall plant health
Shepherd’s Purse Calcium, potassium, magnesium Improves soil structure, boosts seedling growth
Purslane Omega-3 fatty acids, iron, calcium Enhances plant growth, improves soil moisture retention
Sorrel Potassium, phosphorus, calcium Improves root development, enhances soil acidity balance
Ragweed Nitrogen, potassium, magnesium Boosts plant growth, improves soil texture
Goldenrod Potassium, calcium, magnesium Enhances flowering, supports pollinator activity
Field Bindweed Nitrogen, potassium, calcium Improves soil fertility, enhances plant growth
Clover Nitrogen, calcium, magnesium Fixes nitrogen in soil, enhances overall plant health
Milk Thistle Potassium, calcium, magnesium Improves soil structure, supports plant growth

Benefits of Weed Water

  1. Nutrient-Rich: Weeds like dandelions, nettles, and comfrey are packed with nutrients such as nitrogen, potassium, and phosphorous.
  2. Cost-Effective: Utilizes garden waste, reducing the need for commercial fertilizers.
  3. Eco-Friendly: Promotes sustainable gardening practices by recycling garden waste into a beneficial product.

Step-by-Step Guide to Making Weed Water

Materials Needed

  • Fresh weeds (avoid using weeds with seeds)
  • Large container (bucket or barrel)
  • Water
  • Stirring stick
  • Optional: gloves (for handling prickly or stinging weeds)

Instructions

  1. Collect Weeds:
    • Gather a variety of weeds from your garden. Aim for nutrient-rich weeds like nettles, dandelions, and comfrey.
    • Avoid weeds with seeds to prevent them from spreading when you use the weed water.
  2. Prepare the Container:
    • Place the weeds in a large container. A bucket or barrel works well for this purpose.
    • Chop or break the weeds into smaller pieces to speed up the decomposition process.
  3. Add Water:
    • Fill the container with water, covering the weeds completely.
    • Use a ratio of roughly 1 part weeds to 10 parts water.
  4. Fermentation Process:
    • Let the mixture steep for 2-4 weeks. During this time, the weeds will break down and release their nutrients into the water.
    • Stir the mixture every few days to speed up the decomposition and ensure even nutrient distribution.
  5. Strain the Mixture:
    • After 2-4 weeks, strain the liquid to remove the plant debris.
    • The resulting liquid is your nutrient-rich weed water.
  6. Dilute for Use:
    • Weed water can be quite strong, so dilute it before using. Mix one part weed water with ten parts fresh water.
    • This ensures that the nutrient concentration is appropriate for your plants.

Using Weed Water in Your Garden

  1. Watering Plants:
    • Use the diluted weed water to water your plants as you would with regular water.
    • Apply it directly to the soil around the base of plants to ensure the roots absorb the nutrients.
  2. Foliar Spray:
    • Weed water can also be used as a foliar spray. Fill a spray bottle with the diluted solution and mist the leaves of your plants.
    • This method allows the plants to absorb nutrients directly through their leaves.
  3. Frequency of Use:
    • Apply weed water every 2-4 weeks during the growing season.
    • Monitor your plants’ response and adjust the frequency if necessary.

Additional Tips

  • Safety First: Wear gloves when handling prickly or stinging weeds like nettles.
  • Avoid Overuse: Too much weed water can overwhelm plants with nutrients. Always dilute and use in moderation.
  • Compost the Leftovers: The strained plant material can be added to your compost pile to continue the nutrient cycle.

Using weed water is a sustainable and effective way to nourish your garden. By repurposing garden weeds, you not only reduce waste but also provide your plants with a natural, nutrient-rich boost.

References and Further Reading.

The Spruce: How to Make and Use Weed Tea Fertilizer
Gardening Know How: How To Make Nettle Fertilizer Tea
Permaculture News: DIY Weed Tea for Organic Plant Fertilizer
Organic Authority: Homemade Weed Tea: Natural Plant Fertilizer
Gardeners World: How to Make Liquid Fertilizer from Weeds


The 12 Best Breeds of Chickens for Egg Laying

Planning your chicken coop means taking into account what kind of chickens in you are raising.  In this article we take an overview look at the 12 most common chicken varieties as well as a variety of factors that can impact your chicken farming experience.   I also take into account factors such as tolerance to winter conditions and their reputation as egg layers as well as personality habits.

The 12 Most Common Chicken Breeds

1. Plymouth Rock (Barred Rock)

  • Egg Yield: 4-5 eggs per week
  • Egg Color: Light brown
  • Egg Size: Medium to large
  • Size: 6-7 lbs
  • Winter Tolerant: Yes
  • Class: Dual-purpose
  • Characteristics: Plymouth Rocks are known for their friendly nature and ease of care, making them ideal for beginners. They are hardy birds that can tolerate cold climates well.

2. Rhode Island Red

  • Egg Yield: 5-6 eggs per week
  • Egg Color: Brown
  • Egg Size: Medium to large
  • Size: 6.5-8.5 lbs
  • Winter Tolerant: Yes
  • Class: Dual-purpose
  • Characteristics: Rhode Island Reds are versatile birds, excellent for both egg production and meat. They are hardy and adaptable, making them a popular choice among homesteaders.

3. Leghorn ( White ) 

  • Egg Yield: 5-6 eggs per week
  • Egg Color: White
  • Egg Size: Large
  • Size: 4.5-6 lbs
  • Winter Tolerant: Moderate
  • Class: Egg-laying
  • Characteristics: Leghorns are prolific layers known for their high egg production. They are active and efficient foragers but can be flighty and nervous.


4. Wyandotte

  • Egg Yield: 4-5 eggs per week
  • Egg Color: Cream
  • Egg Size: Large
  • Size: 6-8 lbs
  • Winter Tolerant: Yes
  • Class: Dual-purpose
  • Characteristics: Wyandottes are known for their beautiful plumage and calm temperament. They are good for both eggs and meat, and they thrive in cold climates.


5. Sussex

  • Egg Yield: 4-5 eggs per week
  • Egg Color: Light brown, cream
  • Egg Size: Large
  • Size: 6-8 lbs
  • Winter Tolerant: Yes
  • Class: Dual-purpose
  • Characteristics: Sussex chickens are friendly and easy to manage, making them ideal for beginners. They are dual-purpose birds, providing good quality meat as well.


6. Australorp

  • Egg Yield: 4-5 eggs per week
  • Egg Color: Light brown
  • Egg Size: Medium to large
  • Size: 6-8 lbs
  • Winter Tolerant: Yes
  • Class: Dual-purpose
  • Characteristics: Australorps are renowned for their consistent laying and friendly nature. They thrive well in various climates and are known for their hardiness.


7. Chantecler

  • Egg Yield: 4-5 eggs per week
  • Egg Color: Brown
  • Egg Size: Medium to large
  • Size: 6.5-7.5 lbs
  • Winter Tolerant: Yes
  • Class: Dual-purpose
  • Characteristics: Chanteclers are hardy birds developed in Canada for cold climates. They are calm, good layers, and dual-purpose birds.


8. Minorca

  • Egg Yield: 4-5 eggs per week
  • Egg Color: White
  • Egg Size: Large
  • Size: 6-8 lbs
  • Winter Tolerant: Moderate
  • Class: Egg-laying
  • Characteristics: Minorcas are known for their large white eggs and striking appearance. They are active birds that do well in warm climates but can be a bit flighty.


9. Delaware

  • Egg Yield: 4-5 eggs per week
  • Egg Color: Brown
  • Egg Size: Medium to large
  • Size: 6-8 lbs
  • Winter Tolerant: Yes
  • Class: Dual-purpose
  • Characteristics: Delawares are friendly and curious birds, good for both eggs and meat. They are hardy and do well in various climates.


10. Easter Egger

  • Egg Yield: 4-5 eggs per week
  • Egg Color: Green, blue, olive, pink, tan, cream
  • Egg Size: Medium
  • Size: 4-5 lbs
  • Winter Tolerant: Moderate
  • Class: Egg-laying
  • Characteristics: Easter Eggers are known for their colorful eggs and friendly nature. They are adaptable to various environments and make excellent backyard birds.


11. Isa Brown

  • Egg Yield: 6-7 eggs per week
  • Egg Color: Brown
  • Egg Size: Large
  • Size: 4-5 lbs
  • Winter Tolerant: Moderate
  • Class: Egg-laying
  • Characteristics: Isa Browns are prolific layers known for their friendly and docile nature. They start laying eggs at around 4-5 months old and produce large, brown eggs. However, they have a shorter lifespan of about 3-4 years.


12. Black Star (Black Sex Link)

  • Egg Yield: 5-6 eggs per week
  • Egg Color: Brown
  • Egg Size: Medium to large
  • Size: 5-7 lbs
  • Winter Tolerant: Yes
  • Class: Egg-laying
  • Characteristics: Black Stars are hybrid birds known for their high egg production. They are good foragers, friendly, and easy to manage, making them popular among homesteaders.

Comparison Table of Egg-Laying Chicken Breeds

Breed Eggs per Week Egg Color Egg Size Size Winter Tolerant Class Key Characteristics
Plymouth Rock 4-5 Light brown Medium to large 6-7 lbs Yes Dual-purpose Friendly, hardy, cold-tolerant
Rhode Island Red 5-6 Brown Medium to large 6.5-8.5 lbs Yes Dual-purpose Dual-purpose, hardy, adaptable
Leghorn 5-6 White Large 4.5-6 lbs Moderate Egg-laying Prolific layers, active, flighty
Wyandotte 4-5 Cream Large 6-8 lbs Yes Dual-purpose Beautiful plumage, calm, cold-tolerant
Sussex 4-5 Light brown, cream Large 6-8 lbs Yes Dual-purpose Friendly, easy to manage, dual-purpose
Australorp 4-5 Light brown Medium to large 6-8 lbs Yes Dual-purpose Consistent layers, friendly, climate resilient
Chantecler 4-5 Brown Medium to large 6.5-7.5 lbs Yes Dual-purpose Hardy, calm, dual-purpose
Minorca 4-5 White Large 6-8 lbs Moderate Egg-laying Large eggs, active, warm climates
Delaware 4-5 Brown Medium to large 6-8 lbs Yes Dual-purpose Friendly, curious, dual-purpose
Easter Egger 4-5 Green, blue, olive, pink, tan, cream Medium 4-5 lbs Moderate Egg-laying Colorful eggs, friendly, adaptable
Isa Brown 6-7 Brown Large 4-5 lbs Moderate Egg-laying Prolific layers, friendly, shorter lifespan
Black Star 5-6 Brown Medium to large 5-7 lbs Yes Egg-laying High egg production, friendly, good foragers

Easiest Egg-Laying Chicken Breeds for Beginners

Starting a backyard flock can be a rewarding experience, but it’s important to choose the right breeds, especially if you’re a beginner. Some chicken breeds are known for their friendly demeanor, ease of care, and reliable egg production, making them ideal for those new to raising chickens. Here are some of the best egg-laying breeds for beginners:

Breed Eggs per Week Egg Color Egg Size Size Winter Tolerant Class Key Characteristics
Rhode Island Red 5-6 Brown Medium to large 6.5-8.5 lbs Yes Dual-purpose Hardy, adaptable, friendly, dual-purpose
Plymouth Rock 4-5 Light brown Medium to large 6-7 lbs Yes Dual-purpose Friendly, hardy, cold-tolerant
Sussex 4-5 Light brown, cream Large 6-8 lbs Yes Dual-purpose Friendly, easy to manage, dual-purpose
Australorp 4-5 Light brown Medium to large 6-8 lbs Yes Dual-purpose Consistent layers, friendly, climate resilient
Orpington 3-4 Light brown Large 7-8 lbs Yes Dual-purpose Calm, friendly, hardy, good for meat and eggs

These breeds are not only prolific layers but also have temperaments and characteristics that make them easy to manage, even for novice chicken keepers. Choosing any of these breeds will help ensure a smooth and enjoyable start to your chicken-keeping journey.

Hardiest Egg-Laying Chicken Breeds for Cold Climates

Choosing the right chicken breeds for cold climates is essential to ensure your flock remains healthy and productive throughout the winter. Here are some of the best egg-laying breeds that are known for their hardiness in colder temperatures:

Breed Eggs per Week Egg Color Egg Size Size Winter Tolerant Class Key Characteristics
Plymouth Rock 4-5 Light brown Medium to large 6-7 lbs Yes Dual-purpose Friendly, hardy, cold-tolerant
Rhode Island Red 5-6 Brown Medium to large 6.5-8.5 lbs Yes Dual-purpose Hardy, adaptable, friendly, dual-purpose
Sussex 4-5 Light brown, cream Large 6-8 lbs Yes Dual-purpose Friendly, easy to manage, dual-purpose
Australorp 4-5 Light brown Medium to large 6-8 lbs Yes Dual-purpose Consistent layers, friendly, climate resilient
Wyandotte 4-5 Cream Large 6-8 lbs Yes Dual-purpose Beautiful plumage, calm, cold-tolerant
Orpington 3-4 Light brown Large 7-8 lbs Yes Dual-purpose Calm, friendly, hardy, good for meat and eggs
Chantecler 4-5 Brown Medium to large 6.5-7.5 lbs Yes Dual-purpose Developed for cold climates, calm, dual-purpose

These breeds are well-suited to colder environments due to their hardiness, feathering, and overall resilience. They not only thrive in winter conditions but also continue to lay eggs consistently, ensuring a steady supply of fresh eggs even in the cold months. Choosing any of these breeds will help you maintain a productive and healthy flock throughout the year.


Canadian Laws and Defending Your Homestead

Defending one’s home is a fundamental concern for homeowners, particularly those living in rural or isolated areas. In Canada, the legal framework surrounding self-defense is designed to balance the right of individuals to protect themselves with the need to regulate the use of force. This article explores the key principles of Canadian self-defense law, with a focus on defending one’s homestead.

It’s important to also accept that I am not a lawyer and the advice in this article should not be taken as legal advice.  The irony of this isn’t lost on me as I try to help my fellow Canadians understand protecting your home while also having to add a disclaimer on the content I write.   Never the less, this is pretty accurate stuff when it comes to how Canada views protecting your home in the eyes of the law.

The frustration for Canadians is that under the law, you are obligated to call for help – but when living in the country – that help might be an hour away.  As a person that lives in the country, your first instinct is to set the bad guy straight and make sure he doesn’t do it again – but unfortunately our laws lean more to protecting bad guys then they do you.  This article then is to help you understand the law and your rights when some poor soul with a bad up bringing is trying to take what is yours.  It refers continually to section 34 and 35 of the criminal code and how it impacts your rights to protect yourself and your property.

This article also examines the Wiebo Ludwig case as well as the Gerald Stanley case as is relates to you as a property owner.

Application to the Scenario: Someone Trying to Steal Your Truck in the Middle of the Night Off Your Farm…

In the scenario where someone is stealing a truck from your home in the middle of the night, the following considerations apply:

  1. Assessment of Threat:
    • If the thief is solely attempting to steal the truck and poses no immediate threat to the farmer’s life or safety, the use of deadly force is not justified under Canadian law.
    • The farmer must evaluate whether there is an immediate danger to personal safety. For instance, if the thief is armed and threatens the farmer, the situation might justify a different level of response.
  2. Necessity and Proportionality:
    • The farmer should consider non-lethal alternatives first, such as alerting law enforcement, using a security system to deter the theft, or verbally warning the thief to leave.
    • Deadly force is only justifiable if the thief poses an immediate and significant threat to the farmer’s life or bodily integrity. For example, if the thief brandishes a weapon and threatens the farmer directly, the use of deadly force might be considered necessary and proportional.

Judicial Scrutiny

Canadian courts will rigorously scrutinize cases involving the use of deadly force. They will consider factors such as:

  • Immediacy of the Threat: Whether the threat was immediate and unavoidable.
  • Alternative Options: Whether the homeowner had other options to prevent the theft without resorting to deadly force.
  • Perceived Danger: Whether a reasonable person in the same situation would have perceived the same level of danger and responded similarly.

Legal Foundation of Self-Defense in Canada

In Canada, self-defense laws are codified in the Criminal Code, which provides a structured legal framework for determining when the use of force is justified. The primary sections dealing with self-defense are Sections 34 and 35 of the Criminal Code.

Key Provisions:

  • Section 34: This section allows for the use of force in self-defense against an unprovoked assault, provided that the force used is reasonable in the circumstances.
  • Section 35: This section addresses the use of force in defense of property, allowing individuals to use reasonable force to prevent someone from entering or damaging their property​ (LII / Legal Information Institute)​.

Core Principles of Self-Defense

The application of self-defense law in Canada hinges on several core principles:

  1. Reasonableness: The force used must be reasonable in the circumstances. This means that the response to the threat must be proportionate to the level of danger faced. Excessive or unnecessary force can lead to criminal liability.
  2. Imminence: The threat must be immediate. Self-defense is justified only when there is an immediate and direct threat to personal safety or property. The perception of threat must be based on reasonable grounds​ (LII / Legal Information Institute)​.
  3. Necessity: The use of force must be necessary to protect oneself or one’s property. If there are alternative means to avoid the threat, such as retreating or calling for help, those options should be considered before resorting to force​ (LII / Legal Information Institute)​.

Self-Defense Against Intruders of Your Home or Property

When defending against an intruder, homeowners must navigate the legal nuances to ensure their actions are within the bounds of the law:

Key Considerations:

  • Proportionality: The degree of force used in self-defense must match the level of threat posed by the intruder. For instance, using deadly force against an unarmed intruder may be deemed excessive unless there is a reasonable belief that the intruder poses a lethal threat​ (LII / Legal Information Institute)​.
  • Objective and Subjective Analysis: Courts will consider both the subjective perspective of the defender (what the defender believed at the time) and the objective standard (what a reasonable person would have believed under similar circumstances) to determine the reasonableness of the use of force​ (LII / Legal Information Institute)​.

Self-Defense of Property in Canadian Law

Defending one’s property in Canada involves a distinct set of legal principles and guidelines that differ from the laws governing self-defense against personal harm. These laws are primarily outlined in the Criminal Code of Canada and are designed to balance the right to protect one’s property with the need to prevent unnecessary violence. Here’s an in-depth look at how self-defense of property is handled under Canadian law.

Legal Framework

Again we come back to the key sections of the Criminal Code that address the defense of property which are sections 34 and 35:

  • Section 34: While primarily focused on self-defense against personal attacks, this section can be relevant when the defense of property involves personal confrontation.
  • Section 35: Specifically addresses the use of force to defend property. It allows individuals to use reasonable force to prevent someone from entering or damaging their property, with strict limitations on the use of deadly force​ (LII / Legal Information Institute)​.

Core Principles of Property Defense

  1. Reasonableness:
    • The use of force must be reasonable in the circumstances. This means that the response to the threat must be proportionate to the level of danger to the property and must be necessary to prevent the intrusion or damage​ (LII / Legal Information Institute)​.
    • Courts evaluate reasonableness based on what a typical person would consider appropriate under similar circumstances.
  2. Necessity:
    • Force must only be used when it is necessary to prevent the intrusion or damage to property. If there are alternative means to protect the property, such as calling the police or using non-violent methods, those should be considered first​ (LII / Legal Information Institute)​.
    • The necessity of force is closely scrutinized, particularly when deadly force is involved.
  3. Proportionality:
    • The level of force used must be proportional to the threat posed. Using deadly force to protect property alone is rarely justified unless there is an immediate and concurrent threat to personal safety​ (LII / Legal Information Institute)​.
    • For example, while it may be reasonable to use physical force to prevent someone from vandalizing your property, using a firearm in such a situation would likely be deemed excessive unless there was a direct threat to life or serious injury.

At this point it is important to understand that using physical or deadly force when someone is trying to steal from you under Canadian law is  going to get you in trouble as screwed up as that seems.

The Use of Firearms to Protect Property Under Canadian Law

In Canada, the use of firearms in self-defense, particularly in the defense of property, is subject to stringent legal restrictions. The laws governing the use of force, including firearms, are primarily outlined in the Criminal Code of Canada. These laws are designed to ensure that any use of force is necessary, reasonable, and proportional to the threat faced.

Legal Framework

The key sections of the Criminal Code that address the use of force and firearms in self-defense and property defense are Sections 34 and 35:

  • Section 34: This section allows individuals to use force, including firearms, in self-defense if they believe on reasonable grounds that it is necessary to protect themselves or others from death or grievous bodily harm.
  • Section 35: This section pertains to the defense of property. It permits the use of reasonable force to prevent someone from unlawfully entering, taking, or damaging property. However, the use of deadly force, including firearms, is highly restricted and generally not justified solely for the protection of property​ (LII / Legal Information Institute)​​ (Findlaw)​.

Key Principles Governing the Use of Firearms

  1. Necessity:
    • The use of a firearm must be absolutely necessary to prevent an imminent threat of death or serious bodily harm. There must be no other reasonable alternatives to avoid the threat, such as retreating or calling law enforcement​ (LII / Legal Information Institute)​​ (Findlaw)​.
    • In property defense situations, the necessity to use a firearm is scrutinized rigorously, as non-lethal means of protection are preferred.
  2. Proportionality:
    • The response must be proportional to the threat. Using a firearm to defend against a non-lethal threat or minor property crime is generally not considered acceptable.
    • The level of force must match the severity of the threat. Firearms should only be used when the threat involves the potential for deadly force​ (LII / Legal Information Institute)​​ (Findlaw)​.
  3. Reasonableness:
    • The defender’s belief in the necessity of using a firearm must be reasonable. This means that an ordinary person in the same situation would likely perceive the same level of threat and consider the use of a firearm necessary.
    • Courts apply both subjective (the defender’s perspective) and objective (what a reasonable person would believe) standards to evaluate the reasonableness of using a firearm​ (LII / Legal Information Institute)​​ (Findlaw)​.

Defence attorney Scott Spencer, right, and his client Gerald Stanley enter the Court of Queen’s Bench on the day of closing arguments in his trial, the farmer is accused of killing the 22-year-old Indigenous man Colten Boushie, in Battleford, Sask., Thursday, February 8, 2018. THE CANADIAN PRESS/Liam Richards AppleMark

Use of Deadly Force in Property Defense –

In Canada, the use of deadly force to defend property is highly restricted. The Criminal Code specifies that deadly force cannot be used solely to protect property. It can only be justified if there is an immediate threat to personal safety or the safety of others.  See below for further discussion.

Key Points:

  • Imminent Threat to Life: Deadly force may be considered reasonable if the property defense situation simultaneously involves an imminent threat to the life or serious bodily harm of the defender or another person​ (LII / Legal Information Institute)​​ (Findlaw)​.
  • Judicial Scrutiny: Cases involving the use of deadly force are subject to rigorous judicial scrutiny to ensure that the force was both necessary and proportional to the threat faced.

Judicial Interpretation and Notable Cases

Canadian courts have addressed several cases that illustrate the application of self-defense laws in property protection contexts. These cases help clarify the limits and application of these laws.

R v. Cadwallader (2003):

  • Background: Cadwallader used excessive force against an unarmed intruder. The court scrutinized whether his actions were necessary and proportional.
  • Outcome: The case highlighted that while defending property, the force used must not exceed what is reasonable and necessary under the circumstances. Excessive force can lead to criminal liability​ (LII / Legal Information Institute)​.

R v. Gunning (2005):

  • Background: Involved a defendant using a firearm to defend his property from a group of intruders.
  • Outcome: The court examined whether the use of deadly force was justified given the circumstances. It reinforced that deadly force is rarely justified solely for property defense unless there is an immediate threat to personal safety​ (LII / Legal Information Institute)​.

R v. Khill (2018):

  • Background: This case involved a homeowner who used deadly force against an intruder. The court analyzed whether the homeowner’s perception of the threat and the use of deadly force were reasonable.
  • Outcome: This case underscored the importance of assessing the imminence and severity of the threat, and whether the homeowner had reasonable grounds to believe that deadly force was necessary​ (LII / Legal Information Institute)​.

Practical Considerations for Homeowners

Homeowners need to understand their rights and the limitations of using force to defend their property:

  • Assessment of Threat: Homeowners should carefully assess the level of threat posed by an intruder. Non-violent measures should be considered first whenever possible.
  • Legal Risks: Even if force is deemed necessary, there are legal risks associated with its use. Homeowners should be prepared to justify their actions based on the principles of necessity, proportionality, and reasonableness.
  • Alternatives to Force: Whenever possible, homeowners should consider alternatives to using force, such as securing property with locks, alarms, and surveillance systems, and contacting law enforcement.

Political and Public Relations Considerations

The use of deadly force in property defense carries significant political and public relations implications. These considerations can impact both the legal process and public perception of the incident.

  1. Political Context:
    • Legislative Attention: Incidents involving the use of deadly force often attract legislative attention, prompting discussions about potential changes to self-defense laws. Lawmakers may face pressure to tighten or relax restrictions based on public sentiment and high-profile cases​ (Findlaw)​.
    • Public Policy: The balance between individual rights to defend property and the need to prevent excessive violence is a sensitive issue in public policy. Policymakers must navigate these complexities to create laws that protect citizens while preventing abuse of self-defense claims.
  2. Public Relations:
    • Media Coverage: High-profile cases involving deadly force in property defense typically receive extensive media coverage. The narrative presented in the media can influence public opinion and, subsequently, the judicial process​ (Findlaw)​​ (LII / Legal Information Institute)​.
    • Community Impact: The use of deadly force can have a profound impact on the community, affecting perceptions of safety and trust in the legal system. Effective communication and transparency from law enforcement and legal authorities are crucial in managing public relations.
    • Defendant’s Image: The homeowner’s public image can be significantly affected by the incident. Engaging with media, presenting a clear and consistent message, and demonstrating remorse or justification can influence public perception and support.
  3. Ethical and Moral Considerations:
    • Moral Responsibility: Beyond legal justification, homeowners must consider the moral implications of using deadly force. Taking a life, even in defense of property, carries a heavy ethical burden and can lead to lasting psychological and social consequences.
    • Public Discourse: Public discourse around such incidents often involves debates about the ethics of self-defense and the appropriate limits of using force. These discussions can shape societal norms and expectations regarding property defense.

Application to the Scenario: Defending Against an Intruder in Your Home Under Canadian Law

When an intruder enters your home, the legal framework governing self-defense in Canada provides guidance on what constitutes acceptable use of force. Understanding these principles is crucial for homeowners to ensure their actions are legally justified.

Legal Framework for Home Defense

The Criminal Code of Canada outlines the conditions under which force, including deadly force, can be used in self-defense or the defense of property:

  • Section 34: Allows individuals to use reasonable force in self-defense if they believe on reasonable grounds that it is necessary to protect themselves or others from death or grievous bodily harm.
  • Section 35: Pertains to the defense of property, allowing for reasonable force to prevent someone from unlawfully entering, taking, or damaging property. However, the use of deadly force is highly restricted and generally not justified solely for the protection of property​ (LII / Legal Information Institute)​​ (Findlaw)​.

Key Principles in Home Defense

  1. Necessity:
    • The use of force must be necessary to protect against an imminent threat. If the intruder poses an immediate danger to the homeowner’s life or serious bodily harm, the use of deadly force may be justified​ (LII / Legal Information Institute)​​ (Findlaw)​.
    • The necessity is determined by whether there are no other reasonable alternatives to avoid the threat, such as retreating or calling for help.
  2. Proportionality:
    • The force used must be proportional to the threat faced. If the intruder is unarmed and poses no direct threat to personal safety, using deadly force would likely be deemed excessive.
    • The level of force must match the severity of the threat. For instance, using a firearm against an armed intruder who threatens life may be considered proportional​ (LII / Legal Information Institute)​​ (Findlaw)​.
  3. Reasonableness:
    • The homeowner’s belief in the necessity of using force must be reasonable. This involves both subjective (the homeowner’s perception) and objective (what a reasonable person would perceive) standards​ (LII / Legal Information Institute)​​ (Findlaw)​.
    • Courts will consider the circumstances surrounding the incident, including the intruder’s actions, the level of threat perceived, and the homeowner’s response.

Case Study: Application in Real-World Scenarios

Scenario 1: Armed Intruder

  • Situation: An intruder breaks into a home at night armed with a weapon and threatens the homeowner.
  • Application: The homeowner, fearing for their life, uses a firearm to defend themselves. In this case, the use of deadly force might be justified if it is necessary to prevent imminent death or serious injury. The proportionality and reasonableness of the response would likely support the homeowner’s actions​ (LII / Legal Information Institute)​​ (Findlaw)​.

Scenario 2: Unarmed Intruder

  • Situation: An intruder enters the home but is unarmed and does not directly threaten the homeowner.
  • Application: The use of deadly force in this scenario would likely be deemed excessive. The homeowner should consider non-lethal alternatives, such as retreating to a safe area and calling law enforcement. The necessity and proportionality principles would not support the use of deadly force in this situation​ (LII / Legal Information Institute)​​ (Findlaw)​.

Scenario 3: Intruder with Unknown Intentions

  • Situation: An intruder breaks in at night, and the homeowner is unsure if the intruder is armed.
  • Application: The homeowner must quickly assess the threat. If there are reasonable grounds to believe that the intruder poses a significant threat to life or safety, the use of force, including potentially deadly force, may be justified. However, if the intruder does not display threatening behavior, non-lethal responses should be prioritized​ (LII / Legal Information Institute)​​ (Findlaw)​.

Legal Process and Considerations

If a homeowner uses force against an intruder, the following steps typically ensue:

  1. Police Investigation:
    • Law enforcement will conduct a thorough investigation, collecting evidence and taking statements from all involved parties.
    • The homeowner’s actions will be scrutinized to determine if the use of force was necessary, proportional, and reasonable​ (LII / Legal Information Institute)​​ (Findlaw)​.
  2. Prosecutorial Review:
    • The Crown prosecutor reviews the evidence to decide whether to lay charges. This review includes assessing whether there is a reasonable prospect of conviction and whether prosecution is in the public interest​ (LII / Legal Information Institute)​​ (Findlaw)​.
    • Charges could range from no charges to serious offenses like manslaughter or second-degree murder if the force used is deemed excessive or unjustified.
  3. Judicial Process:
    • If charges are laid, the case will proceed through the judicial system, where the court will evaluate the evidence and arguments from both the prosecution and defense.
    • The court will decide based on the principles of necessity, proportionality, and reasonableness whether the homeowner’s use of force was justified​ (LII / Legal Information Institute)​​ (Findlaw)​.

The Use of Deadly Force in Canadian Law

In Canada, the use of deadly force is governed by strict legal principles that emphasize necessity, proportionality, and reasonableness. These principles are embedded within the Criminal Code of Canada, which provides the legal framework for self-defense, including the use of deadly force.

Legal Framework

The primary sections of the Criminal Code that address self-defense and the use of force are Sections 34 and 35:

  • Section 34: This section covers self-defense against an unprovoked assault and allows individuals to use reasonable force, including deadly force, if they believe on reasonable grounds that it is necessary to defend themselves or others from death or grievous bodily harm.
  • Section 35: This section deals with the defense of property, allowing individuals to use force to prevent someone from entering or damaging their property, but with more stringent limitations on the use of deadly force​ (LII / Legal Information Institute)​ .

Key Principles Governing the Use of Deadly Force

  1. Necessity:
    • Deadly force can only be used when it is necessary to protect oneself or others from an imminent threat of death or serious injury. This means there must be no reasonable alternative to avoid the threat, such as retreating or seeking help​ (LII / Legal Information Institute)​.
    • The necessity of using deadly force is assessed based on the immediacy and severity of the threat. Courts will examine whether a reasonable person in the same situation would perceive deadly force as the only viable option.
  2. Proportionality:
    • The response to the threat must be proportional. Using deadly force in response to a non-deadly threat, such as an unarmed intruder, is generally considered excessive and unjustified .
    • Proportionality requires that the level of force used matches the severity of the threat. For instance, deadly force is justified if the intruder is armed and poses a clear danger of death or grievous bodily harm.
  3. Reasonableness:
    • The defender’s belief in the necessity of using deadly force must be reasonable. This means that a typical person in the same circumstances would likely have the same perception of threat and response .
    • Courts use both subjective (the defender’s actual belief) and objective (what a reasonable person would believe) standards to evaluate the reasonableness of the use of deadly force

Practical Considerations

For homeowners, particularly those in rural areas, understanding the legal limits of using deadly force is critical:

  • Assessment of Threat: Homeowners must quickly and accurately assess whether an intruder poses a deadly threat. Factors such as the intruder’s actions, possession of weapons, and verbal threats should be considered.
  • Legal Risks: Even if deadly force is deemed necessary, homeowners may face legal scrutiny. They should be prepared to justify their actions based on the principles of necessity, proportionality, and reasonableness .
  • Alternatives: Whenever possible, homeowners should consider non-lethal means of protecting themselves and their property. This can include retreating, calling for help, or using non-deadly force.

The use of deadly force in self-defense is a complex and heavily regulated area of Canadian law. Homeowners must ensure that their actions align with the principles of necessity, proportionality, and reasonableness to avoid legal repercussions. By understanding these legal standards and considering the ethical implications, individuals can make informed decisions when defending their homesteads.

How a Case of Use of Deadly Force is Handled in Canada: Detailed Process

When a homeowner uses deadly force in self-defense, the incident sets off a comprehensive legal process in Canada, beginning with an investigation by law enforcement and potentially leading to charges and a judicial review. Here’s an overview of how such cases are typically handled:

Initial Police Investigation

  1. Incident Reporting and Arrival:
    • Emergency Call: The process often begins with a 911 call from the homeowner or a witness. Dispatchers gather initial information and dispatch police officers to the scene.
    • Arrival at the Scene: Officers secure the area to ensure safety and preserve evidence, assess the situation, provide medical assistance if necessary, and may detain individuals involved for questioning.
  2. Evidence Collection:
    • Physical Evidence: Officers collect physical evidence, such as weapons, shell casings, blood samples, and any relevant objects.
    • Scene Documentation: The scene is thoroughly documented through photographs, videos, and detailed notes, including the positioning of bodies, weapons, and signs of struggle or forced entry.
    • Witness Statements: Police take statements from the homeowner, witnesses, and possibly the intruder if they survive. These statements help reconstruct the events leading to and during the incident​ (LII / Legal Information Institute)​​ (Findlaw)​.
  3. Preliminary Assessment:
    • Initial Assessment: Officers make an initial assessment to determine if the use of force appears justified. They consider factors like the perceived threat, the proportionality of the response, and the homeowner’s reasonable belief in imminent danger.

Post-Investigation Procedures

  1. Mandatory Filing of Charges:
    • Policy Requirement: According to RCMP procedures, in incidents involving deadly force, officers are typically required to file charges. This ensures that the case is formally reviewed by the judicial system​ (LII / Legal Information Institute)​​ (Findlaw)​.  This means that no matter the situation, the police are going to file some form of charge against the person that used deadly force and it is up to the crown prosecutor to determine if the charges are to be followed up on.
    • Custody Decisions: Depending on initial findings, the homeowner may be detained for further questioning. However, they might also be released pending further investigation.
  2. Prosecutorial Review in Canadian Law: A Detailed Examination

    When a homeowner uses deadly force in self-defense, the incident undergoes rigorous scrutiny through a prosecutorial review. This process is crucial in determining whether criminal charges should be pursued and ensures that the use of force was justified under the law. Here’s a detailed look at how this process works in Canada.

    Initial Police Investigation and Reporting

    Before the prosecutorial review, the police conduct a thorough investigation, gathering evidence, interviewing witnesses, and documenting the scene. This investigation results in a comprehensive report, which is then submitted to the Crown prosecutor for review.

    The Role of the Crown Prosecutor

    The Crown prosecutor, also known simply as “the Crown,” plays a pivotal role in the Canadian criminal justice system. Their primary responsibility is to represent the state and ensure that justice is served. When reviewing a case involving the use of deadly force in self-defense, the Crown considers several critical factors:

    1. Evidentiary Sufficiency:
      • Reasonable Prospect of Conviction: The Crown must determine whether there is a reasonable prospect of conviction based on the available evidence. This means assessing whether the evidence is likely to convince a judge or jury, beyond a reasonable doubt, that the use of deadly force was not justified​ (LII / Legal Information Institute)​.
      • Evidence Review: This involves a detailed review of all collected evidence, including witness statements, physical evidence, forensic reports, and any relevant video or audio recordings. The Crown evaluates the credibility and reliability of this evidence.
    2. Public Interest:
      • Public Safety: The Crown assesses whether pursuing charges serves the public interest, including considerations of public safety and the need to uphold the law. This includes evaluating the potential impact on community safety and the message that prosecution might send to the public​ (LII / Legal Information Institute)​.
      • Victim and Community Impact: The Crown considers the effects on the victim (if applicable), the accused, and the broader community. This includes the psychological and social implications of the incident.
    3. Legal Standards and Self-Defense Claims:
      • Necessity and Reasonableness: The Crown analyzes whether the homeowner’s use of deadly force was necessary and reasonable under the circumstances. This involves applying both subjective and objective standards—what the homeowner believed at the time and what a reasonable person would have believed​ (Findlaw)​​ (LII / Legal Information Institute)​.
      • Proportionality: The Crown examines whether the force used was proportionate to the threat faced. Excessive force, even in self-defense, can lead to charges if deemed unreasonable.

    Decision to Prosecute

    Based on the above considerations, the Crown makes a decision on whether to proceed with charges. This decision can take several forms:

    1. No Charges:
      • If the Crown concludes that the use of deadly force was justified, they may decide not to pursue any charges. This decision is often based on clear evidence that the homeowner acted in self-defense and that their actions were necessary and reasonable under the circumstances​ (Findlaw)​​ (LII / Legal Information Institute)​.
    2. Lesser Charges:
      • In some cases, the Crown may opt to pursue lesser charges if the evidence suggests that while the use of force was not entirely justified, it was not entirely unreasonable either. This might include charges such as manslaughter instead of murder​ (LII / Legal Information Institute)​.
    3. Full Prosecution:
      • If the Crown believes there is sufficient evidence to support a conviction and that it is in the public interest, they will file charges and proceed with a full prosecution. This could involve charges such as second-degree murder or manslaughter, depending on the specifics of the case​ (LII / Legal Information Institute)​.


  3. Formal Charges:
    • Possible Charges: Charges can range from no charges (if the use of force is deemed justified) to serious charges like manslaughter or second-degree murder if the force used was excessive or unjustified.
    • Legal Representation: If charged, the homeowner will need legal representation. A defense attorney will represent their interests throughout the legal process.

Judicial Process

  1. Preliminary Hearings:
    • Bail Hearings: If the homeowner is detained, a bail hearing determines whether they can be released pending trial.
    • Pre-Trial Motions: Various pre-trial motions may be filed, including motions to dismiss charges or exclude certain evidence.
  2. Trial:
    • Burden of Proof: The prosecution must prove beyond a reasonable doubt that the use of deadly force was not justified.
    • Defense Arguments: The defense will argue that the use of deadly force was necessary and reasonable, presenting evidence and witnesses to support the homeowner’s perception of danger and the proportionality of their response.
    • Jury or Judge Decision: The case may be heard by a judge or jury, who will decide on the guilt or innocence of the homeowner based on the evidence.
  3. Verdict and Sentencing:
    • Not Guilty: If the homeowner is found not guilty, they are acquitted, and no further legal action is taken.
    • Guilty: If found guilty, the homeowner will face sentencing, with penalties determined based on the severity of the charges and any mitigating or aggravating factors​ (LII / Legal Information Institute)​​ (Findlaw)​.

Legal and Ethical Considerations

  • Self-Defense Claims: Successful self-defense claims hinge on demonstrating that the homeowner’s actions were necessary and proportional to the threat faced.
  • Legal Standards: Courts apply both subjective (the homeowner’s actual belief) and objective (what a reasonable person would believe) standards to assess the reasonableness of the use of deadly force.
  • Ethical Implications: Ethical considerations involve the moral responsibility of taking a life, even in defense, and the impact on all parties involved.

Case Law and Judicial Interpretation

Judicial interpretation of self-defense laws in Canada has evolved through various landmark cases. These cases help to clarify the application of the law and provide precedents for future decisions.

Notable Cases in Canadian Self-Defense Law

Understanding Canadian self-defense law is enriched by examining notable judicial decisions that have shaped its interpretation. These cases provide insights into how courts apply legal principles to real-world scenarios, establishing precedents that guide future cases.

R v. Lavallee (1990)

Background: R v. Lavallee is a landmark case in Canadian self-defense law, particularly in the context of domestic violence. The case involved Angelique Lavallee, who was in an abusive relationship and killed her partner during an altercation. She argued that she acted in self-defense, fearing for her life.

Significance:

  • Battered Woman Syndrome: The Supreme Court of Canada recognized “Battered Woman Syndrome” as a legitimate factor in assessing the reasonableness of a defendant’s belief in imminent danger. This case set a precedent for considering the psychological state of victims of prolonged abuse in self-defense claims​ (LII / Legal Information Institute)​.
  • Subjective and Objective Standards: The Court held that both subjective (the defendant’s perspective) and objective (what a reasonable person would believe) standards should be used to evaluate the necessity and reasonableness of the use of force.

Impact: This case significantly influenced how courts handle self-defense claims involving domestic violence, acknowledging that victims of chronic abuse may perceive threats differently from those not subjected to such trauma​ (LII / Legal Information Institute)​.

R v. McIntosh (1995)

Background: R v. McIntosh involved an incident where McIntosh shot and killed an unarmed intruder in his home. He claimed self-defense, arguing that he believed the intruder posed an imminent threat to his safety.

Significance:

  • Clarification of Reasonableness and Imminence: The Supreme Court of Canada examined the concepts of reasonableness and imminence in self-defense claims. The Court emphasized that the perceived threat must be immediate and the response proportional to that threat.
  • Legal Interpretation of “No Retreat”: The case discussed the application of the “no retreat” principle within the home, reinforcing that homeowners are not required to retreat before using force in self-defense, but the force must still be reasonable​ (LII / Legal Information Institute)​.

Impact: R v. McIntosh clarified the application of self-defense principles within the context of home defense, reinforcing the importance of proportionality and the immediacy of the threat​ (LII / Legal Information Institute)​.

R v. Cadwallader (2003)

Background: In R v. Cadwallader, the defendant, Cadwallader, used force against an intruder who had broken into his home. The intruder was unarmed, and Cadwallader’s response was deemed excessive by the prosecution.

Significance:

  • Proportionality of Force: The case highlighted the necessity of proportionality in the use of force. Cadwallader’s use of excessive force against an unarmed intruder was scrutinized, emphasizing that the response must be appropriate to the level of threat​ (LII / Legal Information Institute)​.
  • Impact on Jury Instructions: The case influenced how judges instruct juries on self-defense claims, particularly regarding the evaluation of reasonable and proportional responses to threats.

Impact: R v. Cadwallader reinforced the need for a balanced approach in self-defense cases, ensuring that the force used in defense is proportional to the threat faced​ (LII / Legal Information Institute)​.

R v. Szczerbaniwicz (2010)

Background: R v. Szczerbaniwicz involved a defendant who used force against his ex-wife’s new partner during a confrontation at his home. The case centered on whether the force used was necessary and reasonable under the circumstances.

Significance:

  • Necessity and Reasonableness: The Supreme Court of Canada reiterated that the force used in self-defense must be both necessary and reasonable. The Court analyzed the circumstances of the confrontation, considering factors such as the behavior of the parties involved and the immediate threat perceived by the defendant​ (LII / Legal Information Institute)​.
  • Legal Standards for Imminence: The case further clarified the standards for assessing imminence and the necessity of the response, providing a nuanced understanding of how courts evaluate self-defense claims.

Impact: R v. Szczerbaniwicz contributed to the jurisprudence on self-defense by emphasizing the importance of necessity and reasonableness in evaluating the use of force in defense situations​ (LII / Legal Information Institute)​.

Legal Consequences and Protections

While Canadian law allows for the use of force in self-defense, there are potential legal consequences for excessive or unreasonable use of force:

Potential Legal Consequences:

  • Criminal Charges: Homeowners who use excessive force may face criminal charges, including assault or manslaughter.
  • Civil Liability: In addition to criminal consequences, homeowners may also face civil lawsuits from the intruder or their family for damages resulting from the use of force​ (LII / Legal Information Institute)​.

Moral and Ethical Considerations

Beyond the legal framework, moral and ethical considerations play a crucial role in decisions about using force in self-defense. Homeowners must weigh the potential consequences of their actions, including the loss of life and the psychological impact of using force.

Ethical Questions:

  • Proportionality: Is the use of deadly force always justified in defending one’s home? Evaluating the proportionality of the threat and response is essential.
  • Intent and Motivation: Understanding the intruder’s intent can be challenging. Homeowners must balance the need for self-defense with the possibility of non-violent resolutions​ (LII / Legal Information Institute)​.

Canadian law provides a structured and balanced framework for self-defense, emphasizing the principles of reasonableness, imminence, and necessity. Homeowners have the right to defend their homes, but must do so within the legal boundaries to avoid criminal and civil liabilities. By understanding these legal principles and considering the moral and ethical implications, individuals can make informed decisions about protecting their homesteads. For those living in rural areas, staying informed about these laws is crucial for ensuring both legal compliance and moral responsibility when defending their home.

Fatal Shooting Incident: Wiebo Ludwig Case

The fatal shooting incident involving Wiebo Ludwig serves as a notable case study in the application of Canadian law concerning the use of deadly force in defense of property. This incident highlights the complexities and legal nuances of self-defense and property defense under Canadian law.

Background

Wiebo Ludwig, a Christian fundamentalist and environmental activist, resided on a farm in Trickle Creek, Alberta. His activism against the oil and gas industry, which he believed was causing health and environmental issues, often brought him into conflict with authorities and industry representatives. The tensions culminated in a series of confrontations, including a fatal shooting incident in 1999.

The Incident

In June 1999, Karman Willis, a 16-year-old girl, was fatally shot while joyriding with friends on Ludwig’s property. The teenagers were in a truck driving near Ludwig’s farm when the shooting occurred. Ludwig claimed that he fired warning shots to scare off trespassers who had been harassing his family and damaging his property. He maintained that the fatal shot was accidental.

Legal Considerations

The legal examination of this case revolved around several key principles:

  1. Necessity:
    • Ludwig argued that the use of his firearm was necessary to protect his property from repeated harassment and vandalism by trespassers. However, the court had to determine whether this level of force was indeed necessary to address the threat posed by the teenagers.
  2. Proportionality:
    • The court scrutinized whether Ludwig’s response was proportional to the threat. While firing warning shots may be seen as a deterrent, the use of deadly force resulting in a fatality required justification that the threat was significant enough to warrant such a response.
  3. Reasonableness:
    • Ludwig’s belief that the use of force was necessary was evaluated for reasonableness. The court considered whether a reasonable person in Ludwig’s situation would have perceived the same level of threat and responded similarly. Factors included the past incidents of harassment and the immediate circumstances of the joyriding incident.

Judicial Outcomes

  1. Investigation:
    • The RCMP conducted a thorough investigation, examining the scene, collecting evidence, and interviewing witnesses. The complexity of the case and the involvement of a fatality required detailed scrutiny to establish the facts and Ludwig’s intent.
  2. Charges and Prosecution:
    • Ludwig faced significant legal challenges as the incident led to public outcry and media attention. The Crown had to decide whether to lay charges based on the investigation’s findings and whether there was a reasonable prospect of conviction.
    • Although Ludwig was suspected of orchestrating other acts of sabotage against oil and gas infrastructure, the shooting incident was particularly scrutinized under self-defense and property defense laws.
  3. Court Decision:
    • Ultimately, Ludwig was not convicted of murder for the fatal shooting. However, his actions continued to be a subject of legal and ethical debate, illustrating the stringent requirements and careful consideration courts must apply in cases involving the use of deadly force.

Political and Public Relations Considerations

The incident had significant political and public relations implications:

  1. Public Perception:
    • The case polarized public opinion. Some saw Ludwig as a defender of his family and property, while others viewed his actions as excessive and dangerous. Media coverage played a crucial role in shaping public perception and the discourse around the use of deadly force in property defense.
  2. Impact on Policy and Law Enforcement:
    • The case prompted discussions about the adequacy of laws governing self-defense and the use of force in protecting property. It highlighted the need for clear guidelines and better understanding among the public and law enforcement agencies regarding the acceptable limits of using firearms in self-defense.
  3. Community Relations:
    • The incident affected the relationship between local communities, law enforcement, and the oil and gas industry. It underscored the tensions that can arise when environmental and property rights conflicts intersect with public safety concerns.

Conclusion

The fatal shooting incident involving Wiebo Ludwig underscores the complexities and stringent legal standards surrounding the use of deadly force in property defense under Canadian law. The principles of necessity, proportionality, and reasonableness are central to determining the legality of such actions. Ludwig’s case illustrates the challenges in balancing property defense with legal and ethical considerations, emphasizing the importance of understanding and adhering to the legal framework to avoid excessive and unjustifiable use of force.

Political and Public Relations Considerations: Differential Treatment of Aboriginal Law Breakers in the Canadian Judicial System

The Canadian judicial system’s approach to Aboriginal offenders has been shaped by a combination of historical, political, and legal factors that recognize the unique circumstances and systemic disadvantages faced by Indigenous peoples in Canada. This differential treatment is part of a broader effort to address the over-representation of Indigenous individuals in the criminal justice system and to promote restorative justice practices.

Historical Context and Legal Framework

The over-representation of Indigenous peoples in the Canadian criminal justice system has been a long-standing issue. Indigenous individuals are more likely to be arrested, charged, and incarcerated compared to non-Indigenous Canadians. This disparity stems from historical injustices, including colonization, residential schools, and systemic discrimination, which have contributed to socio-economic disadvantages and higher rates of involvement in the criminal justice system.

To address these issues, the Canadian government and judicial system have implemented specific policies and legal provisions:

  1. Section 718.2(e) of the Criminal Code:
    • This section, introduced in 1996, requires judges to consider all available sanctions other than imprisonment, with particular attention to the circumstances of Aboriginal offenders. This provision aims to reduce the over-representation of Indigenous peoples in prisons by encouraging alternatives to incarceration.
  2. Gladue Principles:
    • The landmark Supreme Court case R v. Gladue (1999) clarified the application of Section 718.2(e). The Gladue decision emphasized that judges must consider the unique systemic or background factors that may have contributed to the criminal behavior of Indigenous offenders. These factors include poverty, substance abuse, lack of education, and the impact of residential schools.
    • Gladue principles also encourage the use of restorative justice approaches, such as community-based sentences, healing circles, and other culturally appropriate interventions that focus on rehabilitation and reconciliation rather than punishment​ (Findlaw)​​ (LII / Legal Information Institute)​.

Implementation and Challenges

While the intent of Section 718.2(e) and Gladue principles is to ensure fair and equitable treatment of Indigenous offenders, their implementation has faced several challenges:

  1. Inconsistent Application:
    • There is significant variability in how Gladue principles are applied across different jurisdictions. Some judges and courts have embraced these principles, while others have been slower to incorporate them into sentencing practices​ (LII / Legal Information Institute)​.
  2. Resource Limitations:
    • The availability of Gladue reports, which provide detailed information about an Indigenous offender’s background and the circumstances surrounding their offense, varies widely. In some areas, there are limited resources to produce these reports, affecting their use in sentencing decisions.
  3. Systemic Barriers:
    • Indigenous communities continue to face systemic barriers, including underfunding of support services and lack of access to culturally appropriate rehabilitation programs. These barriers hinder the effectiveness of alternative sentencing options promoted by Gladue principles.

Political and Public Relations Considerations

The differential treatment of Aboriginal law breakers in the Canadian judicial system has significant political and public relations implications:

  1. Public Perception:
    • There is often a lack of understanding among the general public about the reasons for differential treatment and the principles behind restorative justice. This can lead to misconceptions and resistance to policies perceived as giving preferential treatment to Indigenous offenders.
  2. Political Debate:
    • The implementation of Gladue principles and Section 718.2(e) has been a subject of political debate. Some politicians and stakeholders advocate for stronger adherence to these principles to address systemic inequities, while others argue for a more uniform application of justice regardless of background​ (Findlaw)​​ (LII / Legal Information Institute)​.
  3. Reconciliation Efforts:
    • The differential treatment of Indigenous offenders is part of broader reconciliation efforts between the Canadian government and Indigenous communities. These efforts aim to acknowledge past injustices, promote healing, and create a more just and equitable society.

Case Study: Gerald Stanley and the Use of Deadly Force in Property Defense Under Canadian Law

The case of Gerald Stanley is a significant example that highlights the complexities and legal challenges associated with using deadly force in defense of property under Canadian law. This case provides insights into the principles of necessity, proportionality, and reasonableness, and underscores the judicial and societal scrutiny involved in such incidents.  For homesteaders who live on the Canadian prairies, you have a car of  intoxicated persons with a 22 rifle in the car who were admittingly trying to steal cars and quads and a property owner ( Stanley ) fought back to protect his land and possessions but was charged with wrongful death.

Background

Gerald Stanley, a Saskatchewan farmer, became involved in a highly publicized legal case following the fatal shooting of Colten Boushie, a 22-year-old Indigenous man, in August 2016. Boushie and his friends drove onto Stanley’s farm, reportedly seeking help for a flat tire. The confrontation that ensued led to Boushie’s death from a gunshot wound, which Stanley claimed was accidental.

The Incident

On August 9, 2016, Colten Boushie and four friends drove onto Gerald Stanley’s property in rural Saskatchewan. According to Stanley, he and his son approached the group, believing they were trying to steal vehicles. A confrontation occurred, and Stanley retrieved a handgun. He claimed he fired warning shots and then a final shot that he believed was a misfire. However, this shot struck and killed Boushie.

In Canada, a blood alcohol concentration (BAC) of 0.08% or higher is considered legally impaired for drivers. Colten Boushie’s BAC was 0.3%, significantly above this threshold, indicating he was legally intoxicated at the time of the incident. This level of intoxication was discussed during Gerald Stanley’s trial and contributed to the context of the events leading up to the fatal shooting.

During the trial, it was revealed that Colten Boushie and his friends had a .22-caliber rifle in their vehicle. This detail emerged during the court proceedings, and one of Boushie’s friends, Cassidy Cross, admitted under cross-examination that they had the rifle and were attempting to steal vehicles, including a quad, from nearby farms on the day of the incident. The rifle, however, was not loaded and was not used during the confrontation on Stanley’s property.

Stanley and his son testified that they believed the group was attempting to steal a quad from their property, which led to the altercation. Stanley claimed the fatal shot was accidental, occurring during a struggle over the firearm.

This context is crucial in understanding the perceived threats and actions taken by those involved, as it highlights the complex dynamics at play during the incident.

Legal Considerations

The legal examination of the Stanley case involved several critical principles under Canadian law:

  1. Necessity:
    • Claim: Stanley argued that his use of the firearm was necessary to protect his property and family from what he perceived as a threat from Boushie and his friends.
    • Scrutiny: The court had to determine whether the use of deadly force was indeed necessary to address the situation. The necessity of the force used is evaluated based on whether there were no other reasonable alternatives to avoid the perceived threat.
  2. Proportionality:
    • Claim: Stanley’s defense hinged on the argument that the force used was proportional to the threat he perceived. He claimed the shooting was accidental during a chaotic and threatening situation.
    • Scrutiny: The proportionality of the response was a key issue. The court examined whether the use of a firearm was a reasonable and proportional response to the presence of Boushie and his friends on Stanley’s property.
  3. Reasonableness:
    • Claim: Stanley maintained that he believed his actions were necessary to defend his property and family. His belief in the necessity of using force was a central point of the defense.
    • Scrutiny: The court applied both subjective and objective standards to evaluate the reasonableness of Stanley’s actions. This involved considering what a reasonable person in Stanley’s situation would have perceived and how they would have responded.

Judicial Outcomes

  1. Investigation:
    • The RCMP conducted a thorough investigation, collecting evidence, interviewing witnesses, and reconstructing the events leading to the shooting. The investigation aimed to establish the facts and Stanley’s intent during the incident.
  2. Charges and Prosecution:
    • Stanley was charged with second-degree murder and manslaughter. The prosecution argued that Stanley’s actions were not justified and that the use of deadly force was excessive and unreasonable.
  3. Trial and Verdict:
    • In February 2018, a jury found Gerald Stanley not guilty of all charges. The jury accepted Stanley’s defense that the shooting was accidental and not a deliberate act of violence. The verdict led to significant public outcry and debates about the justice system’s treatment of Indigenous peoples and property defense laws in Canada​ (Findlaw)​​ (LII / Legal Information Institute)​.


The Legality of Defending Your Homestead

Defending your homestead is a fundamental concern for many homesteaders and rural dwellers. Understanding the legal boundaries and moral implications is important for anyone considering how to protect their home from intruders. This article delves into the legal principles governing self-defense in the home, the variations by state in the USA, the specifics of the Castle Doctrine, the legal consequences, and a comparison with Canadian self-defense laws.

General Legal Principles of Self-Defense in the Home

Understanding the general legal principles of self-defense in the home is essential for any homeowner, especially for those living in rural or isolated areas where law enforcement may not be immediately accessible. Here, we delve into the core elements that define legal self-defense in the United States, focusing on the concepts of imminence, proportionality, and reasonableness.

Imminence

The principle of imminence requires that the threat of harm must be immediate and unavoidable for self-defense to be legally justified. The “window of imminence” opens when the threat is actively occurring or about to occur, and closes once the threat has ended​ (Law of Self Defense)​​ (Findlaw)​.

Key Considerations:

  • Timing of the Threat: The defender must perceive the threat as happening right now or about to happen. For example, if an intruder breaks into your home with a weapon and makes a clear and immediate threat, the use of defensive force is justified. However, using force in retaliation after the threat has ended, such as confronting the intruder the next day, is not considered self-defense​ (Findlaw)​.
  • Perception of Danger: Courts will assess whether a reasonable person in the same situation would have perceived an imminent threat. This includes evaluating the behavior and actions of the intruder and any verbal threats made​ (LII / Legal Information Institute)​.

Proportionality

Proportionality refers to the requirement that the force used in self-defense must be proportional to the threat faced. This means that the response must not exceed what is necessary to prevent the harm.

Key Considerations:

  • Non-Deadly vs. Deadly Force: If the threat involves non-deadly force, such as a fistfight, the defender is only justified in using non-deadly force in return. Conversely, if the threat involves deadly force, such as an armed intruder, the defender may use deadly force to protect themselves​ (Law of Self Defense)​.
  • Escalation of Force: If an intruder initially presents a non-deadly threat but then escalates to a deadly threat, the defender’s response must also escalate appropriately. For instance, if an intruder starts with a verbal threat but then draws a weapon, the defender’s use of deadly force may become justified​ (Law of Self Defense)​​ (Findlaw)​.

Reasonableness

The reasonableness of the defender’s perception and actions is a crucial element in self-defense law. This principle is often considered an “umbrella” that covers all other aspects of self-defense.

Key Considerations:

  • Objective Standard: Courts use the “reasonable person” standard to evaluate whether the defender’s belief in the need for force was reasonable under the circumstances. This means considering what a typical person would do in the same situation​ (LII / Legal Information Institute)​.
  • Defender’s Characteristics: The court may also take into account the defender’s physical and psychological characteristics. For example, an elderly or disabled person might be deemed reasonable in using a higher degree of force than a young, physically fit person in the same scenario​ (Law of Self Defense)​​ (LII / Legal Information Institute)​.
  • Mistaken Beliefs: The law allows for honest but mistaken beliefs. If the defender genuinely, albeit incorrectly, believed that the threat was imminent and used force, this mistake could still fall under lawful self-defense, provided it was a reasonable mistake under the circumstances​ (Law of Self Defense)​​ (LII / Legal Information Institute)​.

Duty to Retreat vs. Stand-Your-Ground

The duty to retreat requires individuals to avoid using force if safely possible. In contrast, stand-your-ground laws allow individuals to use force without retreating if they are in a place they have a legal right to be, such as their home.

Key Considerations:

  • Castle Doctrine: This legal doctrine states that there is no duty to retreat when a person is in their home. The Castle Doctrine supports the idea that one’s home is their sanctuary, and they have the right to defend it against intruders without the obligation to flee first​ (Law of Self Defense)​​ (LII / Legal Information Institute)​.
  • State Variations: The duty to retreat is mandated in a minority of states, while the majority have adopted stand-your-ground laws. These laws vary in specifics, but generally provide broader protection for using force in self-defense within one’s home​ (Findlaw)​​ (Law of Self Defense)​.

Variations by State in the USA

Self-defense laws vary significantly across different states. The major distinction lies between “stand-your-ground” laws and “duty to retreat” principles:

  • Stand-Your-Ground Laws: These laws allow individuals to use force without the obligation to retreat, provided they are in a place where they have a legal right to be. States with these laws include Florida, Texas, and over 20 others​ (Findlaw)​​ (Law of Self Defense)​.
  • Duty to Retreat: In states adhering to this principle, individuals must attempt to retreat from the threat if it is safe to do so before using force. Exceptions typically include situations within one’s own home, aligning with the Castle Doctrine​ (Findlaw)​.

The Castle Doctrine: Legal Protection of the Home

The Castle Doctrine is a significant legal principle in the realm of self-defense law, particularly relevant for homeowners and rural dwellers. This doctrine grants individuals the right to use reasonable force, including deadly force, to protect themselves against intruders within their home. Understanding the nuances of the Castle Doctrine, its application, and its limitations is crucial for anyone considering the legal implications of defending their homestead.

Historical Context and Evolution

The Castle Doctrine is rooted in the common law principle that “a man’s home is his castle.” This idea dates back to English common law, emphasizing the sanctity and security of one’s home. The doctrine has evolved over time to adapt to modern legal frameworks, especially in the United States, where it has been codified in various state laws.

Key Historical Points:

  • English Common Law: Initially, the doctrine allowed individuals to defend their homes without retreating, reflecting the view that one’s home should be a safe haven.
  • Modern Adaptations: In the U.S., the Castle Doctrine has been incorporated into state statutes and case law, providing a clear legal basis for using force in home defense​ (Findlaw)​​ (LII / Legal Information Institute)​.

Core Principles of the Castle Doctrine

The Castle Doctrine establishes several key principles that govern its application:

  1. No Duty to Retreat: Under the Castle Doctrine, there is no legal obligation to retreat from an intruder before using force. This principle contrasts with the duty to retreat, which requires individuals to avoid confrontation if safely possible.
  2. Use of Force: The doctrine permits the use of both non-deadly and deadly force. The level of force must be reasonable and proportional to the threat faced. For instance, if an intruder poses a deadly threat, the homeowner is justified in using deadly force to neutralize the threat​ (Wikipedia)​​ (Findlaw)​.
  3. Legal Presumption: Many states provide a legal presumption that an intruder who forcibly enters a home intends to cause harm. This presumption supports the homeowner’s right to use force without having to prove the intruder’s intent​ (Law of Self Defense)​​ (LII / Legal Information Institute)​.

State-by-State Variations

The application of the Castle Doctrine varies across the United States, with each state having its own statutes and case law interpreting the doctrine.

Examples of State Variations:

  • Florida: Florida’s Castle Doctrine is part of its broader stand-your-ground law, allowing individuals to use force in self-defense without the duty to retreat, both inside and outside their homes​ (Findlaw)​.
  • Texas: Texas law explicitly states that individuals have no duty to retreat when using force to protect their home, vehicle, or place of work. The law also presumes that the use of force is justified if the intruder is unlawfully entering or attempting to enter these premises​ (Findlaw)​.
  • California: California’s Castle Doctrine provides strong protections for homeowners, including a presumption that an intruder who forcibly enters a home intends to commit a violent act. However, the doctrine does not extend as broadly as stand-your-ground laws, maintaining some duty to retreat principles outside the home​ (LII / Legal Information Institute)​.

Legal Limitations and Exceptions

While the Castle Doctrine provides robust protections for homeowners, it is not without limitations and exceptions:

  1. Initial Aggressor: The doctrine does not protect individuals who are the initial aggressors in a confrontation. If a homeowner provokes an intruder, their claim to self-defense under the Castle Doctrine may be invalidated​ (Wikipedia)​​ (Law of Self Defense)​.
  2. Unlawful Activity: Homeowners engaged in unlawful activities at the time of the intrusion may not be protected by the Castle Doctrine. For example, if a homeowner is conducting illegal activities, their right to use force in defense may be compromised​ (LII / Legal Information Institute)​.
  3. Reasonable Belief: The use of force must still be based on a reasonable belief that it is necessary to prevent imminent harm. Excessive or unreasonable use of force can lead to criminal charges, even under the Castle Doctrine​ (Law of Self Defense)​​ (LII / Legal Information Institute)​.

Moral and Ethical Considerations

Beyond the legal framework, the Castle Doctrine also raises important moral and ethical questions. Defending one’s home is often viewed as a fundamental right, but the implications of using deadly force can be significant. Homeowners must consider the potential for loss of life and the psychological impact of such actions.

Ethical Questions:

  • Proportionality: Is the use of deadly force always the appropriate response to a home invasion? Evaluating the proportionality of the threat and response is crucial.
  • Intent and Motivation: Understanding the intruder’s intent can be challenging. Homeowners must balance the need for self-defense with the possibility of non-violent resolutions.

Self-Defense Laws in Canada

Canadian self-defense laws are more restrictive compared to those in the USA. The Criminal Code of Canada allows for the use of force in self-defense, but it must be reasonable under the circumstances. Key points include:

  • Imminence and Reasonableness: The threat must be immediate, and the response must be reasonable​ (LII / Legal Information Institute)​.
  • Proportionality: The use of force must be proportional to the threat faced. Deadly force is justified only if there is a reasonable belief that it is necessary to prevent death or grievous bodily harm​ (LII / Legal Information Institute)​.
  • Duty to Retreat: While Canada does not have explicit stand-your-ground laws, courts often consider whether the defender had the opportunity to retreat safely before using force​ (LII / Legal Information Institute)​.

Authorities’ View on Home Defense Cases

In both the USA and Canada, authorities assess home defense cases based on the principles of imminence, proportionality, and reasonableness. In the USA, states with stand-your-ground laws provide more leeway for using force without the duty to retreat. In contrast, Canadian laws emphasize using force only when absolutely necessary and as a last resort​ (Findlaw)​​ (LII / Legal Information Institute)​.

Imminence and Canadian Law: Understanding the Principle and Its Application

Imminence is a critical concept in self-defense law, particularly when considering the use of force, including deadly force. In the context of Canadian law, imminence refers to the requirement that a threat must be immediate and unavoidable for the use of force to be justified. This principle ensures that individuals act out of genuine necessity to protect themselves or others, rather than preemptively or excessively.

Imminence in Canadian Law

Imminence in Canadian self-defense law emphasizes the necessity of an immediate and unavoidable threat. This means that the danger must be present and occurring, leaving no reasonable opportunity for the defender to avoid the confrontation or seek help from authorities.

Key Aspects of Imminence:

  1. Timing of the Threat:
    • The threat must be happening at the moment or about to happen. It cannot be a speculative or future threat.
    • For example, if an intruder is breaking into your home with a weapon and poses an immediate danger, the use of force, including deadly force, may be justified​ (Findlaw)​.
  2. No Reasonable Alternatives:
    • The principle of imminence requires that there are no reasonable alternatives to using force. This means the defender must have no safe option to retreat or de-escalate the situation.
    • Courts will assess whether the defender could have safely retreated or avoided the use of force without risking harm​ (LII / Legal Information Institute)​.
  3. Reasonable Perception:
    • The defender’s perception of the threat must be reasonable. This involves both subjective (the defender’s belief) and objective (what a reasonable person in the same situation would believe) standards​ (LII / Legal Information Institute)​.

Application in Case Law

R v. Lavallee (1990):

  • This landmark case involved a woman who killed her abusive partner. The Supreme Court of Canada recognized that victims of prolonged abuse might perceive threats differently, acknowledging that the imminence of a threat could be understood within the context of ongoing violence. This case established that imminent danger does not necessarily mean an immediate attack but can include situations where a history of abuse creates a reasonable belief of unavoidable harm​ (LII / Legal Information Institute)​.

R v. Khill (2018):

  • Gerald Stanley’s case also touches on the concept of imminence. Although the focus was on the accidental nature of the shooting, the perceived threat from Boushie and his friends was evaluated under the framework of imminence. The court considered whether Stanley had reasonable grounds to believe that an immediate threat to his safety justified his actions​ (Findlaw)​.

Comparisons and Distinctions

In Canadian law, imminence is interpreted with an emphasis on the actual and immediate presence of a threat. This contrasts with some jurisdictions where the concept of preemptive self-defense might be more broadly interpreted. Canadian courts require a clear and present danger that necessitates the use of force, ensuring that actions are taken as a last resort.

Conclusion

Imminence is a cornerstone of self-defense law in Canada, ensuring that force is used only when absolutely necessary to prevent immediate harm. The principle safeguards against excessive or preemptive use of force, requiring that the threat be immediate and unavoidable. Understanding the nuances of imminence and its application in case law helps clarify the legal boundaries for self-defense and property defense under Canadian law. For more detailed legal advice and specific case assessments, consulting with a legal professional is recommended.


Soil Temperatures Impact on Seed Germination.

For gardeners, achieving a thriving garden is not just about planting seeds and hoping for the best; it requires a deep understanding of the intricate factors that influence plant growth. One of the most important, yet often underestimated, elements is soil temperature. This aspect of gardening plays a key role in determining the success and speed of seed germination, directly effecting the health and yield of your plants.

Soil temperature affects several physiological processes in seeds. It influences the enzymatic activities that break down the seed coat, triggers metabolic functions necessary for growth, and sets the pace for the seedling’s early development. Different seeds have specific temperature requirements that must be met to achieve optimal germination rates. Failing to provide the right temperature conditions can result in delayed germination, poor seedling development, or even complete germination failure while taking advantage of soil temperatures and planting times can significantly impact your harvest.

Often gardeners choose a weekend in May to plant everything all at once while not taking into consideration the temperature of the soil and the heat from the sun.  Some seeds and varieties prefer cool soil – while others hate it.  Garlic for example loves cold almost freezing soil – while corn seeds hate it.

Lets then look at how soil temperature plays a role in your seed growth and development.

Optimal Soil Temperature for Seed Germination

Category Seed Type Optimal Temperature (°F) Optimal Temperature (°C)
Vegetables Lettuce 70 21
Spinach 70 21
Kale 75 24
Carrot 75 24
Radish 85 29
Beet 85 29
Broccoli 85 29
Cauliflower 85 29
Tomato 80 27
Pepper 80 27
Eggplant 85 29
Cucumber 90 32
Squash 90 32
Zucchini 90 32
Pumpkin 90 32
Corn 85 29
Beans 80 27
Peas 75 24
Onion 85 29
Garlic 85 29
Herbs Basil 80 27
Parsley 85 29
Cilantro 65 18
Dill 65 18
Thyme 70 21
Rosemary 75 24
Sage 70 21
Mint 70 21
Oregano 70 21
Chives 70 21
Flowers Marigold 75 24
Sunflower 85 29
Zinnia 80 27
Petunia 75 24
Pansy 70 21
Cosmos 80 27
Nasturtium 65 18
Aster 75 24
Snapdragon 75 24
Impatiens 75 24
Geranium 75 24
Begonia 75 24
Dahlia 75 24
Morning Glory 80 27
Grains and Others Wheat 65 18
Rice 85 29
Barley 65 18
Quinoa 70 21
Sunflower (oilseed) 85 29

This table provides a clear and specific optimal temperature for each type of seed, helping gardeners achieve the best possible germination outcomes.

Influence of Soil Temperature on Germination Speed and Success

Soil temperature is a critical factor that can significantly influence both the speed and success of seed germination. The germination process involves a series of complex biochemical reactions that are highly sensitive to temperature. Understanding how soil temperature affects these processes can help experienced gardeners optimize their planting strategies for better results.

Effects of Cool and Warm Temperatures

Cool Temperatures:

  • Delayed Germination: When seeds are sown in soil temperatures below their optimal range, the metabolic processes within the seed slow down. This delay can lead to extended germination times, which may result in uneven seedling emergence.
  • Reduced Enzymatic Activity: Enzymes that facilitate the breakdown of the seed coat and mobilize stored nutrients work more slowly in cooler conditions. This can impede the seed’s ability to absorb water and essential nutrients, further delaying germination.
  • Risk of Fungal Diseases: Cool, damp soil conditions can promote fungal growth, such as damping-off disease, which can kill seedlings before they have a chance to establish. This risk is particularly high in poorly drained soils.

Here’s a smaller table that lists seeds that prefer cooler soil temperatures for germination, along with their specific optimal temperatures:

Category Seed Type Optimal Temperature (°F) Optimal Temperature (°C)
Vegetables Lettuce 60 16
Spinach 60 16
Kale 65 18
Peas 60 16
Radish 60 16
Broccoli 65 18
Carrot 65 18
Herbs Cilantro 55 13
Dill 60 16
Parsley 60 16
Flowers Pansy 65 18
Nasturtium 60 16
Grains and Others Wheat 65 18
Barley 65 18


Warm Temperatures:

  • Accelerated Germination: Within the optimal range, warmer soil temperatures generally speed up enzymatic activity and metabolic processes, leading to faster germination. Seeds in warm soil can absorb water more quickly and initiate growth sooner.
  • Potential for Overheating: However, excessively high soil temperatures can be detrimental. Enzymatic activities can become too rapid, causing cellular damage or prompting seeds to enter a state of secondary dormancy. In extreme cases, high temperatures can kill the seeds.
  • Stress on Seedlings: Rapid germination in overly warm soil may result in weak, leggy seedlings that are more vulnerable to environmental stresses, such as drought or pests.

Optimal Soil Temperature for Warm-Preferred Seeds

Here’s a table that lists seeds preferring warmer soil temperatures for germination, along with their specific optimal temperatures:

Category Seed Type Optimal Temperature (°F) Optimal Temperature (°C)
Vegetables Tomato 80 27
Pepper 80 27
Eggplant 85 29
Cucumber 90 32
Squash 90 32
Zucchini 90 32
Pumpkin 90 32
Corn 85 29
Beans 80 27
Okra 85 29
Herbs Basil 80 27
Rosemary 75 24
Flowers Sunflower 85 29
Zinnia 80 27
Marigold 75 24
Cosmos 80 27
Morning Glory 80 27
Grains and Others Rice 85 29
Quinoa 70 21
Sunflower (oilseed) 85 29

This table highlights seeds that thrive in warmer soil temperatures, providing a useful reference for gardeners looking to plant heat-loving crops.

Role of Enzymatic Activity

Enzymes play a pivotal role in the germination process. These biological catalysts are responsible for breaking down the food reserves stored in the seed, converting them into usable forms of energy and nutrients that support the initial growth stages. Soil temperature directly influences the efficiency of these enzymes.

  • Optimal Enzyme Function: Each type of enzyme has a specific temperature range in which it operates most efficiently. For many common garden seeds, this range typically falls between 70°F and 85°F (21°C to 29°C). Within this range, enzymes can effectively catalyze the reactions necessary for germination.
  • Temperature Extremes: Outside the optimal range, enzyme activity decreases. At low temperatures, enzymes become sluggish, delaying the breakdown of seed reserves. At high temperatures, enzymes can denature, losing their functional shape and becoming inactive. This can halt the germination process altogether.

Dormancy and Viability

Many seeds possess mechanisms that allow them to remain dormant until environmental conditions are favorable for germination. Soil temperature is a key factor in breaking this dormancy.

  • Breaking Dormancy: Some seeds require exposure to specific temperature ranges to trigger the end of dormancy. For example, certain cool-season crops need a period of cold stratification (exposure to low temperatures) before they can germinate. Conversely, some warm-season crops require consistent warmth to break dormancy.
  • Maintaining Viability: Seeds stored at inappropriate temperatures may lose their viability over time. High temperatures can accelerate the degradation of stored nutrients and the seed’s genetic material, reducing its ability to germinate successfully.

Understanding these mechanisms allows gardeners to manipulate soil temperature to favor germination. For instance, using cold frames or greenhouses can help maintain optimal temperatures for seed starting, ensuring that seeds break dormancy and germinate effectively.

Practical Implications for Gardeners

By paying close attention to soil temperature, gardeners can:

  • Improve Germination Rates: Ensuring that soil temperatures are within the optimal range for the specific seeds being planted can significantly increase germination rates.
  • Achieve Uniform Seedling Emergence: Consistent soil temperatures lead to more uniform germination, resulting in seedlings that emerge at the same time and grow at a similar pace. This uniformity is crucial for crops that are harvested all at once.
  • Enhance Seedling Health: Proper temperature management helps produce robust, healthy seedlings that are better equipped to withstand transplanting and environmental stresses.

Methods to Measure Soil Temperature

Accurately measuring soil temperature is essential for ensuring optimal seed germination and plant growth. There are several methods and tools that experienced gardeners can use to monitor soil temperature effectively. Here’s an overview of the most common and reliable techniques:

Soil Thermometers

Soil thermometers are simple and effective tools designed specifically for measuring soil temperature. They are similar to kitchen or medical thermometers but are built to withstand outdoor conditions and soil insertion.

  • Usage: Insert the thermometer into the soil at the depth where the seeds will be planted. For most seeds, this is typically about 1 to 2 inches deep. For larger seeds or those planted deeper, adjust accordingly.
  • Reading: Leave the thermometer in the soil for a few minutes to stabilize and provide an accurate reading. Soil thermometers usually have easy-to-read dials or digital displays.
  • Frequency: Check soil temperature at different times of the day, as it can vary with changes in air temperature and sunlight exposure. Morning and late afternoon readings can provide a good average.

Digital Probes and Sensors

Digital soil probes and sensors offer more advanced and precise measurements. These devices can provide continuous monitoring and are often connected to digital displays or data loggers.

  • Usage: Insert the probe into the soil at the desired depth. Some models can be left in place for continuous monitoring, providing real-time data on soil temperature.
  • Data Logging: Advanced models can store temperature data over time, allowing gardeners to track changes and trends. This can be particularly useful for monitoring soil conditions in greenhouses or controlled environments.
  • Alerts: Some digital sensors come with alert systems that notify gardeners if soil temperatures fall outside the optimal range for germination.

Infrared Thermometers

Infrared thermometers provide a non-contact method to measure surface soil temperature. These devices use infrared technology to gauge temperature without direct soil contact.

  • Usage: Point the infrared thermometer at the soil surface and press the trigger to get a temperature reading. It’s important to measure the soil surface that receives similar sunlight and environmental exposure as the area where seeds will be planted.
  • Accuracy: While infrared thermometers are less accurate for measuring deeper soil temperatures, they are useful for quick checks and for surfaces like raised beds and container gardens.

Thermocouple Probes

Thermocouple probes are highly accurate tools often used in scientific and agricultural applications. They can measure temperature at various depths and are connected to digital meters.

  • Usage: Insert the thermocouple probe into the soil at the required depth. The probe is usually connected to a digital meter that displays the temperature reading.
  • Precision: Thermocouple probes are known for their precision and are suitable for detailed soil temperature studies.

Practical Tips for Measuring Soil Temperature

  • Depth Matters: Always measure soil temperature at the depth where seeds will be planted. Surface temperatures can differ significantly from temperatures a few inches below.
  • Consistent Timing: Measure soil temperature at the same times each day for consistent readings. Early morning and late afternoon are typically the best times to check soil temperature.
  • Multiple Locations: In larger gardens, take readings from multiple locations to get an accurate overall picture of soil temperature conditions.

Interpreting Soil Temperature Readings

  • Optimal Range: Compare your soil temperature readings to the optimal germination temperatures for your seeds. This helps in deciding the best time to plant.
  • Adjusting Conditions: If soil temperatures are too low or too high, consider using techniques like mulching, row covers, or soil heating mats to adjust the conditions.


Attracting Bats to Your Homestead

Bats are often misunderstood and overlooked creatures, yet they offer many benefits to homesteaders, cabin owners and farms.  Unfortunately there are many misconceptions about bats including the beliefs that they are blind, prone to getting tangled in hair, or commonly carry diseases – not to mention Hollywood’s role in portraying them as blood sucking vampires.

In reality though , bats are vital components of healthy ecosystems and provide numerous benefits. From effective insect control to pollination and seed dispersal, bats play a crucial role in maintaining a balanced and healthy environment. This article explores the various benefits bats provide, practical steps for attracting and maintaining a bat-friendly environment on your property, plans for a bat simple bat house construction that you can do in a few hours,  and insights into their migration and mating cycles.

Understanding these aspects will help you harness the full range of benefits that bats can offer to your homestead.

Why are Bats Valuable for Insect Control on a Homestead?

Bats are nocturnal insectivores, meaning they feed on insects during the night. Their diet includes a variety of pests that can damage crops and gardens, such as mosquitoes, beetles, moths, and flies. A single bat can consume up to 500 t0  1,200 insects in an hour, drastically reducing the insect population in a given area.  As a method for mosquito control, an adult bat can eat an astounding number of mosquitoes in a single night. Depending on the species and the availability of mosquitoes, a bat can consume between 1,000 to 3,000 mosquitoes per night.

The impact of bats on pest populations is particularly valuable for homesteaders seeking organic and sustainable pest control methods. By reducing the number of pests, bats minimize the need for chemical pesticides, which can harm the environment and non-target species. This natural form of pest control promotes a healthier ecosystem, benefiting both the plants and animals on your homestead.

Beyond insect control, bats contribute to the environment in several other ways:

Pollination of Night-Blooming Plants: Certain bat species are vital pollinators for a variety of plants, including those that bloom at night. This is particularly important for crops such as agave and various fruit trees, which rely on bats for pollination. By facilitating the pollination process, bats help ensure the production of fruits and seeds, which are essential for plant reproduction and agricultural yield.

Seed Dispersal and Forest Regeneration: Bats play a crucial role in seed dispersal, especially in tropical and subtropical regions. By spreading seeds over large areas, bats help in forest regeneration and maintaining biodiversity. This natural reforestation process supports the health of entire ecosystems, promoting the growth of diverse plant species that provide habitat and food for other wildlife.

Biodiversity Indicators: Bats are considered bioindicators, meaning their presence and health can reflect the overall health of the environment. A healthy bat population suggests a balanced and thriving ecosystem, which is beneficial for all forms of life on your homestead. Monitoring bat populations can provide valuable insights into environmental changes and the effectiveness of conservation efforts.

What Types of Bats are Most Beneficial for Homesteaders ?

In the USA and Canada, several bat species are particularly beneficial for homesteaders due to their insect-eating habits and ecological roles. Understanding these species can help you attract the right types of bats to your property, maximizing their benefits.

Little Brown Bat (Myotis lucifugus):

  • Description: One of the most common bat species in North America, the Little Brown Bat is small, with a wingspan of 8-11 inches and a body length of about 3-4 inches. It has glossy brown fur and a relatively long life span of up to 10 years.
  • Habitat: Prefers roosting in buildings, bat houses, and tree cavities. They are often found near water sources like lakes and rivers.
  • Diet: Primarily feeds on insects such as mosquitoes, moths, beetles, and flies, consuming up to 50% of its body weight in insects each night.

Big Brown Bat (Eptesicus fuscus):

  • Description: Larger than the Little Brown Bat, with a wingspan of 12-16 inches and a body length of about 4-5 inches. It has dark brown fur and a robust build.
  • Habitat: Adaptable to various environments, including urban areas. Commonly roosts in buildings, under bridges, and in bat houses.
  • Diet: Feeds on larger insects such as beetles, moths, and wasps, making it an effective pest controller for gardens and agricultural areas.

Eastern Red Bat (Lasiurus borealis):

  • Description: Known for its striking reddish-orange fur, the Eastern Red Bat has a wingspan of 11-13 inches and a body length of about 3.5-4.5 inches.
  • Habitat: Prefers forested areas and is often found roosting in tree foliage. It is a solitary bat, unlike many other species that form colonies.
  • Diet: Eats a variety of insects, including moths, beetles, and flies. It is an agile flier, capable of catching insects mid-air.

Hoary Bat (Lasiurus cinereus):

  • Description: The Hoary Bat is one of the largest bats in North America, with a wingspan of 14-16 inches and a body length of about 5-6 inches. It has distinctive frosted, dark brown fur.
  • Habitat: Prefers roosting in tree foliage, often in dense forests. It is a migratory species, traveling long distances between summer and winter habitats.
  • Diet: Feeds on large insects such as moths, beetles, and dragonflies. Its powerful flight enables it to cover large areas while foraging.

Mexican Free-Tailed Bat (Tadarida brasiliensis):

  • Description: Recognizable by its long, narrow wings and tail that extends beyond the tail membrane. It has a wingspan of 11-14 inches and a body length of about 3.5 inches.
  • Habitat: Roosts in large colonies in caves, under bridges, and in buildings. It is found in the southern United States and migrates to Mexico for the winter.
  • Diet: Consumes a wide variety of flying insects, including moths, beetles, and flies. It is known for its high-speed flight, reaching speeds of over 60 mph.

Pallid Bat (Antrozous pallidus):

  • Description: A medium-sized bat with a wingspan of 14-16 inches and a body length of about 4-5 inches. It has pale, sandy-colored fur.
  • Habitat: Found in arid and semi-arid regions, often roosting in rock crevices, caves, and buildings. It is known for its ability to walk on the ground.
  • Diet: Prefers ground-dwelling insects and arthropods such as beetles, crickets, and scorpions. It is also known to eat small vertebrates like lizards and mice.

Silver-Haired Bat (Lasionycteris noctivagans):

  • Description: A medium-sized bat with a wingspan of 10-12 inches and a body length of about 3.5-4 inches. It has black fur with silver-tipped hairs, giving it a frosted appearance.
  • Habitat: Prefers forested areas and often roosts in tree cavities or under loose bark. It is found across much of North America.
  • Diet: Feeds on a variety of insects, including moths, flies, and beetles, making it a valuable pest controller.

Tricolored Bat (Perimyotis subflavus):

  • Description: One of the smallest bats in North America, with a wingspan of 8-10 inches and a body length of about 3-3.5 inches. It has distinctively tricolored fur (dark at the base, yellowish in the middle, and dark at the tips).
  • Habitat: Found in a variety of habitats, including forests and near water bodies. It often roosts in foliage and tree cavities.
  • Diet: Feeds on small insects such as flies, moths, and beetles, contributing to insect control.

Townsend’s Big-Eared Bat (Corynorhinus townsendii):

  • Description: Recognized by its large ears, this bat has a wingspan of 12-14 inches and a body length of about 3.5-4 inches. It has brown fur and a distinctive facial appearance.
  • Habitat: Prefers roosting in caves, abandoned mines, and buildings. It is sensitive to disturbance and often found in protected areas.
  • Diet: Feeds primarily on moths, but also consumes other insects. It is an important species for controlling nocturnal insect populations.

Table of Beneficial Bat Species

Bat Species Wingspan Body Length Fur Color Habitat Diet Region
Little Brown Bat (Myotis lucifugus) 8-11 inches 3-4 inches Glossy brown Buildings, bat houses, tree cavities, near water sources Mosquitoes, moths, beetles, flies Throughout North America
Big Brown Bat (Eptesicus fuscus) 12-16 inches 4-5 inches Dark brown Buildings, under bridges, bat houses Beetles, moths, wasps Throughout North America
Eastern Red Bat (Lasiurus borealis) 11-13 inches 3.5-4.5 inches Reddish-orange Forested areas, tree foliage Moths, beetles, flies Eastern and Central North America
Hoary Bat (Lasiurus cinereus) 14-16 inches 5-6 inches Frosted dark brown Tree foliage, dense forests Moths, beetles, dragonflies Throughout North America
Mexican Free-Tailed Bat (Tadarida brasiliensis) 11-14 inches 3.5 inches Dark brown Caves, under bridges, buildings Moths, beetles, flies Southern United States, migrates to Mexico
Pallid Bat (Antrozous pallidus) 14-16 inches 4-5 inches Pale sandy Rock crevices, caves, buildings Beetles, crickets, scorpions, small vertebrates Western North America
Silver-Haired Bat (Lasionycteris noctivagans) 10-12 inches 3.5-4 inches Black with silver tips Forested areas, tree cavities Moths, flies, beetles Throughout North America
Tricolored Bat (Perimyotis subflavus) 8-10 inches 3-3.5 inches Tricolored (dark, yellowish, dark) Forests, near water bodies, foliage, tree cavities Flies, moths, beetles Eastern and Central North America
Townsend’s Big-Eared Bat (Corynorhinus townsendii) 12-14 inches 3.5-4 inches Brown Caves, abandoned mines, buildings Moths, various insects Western and Southwestern North America


Bat Houses: Attracting Bats to Your Homestead Yard

Bat houses are specially designed structures that provide bats with safe, secure roosting sites. These artificial roosts can significantly enhance the appeal of your homestead yard to bats, offering them a place to rest, breed, and rear their young. This section explores the benefits of installing bat houses, how they help attract bats, and best practices for their placement and maintenance.

Benefits of Bat Houses Bat houses offer numerous benefits, both for bats and for homesteaders. Here are some of the key advantages:

  • Safe Roosting Sites: Bat houses provide a safe and secure environment for bats to roost, free from predators and human disturbances.
  • Support for Maternity Colonies: Female bats seek out safe, warm, and stable roosting sites to give birth and rear their pups. Bat houses can serve as ideal maternity roosts, supporting the next generation of bats.
  • Increased Bat Populations: By providing additional roosting sites, bat houses can help increase the local bat population, enhancing their natural pest control benefits.
  • Educational Opportunities: Installing bat houses can provide educational opportunities for observing bats and learning about their behavior and ecological roles.

How Bat Houses Attract Bats Bats are attracted to roosting sites that meet their specific needs for safety, warmth, and proximity to food and water sources. Here are some ways bat houses help attract bats to your homestead yard:

  • Mimicking Natural Roosts: Bat houses are designed to mimic the characteristics of natural roosts, such as tree cavities, under loose bark, or within caves. They provide the crevices and spaces bats seek for shelter.
  • Protection from Predators: Elevated bat houses protect bats from ground-based predators like cats, raccoons, and snakes. The enclosed structure also keeps birds and other potential predators at bay.
  • Temperature Regulation: Bat houses are built to retain heat, providing a warm environment that is especially important for maternity colonies. Bats prefer roosts that maintain temperatures between 80-100°F.
  • Proximity to Food and Water: Placing bat houses near water sources, such as ponds or streams, and in areas rich in insect life, makes them more attractive to bats looking for convenient access to food and hydration.

Best Practices for Installing Bat Houses To maximize the effectiveness of bat houses and attract bats to your homestead yard, follow these best practices for installation and maintenance:

Placement:

  • Height: Install bat houses at least 15-20 feet off the ground to keep them out of reach of predators and provide a suitable environment for roosting.
  • Sunlight Exposure: Place bat houses in areas that receive plenty of sunlight, ideally 6-8 hours per day. South or southeast-facing locations are best, as they ensure the bat house stays warm.
  • Open Areas: Mount bat houses on poles or buildings rather than trees. This minimizes the risk of predators and provides bats with easy access to the house.
  • Proximity to Water: Position bat houses near natural or artificial water sources, such as ponds, streams, or birdbaths. Water is essential for bats, especially during the breeding season.

Design Features:

  • Chambers: Multi-chamber bat houses are preferable as they provide more space and better thermal regulation, accommodating larger colonies.
  • Ventilation: Proper ventilation is crucial to prevent overheating and maintain a stable internal environment. Ensure your bat house has vents or slits for airflow.
  • Interior Texture: The interior surfaces of bat houses should be roughened or covered with mesh to provide bats with a secure grip for roosting.

Maintenance:

  • Regular Inspections: Check bat houses regularly for damage or signs of wear. Repair any cracks or other issues promptly to ensure the house remains habitable.
  • Cleaning: Clean bat houses during the winter when bats are less likely to be present. Remove any debris or droppings to maintain a healthy environment.
  • Monitoring: Monitor bat activity to assess the success of your bat house. Look for signs such as droppings below the house or visible bats during the evening.

Creating a Bat Colony for Your Property

Creating and maintaining a bat colony on your homestead can significantly enhance the local ecosystem. Understanding the dynamics of bat colonies, including their typical size and the factors influencing their establishment, is essential for fostering a thriving bat population.

Size of a Bat Colony

The size of a bat colony can vary widely depending on the species, availability of roosting sites, and environmental conditions. Here are some key points about bat colony sizes:

  • Small Colonies: Some bat species, such as the Eastern Red Bat (Lasiurus borealis), are solitary or form small colonies. These colonies typically consist of a few individuals and are often found in tree foliage or under loose bark. Solitary bats prefer secluded, well-hidden roosts.
  • Medium Colonies: Species like the Little Brown Bat (Myotis lucifugus) and the Big Brown Bat (Eptesicus fuscus) form medium-sized colonies ranging from a few dozen to a few hundred individuals. These colonies are commonly found in natural settings like tree cavities or human-made structures such as attics, barns, or bat houses.
  • Large Colonies: Certain bat species, such as the Mexican Free-Tailed Bat (Tadarida brasiliensis), can form very large colonies comprising thousands or even millions of bats. These large colonies are typically found in extensive roosting sites like caves or large man-made structures, such as bridges or old buildings. The Brazilian Free-Tailed Bat colonies in Carlsbad Caverns are famous for housing millions of bats.

Bat House Capacity

While bat houses are smaller and cannot accommodate the enormous colonies found in caves, they can still support substantial bat populations. Here are the typical capacities:

  • Single-Chamber Bat Houses: These basic structures can house 20-50 bats, making them suitable for smaller colonies or individual bats.
  • Multi-Chamber Bat Houses: Larger and more complex, these bat houses can support 50-200 bats or more. They are designed to provide more space and better thermal regulation.
  • Rocket Boxes: These cylindrical houses can accommodate several hundred bats, offering excellent ventilation and temperature regulation.

Factors Influencing Bat Colony Size on Your Homestead

Several factors influence the size of a bat colony that can establish itself on your homestead:

  • Availability of Roosting Sites: The number and quality of roosting sites directly impact colony size. Providing multiple, well-designed bat houses can support larger colonies.
  • Food Supply: A plentiful and diverse insect population is crucial for supporting a large bat colony. Ensuring your homestead has rich insect habitats, such as gardens with night-blooming plants, can attract and sustain more bats.
  • Water Sources: Proximity to water sources like ponds, streams, or birdbaths is vital as bats need water for drinking and foraging.
  • Climate and Environment: Bats prefer warm, stable environments. Areas that provide adequate sunlight and protection from wind and predators will attract more bats.
  • Minimal Disturbance: Bats require quiet, undisturbed roosting sites. Avoiding frequent disturbances around bat houses will help maintain and grow your bat colony.

Creating an Optimal Environment for Bat Colonies

To encourage the establishment and growth of bat colonies on your homestead, consider the following strategies:

  • Install Multiple Bat Houses: Providing a variety of roosting options can attract different species and support larger colonies. Ensure houses are well-spaced and positioned to receive adequate sunlight.
  • Enhance Food Supply: Cultivate a garden that attracts nocturnal insects. Avoid using pesticides that can reduce the insect population bats rely on.
  • Maintain Water Sources: Ensure that water features are clean and accessible year-round.
  • Protect Roosting Sites: Limit human activity around bat houses and natural roosting sites to avoid disturbing the bats.
  • Regular Maintenance: Inspect and clean bat houses regularly to ensure they remain in good condition and free from pests or damage.

Conclusion

Understanding the typical size of bat colonies and the factors influencing their establishment can help you create a supportive environment for these beneficial creatures. By providing adequate roosting sites, a rich food supply, and maintaining a disturbance-free zone, you can attract and sustain a healthy bat colony on your homestead. This proactive approach will ensure that bats continue to thrive, contributing to the ecological balance and health of your property.

Bats and Their Eyesight

Bats are often misunderstood creatures, with many myths and misconceptions surrounding their abilities, particularly their eyesight. One common myth is that bats are blind. In reality, bats have varying levels of eyesight depending on their species, and they often have excellent vision adapted to their nocturnal lifestyle. This section explores the truth about bats’ eyesight and how they use it in conjunction with other senses to navigate and hunt.

Myth: Bats Are Blind

The phrase “blind as a bat” is a misnomer. Bats are not blind; in fact, their eyesight is quite functional and adapted to their specific needs. The level of visual acuity in bats varies among species and is suited to their environment and feeding habits.

Types of Bat Eyesight

  1. Megabats (Fruit Bats):
    • Excellent Vision: Megabats, also known as fruit bats or flying foxes, generally have large eyes and excellent vision. These bats are primarily diurnal or crepuscular, meaning they are active during the day or at twilight.
    • Color Vision: Many megabats can see in color and have good depth perception, which helps them locate and identify fruits and flowers.
    • Use of Sight: Megabats rely heavily on their vision for navigation and foraging. Their large eyes are well-suited for seeing in low-light conditions, which is essential for their crepuscular activities.
  2. Microbats:
    • Moderate Vision: Microbats, which are smaller and primarily nocturnal, have relatively smaller eyes compared to megabats. Their eyesight ranges from good to adequate, depending on the species.
    • Echolocation: While microbats do use their vision, they rely more heavily on echolocation to navigate and hunt insects in the dark. Echolocation involves emitting high-frequency sound waves and listening for the echoes that bounce back from objects.
    • Night Vision: Microbats’ eyes are adapted to low-light conditions, allowing them to see at night. Their vision helps them detect large objects and navigate their roosts.

Adaptations for Nocturnal Vision

Bats have several adaptations that enhance their night vision:

  • Tapetum Lucidum: Some bats have a reflective layer behind their retinas called the tapetum lucidum. This layer improves their night vision by reflecting light that passes through the retina back into their eyes, increasing the light available for photoreceptors.
  • Rod Cells: Bats have a high concentration of rod cells in their retinas, which are more sensitive to low light levels than cone cells. This adaptation allows them to see better in dim conditions.
  • Wide Field of View: The positioning of their eyes gives bats a wide field of view, which is beneficial for detecting predators and navigating through complex environments.

The Role of Echolocation

While bats have functional eyesight, echolocation is a crucial sense for many species, especially microbats. This sophisticated biological sonar system allows bats to:

  • Navigate: Echolocation helps bats avoid obstacles and find their way through dark environments, such as forests or caves.
  • Hunt: By emitting sound waves and interpreting the returning echoes, bats can detect and capture prey, such as insects, with remarkable precision.
  • Communicate: Some bats use echolocation calls for communication within their species, helping them coordinate movements and locate each other.

Why Bats Can’t See Well During the Day

While bats are not blind, their eyesight is adapted primarily for low-light conditions, making it less effective during the day. This adaptation is a result of their nocturnal lifestyle, which has shaped their visual system to be more efficient at night. Here’s a detailed look at why bats struggle with daylight vision and how their eyes are optimized for darkness.

Nocturnal Adaptations

Bats are primarily nocturnal, meaning they are active during the night and rest during the day. Several adaptations help them thrive in low-light environments:

  • Rod-Dominated Retinas: Bats have retinas that are rich in rod cells, which are more sensitive to light and motion but do not detect color well. Rod cells are excellent for seeing in dim light but are less effective in bright light conditions.
  • Limited Cone Cells: Cone cells are responsible for color vision and function best in bright light. Bats have fewer cone cells compared to diurnal animals, limiting their ability to see clearly and in color during the day.
  • Tapetum Lucidum: Some bats have a reflective layer behind their retinas called the tapetum lucidum, which enhances night vision by reflecting light back through the retina. While this helps in low light, it can cause glare and reduce visual acuity in bright light.

Daytime Vision Challenges

During the day, bats face several challenges that affect their vision:

  • Glare and Overexposure: The abundance of rod cells and the presence of the tapetum lucidum can make bats more susceptible to glare and overexposure to bright light. This can overwhelm their visual system, causing discomfort and reduced clarity.
  • Limited Color Vision: With fewer cone cells, bats have limited color vision. This is less of a problem at night, where light is scarce, but during the day, it can make it harder for them to differentiate objects based on color.
  • Pupil Constriction: In bright light, bat pupils constrict to reduce the amount of light entering the eye. However, their eyes are not as adept at handling rapid changes in light levels, which can further impair their vision in daylight.

Behavioral Adaptations

Bats have developed several behavioral strategies to cope with their less effective daytime vision:

  • Roosting Habits: Bats typically roost in dark, secluded places during the day, such as caves, tree cavities, or man-made structures like attics and bat houses. These environments provide protection from predators and reduce the impact of bright light on their sensitive eyes.
  • Avoiding Daylight Activity: By being active primarily at night, bats minimize their exposure to bright light. This nocturnal behavior aligns with their visual strengths and helps them avoid the challenges associated with daylight vision.
  • Echolocation Reliance: Even though echolocation is primarily used for navigation and hunting in the dark, it can also help bats orient themselves in dimly lit roosts during the day. Echolocation provides a supplementary sensory input that does not rely on light conditions.

The Migration Cycles of Bats

Bats are fascinating creatures with complex behaviors, including seasonal migration patterns. These migration cycles can significantly impact their presence on your homestead. Understanding these patterns can help you better prepare to attract and support bats year-round.

Why Do Bats Migrate? Bats migrate primarily in response to changes in temperature and food availability. During the warmer months, bats reside in areas abundant in insects, their primary food source. As temperatures drop in the fall and insect populations decrease, many bat species migrate to warmer climates where food is more plentiful.

Migration Patterns in North America In North America, bat migration typically occurs between late summer and early fall, with bats returning to their summer roosts in the spring. The specific timing and distance of migration can vary significantly among species:

Hoary Bat (Lasiurus cinereus):

  • Migration Distance: Hoary Bats undertake some of the longest migrations of any bat species in North America, traveling thousands of miles between their summer and winter habitats.
  • Migration Path: These bats migrate from Canada and the northern United States to warmer regions in the southern United States and Central America.
  • Behavior: Hoary Bats often migrate in small groups and are known for their powerful flight, which allows them to cover large distances.

Mexican Free-Tailed Bat (Tadarida brasiliensis):

  • Migration Distance: This species is known for its extensive migration, traveling up to 1,000 miles.
  • Migration Path: Mexican Free-Tailed Bats migrate from the southwestern United States to Mexico and Central America for the winter.
  • Behavior: They form large colonies and migrate in massive groups, which can be an impressive sight.

Silver-Haired Bat (Lasionycteris noctivagans):

  • Migration Distance: Silver-Haired Bats typically migrate shorter distances compared to Hoary Bats, often traveling several hundred miles.
  • Migration Path: They move from northern regions, including Canada and the northern United States, to more temperate areas in the southern United States.
  • Behavior: These bats are known to migrate individually or in small groups and prefer forested areas for both roosting and migration.

Eastern Red Bat (Lasiurus borealis):

  • Migration Distance: Eastern Red Bats also migrate relatively long distances, often traveling several hundred to over a thousand miles.
  • Migration Path: They migrate from the northeastern United States and Canada to southeastern United States and Mexico.
  • Behavior: These solitary bats migrate alone or in small groups, often using tree foliage for roosting during their journey.

Local and Regional Migratory Patterns Not all bats in North America migrate over long distances. Some species, such as the Big Brown Bat (Eptesicus fuscus) and the Little Brown Bat (Myotis lucifugus), exhibit more regional migration patterns. These bats might move to nearby caves or mines to hibernate during the winter months, rather than undertaking extensive migrations.

Big Brown Bat (Eptesicus fuscus):

  • Migration Distance: Generally migrates short distances to suitable hibernation sites.
  • Behavior: Big Brown Bats often remain within the same general region year-round, moving to underground sites like caves and abandoned mines for hibernation.

Little Brown Bat (Myotis lucifugus):

  • Migration Distance: Similar to Big Brown Bats, Little Brown Bats migrate short distances.
  • Behavior: They seek out hibernacula within a few hundred miles of their summer roosts, often choosing sites with stable temperatures and high humidity.

Implications for Homesteaders Understanding bat migration patterns can help homesteaders create environments that support bats throughout the year:

Seasonal Roosting Sites: Provide a variety of roosting sites that can cater to bats’ needs during different seasons. For example, bat houses can serve as summer roosts, while natural caves or specially designed hibernacula can offer winter shelter.

Water and Food Sources: Ensure that water sources and insect-rich habitats are available to attract migrating bats. Night-blooming plants that attract nocturnal insects can be particularly beneficial.

Monitoring and Maintenance: Regularly monitor and maintain bat houses and roosting sites to ensure they remain attractive to bats. Clean and repair bat houses during the off-season to prepare for the return of migratory bats.

Bat Mating Cycles

The mating cycles of bats are an essential aspect of their life history and have significant implications for their behavior, population dynamics, and the strategies homesteaders can use to attract and support them. This section provides a detailed overview of bat mating cycles, including timing, behaviors, and how these cycles impact their presence on your property.

Mating Season Timing Bat mating seasons vary depending on the species and geographical location, but they generally occur in late summer and early autumn. This timing allows females to prepare for the energy-intensive processes of pregnancy and lactation when insect prey is still abundant. Here are some key points about the timing of bat mating cycles:

  • Late Summer to Early Autumn: Most North American bat species, such as the Little Brown Bat (Myotis lucifugus), Big Brown Bat (Eptesicus fuscus), and Hoary Bat (Lasiurus cinereus), mate during this period.
  • Delayed Fertilization: Many female bats store sperm through the winter and delay fertilization until the spring. This strategy ensures that the birth of pups coincides with peak insect abundance, maximizing the chances of offspring survival.

Mating Behaviors Bat mating behaviors can be complex and vary widely among species. These behaviors include courtship displays, vocalizations, and competition among males. Here are some common mating behaviors observed in bats:

  • Swarming: During the mating season, many bat species engage in swarming behavior, where large numbers of males and females gather at specific sites. Swarming typically occurs near hibernation sites and provides an opportunity for bats to mate and assess potential hibernation locations.
  • Vocalizations: Males often use vocalizations to attract females and establish their presence. These vocalizations can include a variety of sounds, such as clicks, trills, and buzzes.
  • Territorial Displays: Some male bats establish territories within swarming sites and defend them from other males. They may use physical displays, vocalizations, and even aggressive interactions to maintain their territory.

Reproductive Cycle The reproductive cycle of bats involves several stages, from mating to birth and rearing of young. Here is an overview of the key stages:

  • Mating: As mentioned, mating typically occurs in late summer to early autumn. Females may mate with multiple males, ensuring genetic diversity among their offspring.
  • Hibernation: After mating, many bats enter hibernation for the winter. During hibernation, females store sperm and delay fertilization.
  • Fertilization: In the spring, as bats emerge from hibernation and food becomes more abundant, females fertilize their eggs. This timing ensures that pups are born when food is plentiful.
  • Gestation: Gestation periods vary by species but typically last 40 to 60 days. During this time, females seek out maternity roosts that provide a safe and stable environment for giving birth and rearing young.
  • Birth and Rearing: Most bat species give birth to a single pup, although some may have twins. Pups are born hairless and blind, relying entirely on their mothers for warmth, nutrition, and protection. The mother nurses her pup for several weeks until it is capable of flight and independent foraging.

Impact on Homestead Presence Understanding bat mating cycles can help homesteaders create environments that attract and support bats during critical times of the year. Here are some strategies:

  • Maternity Roosts: Provide safe and stable roosting sites for pregnant females and nursing mothers. Bat houses, tree cavities, and attic spaces can serve as suitable maternity roosts.
  • Habitat Stability: Ensure that roosting sites remain undisturbed, particularly during the critical periods of pregnancy, birth, and pup rearing. Avoid tree felling or significant habitat changes during these times.
  • Insect-Rich Environment: Maintain a habitat rich in insects, particularly during the late spring and early summer when females need abundant food to support pregnancy and lactation.
  • Education and Awareness: Educate family members and neighbors about the importance of bats and their mating cycles. Encourage practices that protect and support bat populations, such as reducing pesticide use and preserving natural habitats.

The Life Cycle of a Bat

Bats, like all mammals, have a complex and fascinating life cycle that includes several distinct stages: birth, development, adulthood, and reproduction. Understanding the life cycle of bats can help homesteaders create supportive environments that cater to their needs at each stage, ensuring a healthy and thriving bat population on their property.

Birth and Early Development

  • Mating and Gestation: Bats typically mate in late summer or early autumn. Female bats often practice delayed fertilization, storing sperm throughout the winter and fertilizing their eggs in the spring. This strategy ensures that pups are born during a time of abundant food resources.
  • Birth: Most bats give birth to a single pup, although some species may have twins. Births usually occur in early summer. Newborn bats are born hairless, blind, and entirely dependent on their mothers for warmth and nutrition.
  • Nursing: The mother bat nurses her pup for several weeks. During this period, the pup clings to its mother or remains in the maternity roost while the mother forages for food. Bat milk is rich in fat and protein, providing the pup with the nutrients needed for rapid growth.

Development and Juvenile Stage

  • Growth: Bat pups grow quickly, developing fur and opening their eyes within a few days to weeks after birth. As they mature, they begin to flap their wings and practice short flights within the roost.
  • Learning to Fly: At about three to six weeks old, depending on the species, juvenile bats start to fly and forage for insects. This is a critical learning period where they develop the skills necessary for independent survival.
  • Weaning: As juvenile bats become more proficient at flying and hunting, they gradually reduce their dependence on their mother’s milk. By the end of the summer, most young bats are fully weaned and capable of foraging on their own.

Adulthood and Maturity

  • Independence: Once weaned, young bats continue to grow and hone their foraging skills. They join the adult population in their nightly hunting activities and roosting habits.
  • Sexual Maturity: Bats typically reach sexual maturity at one to two years of age. This can vary depending on the species and environmental conditions. Once mature, they participate in mating activities during the breeding season.
  • Life Span: The life span of bats varies widely among species. Small bat species often live around five to ten years, while some larger species, like the Little Brown Bat (Myotis lucifugus), can live up to 20 years or more under ideal conditions. Some bats, such as the Brandt’s bat (Myotis brandtii), have been known to live over 40 years in the wild.

Reproduction and the Cycle Continues

  • Breeding Season: During the breeding season, which occurs in late summer to early autumn, bats engage in mating behaviors such as swarming, vocalizing, and courtship displays. Females mate with multiple males to ensure genetic diversity in their offspring.
  • Hibernation or Migration: After mating, many bat species prepare for hibernation or migration. Those that hibernate do so in caves, mines, or other sheltered environments where they can survive the winter months with minimal energy expenditure. Migratory species travel to warmer climates to continue foraging during the winter.

Hibernation and Survival

  • Hibernation: In regions with cold winters, many bat species enter a state of hibernation to conserve energy. During hibernation, bats lower their metabolic rate, body temperature, and heart rate, allowing them to survive on stored body fat until spring.
  • Emergence: In the spring, hibernating bats emerge from their hibernacula as temperatures rise and food becomes available. This is also when females fertilize their stored sperm and begin the gestation process, continuing the cycle of life.

The life of a bat is a remarkable journey of growth, development, and adaptation. From their early days as vulnerable pups to becoming skilled flyers and efficient insect hunters, bats undergo significant transformations. Bats typically live for five to ten years, but some species can live over 20 years, and certain individuals, such as Brandt’s bats, have been documented living over 40 years.

Health Risks to Humans from Bats

While bats are incredibly beneficial to ecosystems and homesteaders, they can pose certain health risks to humans. Understanding these risks and taking appropriate precautions can ensure a safe and healthy coexistence with these fascinating creatures. This section will cover the primary health risks associated with bats and provide guidance on how to mitigate these risks effectively.

Rabies

Rabies is one of the most well-known diseases associated with bats. Although only a small percentage of bats carry rabies, the virus is almost always fatal if untreated.

  • Transmission: Rabies is transmitted through the saliva of an infected animal, typically via bites or scratches. The virus can also be transmitted if saliva comes into contact with mucous membranes or an open wound.
  • Symptoms: Early symptoms in humans include fever, headache, and general weakness. As the disease progresses, more severe symptoms such as agitation, hallucinations, and hydrophobia (fear of water) can occur.
  • Prevention: Avoid handling bats directly. If you must handle a bat, wear thick gloves and other protective gear. Ensure pets are vaccinated against rabies. If bitten or scratched, wash the wound thoroughly and seek medical attention immediately.

Histoplasmosis

Histoplasmosis is a fungal infection caused by inhaling spores of the fungus Histoplasma capsulatum, which can be found in bat droppings (guano).

  • Transmission: The fungus thrives in environments with bird and bat droppings. When these droppings dry out and become airborne, the spores can be inhaled.
  • Symptoms: Symptoms can range from mild flu-like symptoms to severe respiratory issues. In severe cases, it can affect other organs and be life-threatening.
  • Prevention: Avoid disturbing areas where bat droppings accumulate. If you need to clean such areas, wear a mask and gloves to prevent inhaling spores. Ensure proper ventilation when cleaning enclosed spaces with bat droppings.

Other Zoonotic Diseases

Bats can carry various other pathogens that may pose health risks to humans, including viruses, bacteria, and parasites. While direct transmission of these pathogens to humans is rare, it is essential to be aware of the potential risks.

  • Leptospirosis: This bacterial disease can be transmitted through contact with water or soil contaminated with the urine of infected animals, including bats.
  • Salmonella: Though more commonly associated with birds and reptiles, Salmonella bacteria can also be found in bat droppings.
  • Prevention: Maintain good hygiene practices, such as washing hands thoroughly after cleaning bat droppings or handling bats. Avoid drinking or coming into contact with contaminated water.

Rabies Awareness and Safety Precautions

Rabies is a viral disease that affects the central nervous system and is almost always fatal once symptoms appear. Although the incidence of rabies transmission from bats to humans is low, it is a serious concern that requires careful attention and preventative measures. Here’s how you can protect yourself and your pets while fostering a safe environment for bats:

Understanding Rabies in Bats

  • Prevalence: Only a small percentage of bats carry rabies. Studies suggest that less than 1% of bats are infected. However, the risk should not be ignored, as rabies is a severe and fatal disease.
  • Transmission: Rabies is transmitted through the saliva of an infected animal, typically via bites or scratches. Bats can also transmit the virus if their saliva comes into contact with mucous membranes or an open wound.

Preventative Measures

  • Avoid Direct Contact: The most effective way to prevent rabies is to avoid direct contact with bats. Educate family members, especially children, about the importance of not handling bats or any other wild animals.
  • Use Protective Gear: If you must handle a bat, always use thick gloves and other protective gear to avoid bites or scratches. This is particularly important for situations such as rescuing a bat or moving it from an indoor area.
  • Safe Bat Removal: If a bat enters your home, do not try to catch it with your bare hands. Instead, close off the room, open windows or doors to the outside, and allow the bat to leave on its own. If necessary, contact local wildlife control for assistance.

Rabies Vaccination

  • Pets: Ensure that all pets, including dogs, cats, and ferrets, are up to date on their rabies vaccinations. Pets are more likely to come into contact with bats, and vaccinating them is a crucial line of defense.
  • Humans: Consider rabies pre-exposure vaccination if you have frequent contact with bats, such as in professional or research settings. This vaccination can provide an added layer of protection.

Response to Bites and Scratches

  • Immediate Action: If you are bitten or scratched by a bat, wash the wound thoroughly with soap and water for at least 15 minutes. This helps remove some of the virus from the wound.
  • Seek Medical Attention: Contact a healthcare provider immediately, even if the wound seems minor. Post-exposure prophylaxis (PEP) is highly effective at preventing rabies if administered promptly after exposure.
  • Report the Incident: Notify local health authorities or animal control about the incident. They may want to capture the bat for testing, which can determine whether it was rabid and guide further medical treatment.

Monitoring Bat Health

  • Signs of Rabies in Bats: Be aware of signs that a bat might be rabid. These include unusual behavior such as activity during the day, difficulty flying, paralysis, or aggression. Do not approach or handle bats showing these symptoms.
  • Reporting: Report any bats displaying signs of illness to local wildlife authorities. They can assess the situation and take appropriate action, which may include testing the bat for rabies.

Creating a Safe Environment

  • Bat House Maintenance: Regularly inspect and maintain bat houses to ensure they are clean and free from disease. This includes removing droppings and ensuring that the structure is intact and safe for bats.
  • Education and Awareness: Educate your family and community about the importance of bat conservation and the steps to take to safely coexist with bats. Reducing fear and misconceptions about bats can help prevent unnecessary harm to both humans and bats.

Additional Reading

Download a Bat House Plan

https://cwf-fcf.org/en/resources/downloads/booklets-handouts/canadianwildlife-bathouse-v4-MASTER.pdf

https://www.thespruce.com/bat-house-plans-4775009


The Life of a Mosquito

Mosquitoes are more than just a summertime nuisance; they are complex insects with significant impacts on human health and ecosystems. For rural and self-sufficient communities, understanding mosquitoes is important not only for comfort but also for health and effective homestead management. This comprehensive guide aims to provide you with everything you need to know about mosquitoes, from their biology and life cycle to the ecological roles they play and effective strategies for control and prevention.

Did you Know…

  1. Oldest Insects:
    • Mosquitoes have been around for over 100 million years, even pre-dating the dinosaurs.
  2. Species Diversity:
    • There are over 3,500 species of mosquitoes worldwide, but only a few hundred of them bite humans.
  3. Only Females Bite:
    • Only female mosquitoes bite humans and animals to obtain the necessary protein for egg development. Male mosquitoes feed solely on nectar and plant juices.
  4. Global Distribution:
    • Mosquitoes are found on every continent except Antarctica. They thrive in a variety of climates, from tropical regions to temperate zones.
  5. Flight Speed:
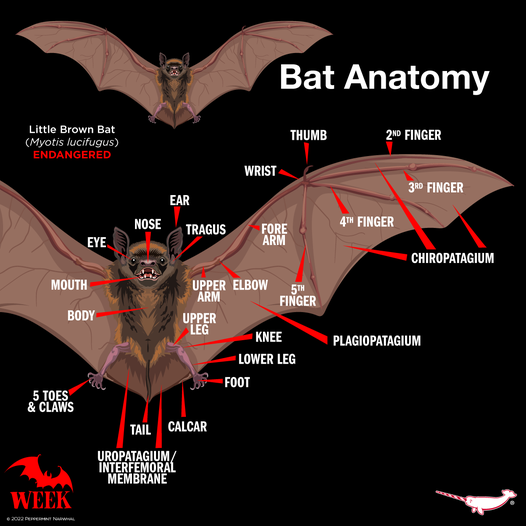
    • Mosquitoes are relatively slow fliers, averaging about 1.5 miles per hour. This makes them easy targets for predators like birds and bats.
  6. Lifespan:
    • The lifespan of a mosquito varies by species and environmental conditions but typically ranges from a few weeks to several months. Females generally live longer than males.
  7. Heat and CO2 Attraction:
    • Mosquitoes are attracted to the carbon dioxide exhaled by humans and animals, as well as body heat and sweat. They use these cues to locate their hosts from up to 100 feet away.
  8. Diverse Diets:
    • While many mosquitoes prefer human blood, some species feed on the blood of birds, reptiles, amphibians, and even other insects.
  9. Disease Vectors:
    • Mosquitoes are considered one of the deadliest animals on the planet due to their role in transmitting diseases such as malaria, dengue fever, Zika virus, and West Nile virus. Malaria alone causes over 400,000 deaths annually.
  10. Egg Laying:
    • Female mosquitoes can lay up to 300 eggs at a time. They often lay their eggs in or near stagnant water, where the larvae will hatch and develop.

Mosquitoes Biological Overview

Mosquitoes belong to the order Diptera, which is the taxonomic order of true flies, and are part of the family Culicidae. This family is characterized by slender, elongated bodies, long legs, and specialized mouthparts adapted for piercing skin and sucking fluids. There are over 3,500 species of mosquitoes found worldwide, each adapted to specific environments ranging from tropical regions to temperate zones.

Anatomy and Physical Characteristics

Mosquitoes typically measure between 3 to 6 mm in length, although some species can be larger. Their bodies are divided into three main segments: the head, thorax, and abdomen, each with distinct functions and structures.

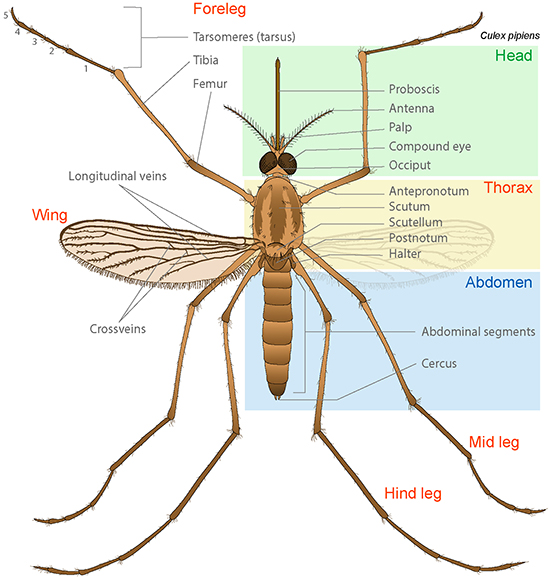
Head: The head houses the mosquito’s sensory equipment and feeding apparatus. It includes:

  • Compound Eyes: Large and prominent, these eyes provide a wide field of vision and are adept at detecting movement and changes in light intensity. The compound eyes are composed of numerous tiny lenses, giving mosquitoes acute sensitivity to motion, which helps them avoid predators and locate hosts.
  • Antennae: These are long, feathery structures used primarily for detecting chemical signals such as carbon dioxide and lactic acid emitted by potential hosts. Males have bushier antennae compared to females, which they use to detect the wingbeat frequency of females.
  • Proboscis: A specialized elongated mouthpart used by females to pierce the skin of their hosts and draw blood. It consists of several needle-like structures that can penetrate skin and blood vessels, and inject saliva containing anticoagulants to prevent blood clotting.
  • Palps: Sensory organs near the proboscis that help in the detection of host odors and aid in feeding.

Thorax: The thorax is the central segment responsible for locomotion and is heavily muscled to support flight. It includes:

  • Wings: Mosquitoes have two wings that are scaled and transparent. Their rapid beating (up to 600 times per second) produces the characteristic buzzing sound. Wings are crucial for movement and finding mates and hosts.
  • Legs: Mosquitoes have six long, slender legs with claws at the end for gripping surfaces. The legs are also covered with scales and sensory hairs that help in detecting vibrations and chemical signals.
  • Halteres: Small, club-shaped structures located behind the wings, functioning as gyroscopic stabilizers that help with balance during flight.

Abdomen: The abdomen is involved in digestion, reproduction, and respiration. It is segmented and flexible, allowing it to expand when a female ingests a blood meal. The abdomen contains:

  • Digestive System: This includes the stomach and intestines where blood or nectar is processed.
  • Reproductive Organs: In females, this includes structures for storing and laying eggs. The abdomen can expand significantly when engorged with blood.
  • Respiratory System: Mosquitoes breathe through spiracles, small openings along the sides of their abdomen that connect to a network of tubes (tracheae) supplying oxygen to their tissues.

Sensory Systems

Mosquitoes possess highly developed sensory systems that allow them to locate their hosts and navigate their environment effectively.

Vision: Mosquitoes rely on their compound eyes for detecting movement and navigating. Their eyes are sensitive to light and can detect contrasts, which helps them identify potential hosts and avoid obstacles. Some species are more active during dusk and dawn, relying on low light conditions to find their prey.

Olfaction: The sense of smell is highly developed in mosquitoes, primarily through their antennae and palps. They can detect carbon dioxide, body odors, and other chemicals emitted by potential hosts from significant distances. This olfactory ability enables them to zero in on their targets even in complete darkness.

Thermoreception: Mosquitoes can sense heat emitted by warm-blooded animals, helping them locate blood vessels closer to the skin’s surface. This ability to detect body heat is crucial for identifying and targeting specific areas to feed.

Mechanoreception: Sensory hairs on their legs and antennae allow mosquitoes to detect vibrations and movements in their surroundings. This mechanoreception aids in evading predators and finding mates.

Mosquitoes are equipped with a suite of sensory tools that make them highly effective hunters, capable of finding hosts over considerable distances and under various environmental conditions.

Did you know a single bat can eat up to 1500 mosquitos per night and a colony of bats on your land can significantly reduce an over population of mosquitos.    Read more on our article here about how important bats are to your homestead.  

Why Mosquitoes Are More Attracted to Some People Than Others

Mosquitoes are known to exhibit preferences when it comes to their human hosts. Several factors contribute to why mosquitoes are more attracted to some people than others. These factors range from genetic differences to lifestyle and even clothing choices. Here’s a detailed look at the reasons behind this phenomenon:

1. Carbon Dioxide Emission

  • How it Works: Mosquitoes are highly sensitive to carbon dioxide (CO2), which humans exhale with every breath. People who emit more CO2, such as larger individuals or those who are physically active, tend to attract more mosquitoes.
  • Why It Matters: The increased CO2 output signals to mosquitoes that a potential host is nearby, guiding them towards the source.

2. Body Odor and Sweat

  • How it Works: Mosquitoes are attracted to certain chemicals present in human sweat and body odor. These chemicals include lactic acid, uric acid, ammonia, and certain fatty acids produced by skin bacteria.
  • Why It Matters: Individuals who produce more of these chemicals, either due to their metabolism, level of physical activity, or genetic makeup, are more likely to attract mosquitoes.

3. Body Heat

  • How it Works: Mosquitoes use thermal sensors to detect body heat. People with higher body temperatures, such as those who are physically active or pregnant women, tend to attract more mosquitoes.
  • Why It Matters: The heat signature helps mosquitoes locate exposed skin areas, making it easier for them to feed.

4. Skin Microbiota

  • How it Works: The bacteria living on human skin produce various compounds that contribute to body odor. Different people have different compositions of skin microbiota, leading to variations in attractiveness to mosquitoes.
  • Why It Matters: A diverse microbiota can result in a more complex body odor that may be more or less attractive to mosquitoes, depending on the specific mix of compounds produced.

5. Blood Type

  • How it Works: Some studies suggest that mosquitoes are more attracted to certain blood types. For instance, people with type O blood are reported to be bitten more frequently than those with type A, B, or AB blood.
  • Why It Matters: The reason for this preference is not entirely clear, but it may be related to the different scent profiles associated with each blood type.

6. Alcohol Consumption

  • How it Works: Consuming alcohol can increase the attractiveness to mosquitoes. This may be due to changes in skin chemistry and body odor after drinking.
  • Why It Matters: Alcohol consumption increases blood circulation and skin temperature, which may make individuals more noticeable to mosquitoes.

7. Pregnancy

  • How it Works: Pregnant women exhale more CO2 and have higher body temperatures, making them more attractive to mosquitoes.
  • Why It Matters: The increased metabolic rate during pregnancy and higher body heat make pregnant women prime targets for mosquitoes.

8. Clothing Color

  • How it Works: Mosquitoes are visual hunters and are attracted to dark colors. Wearing dark clothing can make an individual more noticeable to mosquitoes.
  • Why It Matters: Light-colored clothing reflects more light and may make individuals less visible to mosquitoes.

9. Genetic Factors

  • How it Works: Genetics play a significant role in determining an individual’s body odor, metabolic rate, and the composition of skin microbiota.
  • Why It Matters: Genetic differences can influence how attractive a person is to mosquitoes, with some people naturally emitting scents that are more appealing to these insects.

10. Skin Care Products

  • How it Works: Certain lotions, perfumes, and other skin care products can either attract or repel mosquitoes, depending on their ingredients.
  • Why It Matters: Products containing floral or fruity scents can attract mosquitoes, while those with ingredients like DEET or citronella can help repel them.

The Mosquito Life Cycle

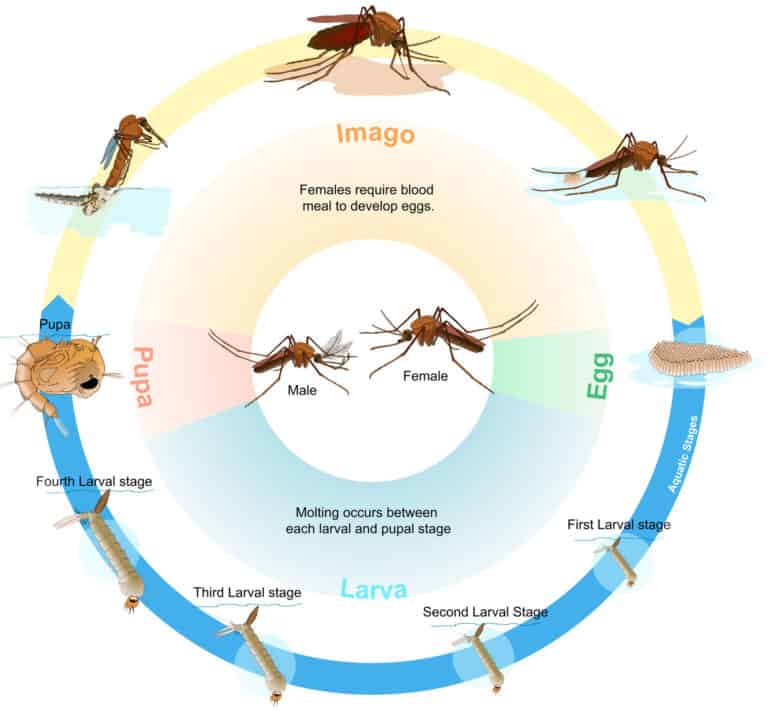
Understanding the life cycle of mosquitoes can go a long way in controlling their populations and mitigating their impact. The life cycle of a mosquito consists of four distinct stages: egg, larva, pupa, and adult. Each stage has unique characteristics and requirements, influencing where and how mosquitoes can be controlled.

Egg Stage

Female mosquitoes lay their eggs in or near water, depending on the species. Some species, like Anopheles, lay individual eggs directly on the water surface, while others, such as Aedes, deposit their eggs in areas that will eventually flood, like containers or flood-prone grounds. Culex mosquitoes often lay their eggs in rafts, which float on the water surface.

The eggs of different mosquito species exhibit various adaptations to environmental conditions. For example, Aedes eggs can withstand desiccation and remain viable for several months, enabling them to survive in dry conditions until water becomes available. These eggs hatch within a few days to weeks when submerged in water, depending on environmental factors such as temperature and humidity.

Larval Stage

Once hatched, mosquito larvae, often called “wigglers,” begin an aquatic phase of their life cycle. Mosquito larvae are filter feeders, consuming organic matter in the water, including algae, bacteria, and other microorganisms. This diet is crucial for their growth and development.

Larvae go through four growth stages known as instars. Each instar involves molting, where the larvae shed their exoskeleton to grow larger. The duration of the larval stage varies among species and is influenced by environmental conditions such as temperature, food availability, and water quality. In optimal conditions, this stage can last from a few days to several weeks.

Larvae breathe through siphon tubes, which are air-filled structures that extend to the water surface. This breathing mechanism requires larvae to stay near the surface, making them visible as they wriggle through the water. Some species, like Anopheles, do not have siphons and lie parallel to the water surface to breathe.

Pupal Stage

After completing the larval stages, mosquitoes enter the pupal stage, also known as “tumblers.” Pupae are comma-shaped and are more mobile than other insect pupae. Unlike larvae, pupae do not feed. This stage is primarily a period of transformation, where the mosquito undergoes metamorphosis.

The pupal stage can last from a few days to a week, depending on environmental conditions. During this time, the pupae remain active, tumbling through the water when disturbed, but they are preparing to emerge as adults. Inside the pupal case, the mosquito undergoes significant physiological changes, transitioning from a larval form to an adult form with fully developed wings, legs, and reproductive organs.

Adult Stage

The final stage of the mosquito life cycle is the adult. Upon emerging from the pupal case, the adult mosquito must rest on the water surface to allow its body to harden and wings to dry before flying. This period of rest is critical for the mosquito to become fully functional.

The adult stage is where mosquitoes’ roles diverge significantly between males and females. Adult mosquitoes can be categorized based on their primary activities: feeding, mating, and reproduction.

Reproduction and Role of the Male Mosquito

Male mosquitoes typically emerge before females and form swarms, often at dusk, to attract females. These swarms can be seen in areas with good lighting or near landmarks like trees or buildings. Females enter these swarms to mate. Male mosquitoes are equipped with specialized antennae and sensory organs to detect the wingbeat frequency of females, which helps them locate potential mates.

Male mosquitoes do not bite or feed on blood. Their primary role is to find and mate with females, ensuring the continuation of the species. They feed on nectar and other plant juices, which provide them with the energy needed for their activities. Males typically live for about a week and often die shortly after mating.

Role of the Female Mosquito

Female mosquitoes are the primary culprits behind the blood-feeding behavior that affects humans and animals. After mating, a female mosquito requires a blood meal to provide the necessary proteins for egg development. This is why female mosquitoes bite, using their specialized mouthparts to pierce the skin and draw blood. They can feed on a variety of hosts, including mammals, birds, reptiles, and amphibians.

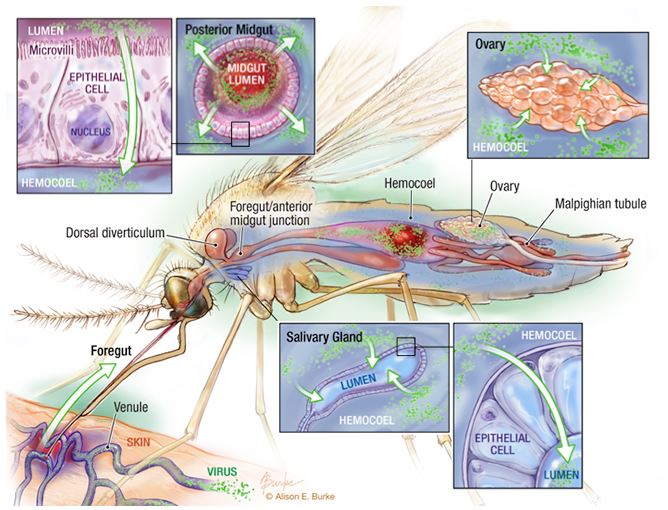
Female mosquitoes possess mouthparts called proboscis, which they use to pierce the skin of their hosts. They inject saliva, which contains anticoagulants to prevent blood from clotting, making it easier to feed. This saliva can also transmit diseases from one host to another.

Once a female has obtained a blood meal, she digests the blood and develops her eggs. She will then seek a suitable water source to lay her eggs, starting the cycle anew. Females can lay multiple batches of eggs throughout their lives, each batch consisting of anywhere from 50 to 300 eggs, depending on the species. The lifespan of a female mosquito varies but typically ranges from a few weeks to several months, depending on environmental conditions and predation.

The Ecological Role of Mosquitoes

Mosquitoes are often viewed solely as pests and vectors of disease, but they also play important roles in various ecosystems. Understanding these roles helps provide a more balanced perspective on these insects and highlights their contributions to ecological stability and biodiversity. One of the lesser-known roles of mosquitoes is their contribution to pollination.

Mosquitoes as Pollinators

While mosquitoes are infamous for their blood-feeding habits, this behavior is primarily exhibited by females seeking the nutrients required for egg development. Both male and female mosquitoes also feed on nectar and other plant sugars for energy. In doing so, they inadvertently contribute to the pollination of various plants.

Nectar Feeding: Male mosquitoes, in particular, feed exclusively on nectar and other plant fluids throughout their lives. Female mosquitoes also consume nectar when they are not seeking a blood meal. This nectar-feeding behavior positions mosquitoes as incidental pollinators. As mosquitoes move from flower to flower in search of nectar, they transfer pollen, facilitating the reproductive processes of plants.

Plant Species: Several plant species benefit from mosquito pollination, especially those that produce flowers in damp, shady environments where mosquitoes are likely to be found. For instance, orchids and certain types of lilies, which thrive in wetland habitats, are known to be pollinated by mosquitoes. These plants often emit scents that attract mosquitoes, thereby increasing the chances of pollination.

Ecological Impact: Mosquito pollination plays a role in maintaining the biodiversity of plant communities, particularly in wetland ecosystems. By contributing to the reproductive success of these plants, mosquitoes help sustain the habitats that support a wide variety of other organisms. This interconnectedness underscores the importance of mosquitoes beyond their more notorious behaviors.

While mosquitoes may not be as efficient or specialized as bees or butterflies in pollination, their contribution should not be overlooked. Their interactions with plants highlight a complex ecological web where even the most seemingly insignificant creatures have their place and purpose.

Mosquitoes as a Food Source

In addition to their role in pollination, mosquitoes are a vital food source for many species across various ecosystems. Both in their larval and adult stages, mosquitoes provide nourishment for a range of predators, contributing to the balance of natural food webs.

Larval Stage: During the larval stage, mosquitoes inhabit aquatic environments such as ponds, marshes, and even small containers of water. Here, they become an important food source for a variety of aquatic predators, including:

  • Fish: Many species of fish, including guppies and goldfish, feed on mosquito larvae. Some fish are even introduced into mosquito-prone areas specifically to control mosquito populations.
  • Invertebrates: Predatory aquatic insects such as dragonfly nymphs and water beetles actively hunt mosquito larvae.
  • Amphibians: Tadpoles and some adult amphibians consume mosquito larvae as part of their diet.

Pupal Stage: While in the pupal stage, mosquitoes are still vulnerable to aquatic predators. Though they are less mobile and do not feed, their presence in the water column makes them accessible to the same predators that target larvae.

Adult Stage: Once mosquitoes emerge as adults, they continue to be an important food source for various terrestrial and aerial predators, including:

  • Birds: Many species of birds, especially those that feed near water, consume adult mosquitoes. Swallows, purple martins, and various types of waterfowl are known to include mosquitoes in their diet.
  • Bats: Bats are significant predators of adult mosquitoes, particularly in regions where both species coexist. A single bat can consume hundreds of mosquitoes in one night.
  • Insects: Predatory insects such as dragonflies and spiders also prey on adult mosquitoes. Dragonflies, often referred to as “mosquito hawks,” are particularly effective at catching mosquitoes in flight.
  • Amphibians and Reptiles: Frogs, lizards, and other small reptiles and amphibians will eat adult mosquitoes when the opportunity arises.

Ecological Impact: By serving as a food source at multiple stages of their life cycle, mosquitoes support the survival and reproductive success of a diverse array of species. This makes them an integral component of food webs in both aquatic and terrestrial ecosystems. The presence of mosquitoes can influence the population dynamics of their predators, contributing to the overall health and stability of ecosystems.

The Mechanism of a Mosquito Bite

Why Mosquito Bites Itch Humans

When a mosquito bites, it uses its specialized mouthparts, known as a proboscis, to pierce the skin and locate a blood vessel. The process involves several steps:

  1. Penetration: The mosquito’s proboscis is composed of several needle-like structures. It inserts these into the skin to probe for a blood vessel.
  2. Injection of Saliva: Once the mosquito finds a blood vessel, it injects saliva into the skin. Mosquito saliva contains a mixture of anticoagulants, enzymes, and proteins that help keep the blood from clotting and make it easier for the mosquito to feed.
  3. Feeding: The mosquito then draws blood through its proboscis, which it uses for nourishment and, in the case of females, to develop eggs.

Why Mosquito Bites Itch

The itching associated with mosquito bites is primarily due to the body’s immune response to the mosquito’s saliva. Here is a detailed breakdown of the process:

  1. Immune System Response: When the mosquito injects saliva into the skin, the body’s immune system recognizes the foreign proteins and reacts to them. This triggers the release of histamines, which are chemicals produced by the body’s immune cells (mast cells) in response to an injury or infection.
  2. Histamine Release: Histamines cause the blood vessels in the affected area to dilate (widen) and become more permeable. This increased permeability allows immune cells and proteins to access the site of the bite more easily to fight off any potential pathogens.
  3. Nerve Stimulation: The release of histamines and the subsequent dilation of blood vessels stimulate the nerve endings in the skin, resulting in the sensation of itching. This is why antihistamines are commonly used to relieve the itchiness associated with mosquito bites, as they block the action of histamines.

Formation of the Red Bump

The red bump that forms around a mosquito bite, also known as a wheal, is a result of the body’s inflammatory response to the saliva injected by the mosquito. Here’s how it develops:

  1. Inflammation: The release of histamines and other inflammatory chemicals causes the blood vessels around the bite to widen and increase blood flow to the area. This leads to redness and warmth around the bite site.
  2. Swelling: The increased permeability of the blood vessels allows fluid to leak into the surrounding tissues, causing swelling. This fluid accumulation, combined with the immune response, forms the characteristic raised bump or wheal.
  3. Redness: The redness around the bite is due to the increased blood flow and the presence of immune cells at the site. The body sends these cells to combat any potential infections and to start the healing process.
  4. Duration: The itchiness and redness usually peak within the first 24 hours after the bite and gradually subside as the immune response diminishes. However, in some individuals, particularly those with sensitive skin or allergic reactions, the symptoms can last longer and be more severe.

Natural Remedies to Reduce Mosquito Bite Itch

  1. Aloe Vera:
    • How it Works: Aloe vera has anti-inflammatory and soothing properties that can help reduce itching and swelling.
    • How to Use: Apply fresh aloe vera gel directly from the plant or use a store-bought gel on the bite.
  2. Baking Soda Paste:
    • How it Works: Baking soda can neutralize the pH of the skin, providing relief from itching.
    • How to Use: Mix one tablespoon of baking soda with a small amount of water to form a paste. Apply the paste to the bite and leave it on for 10-15 minutes before rinsing off.
  3. Honey:
    • How it Works: Honey has natural antibacterial and anti-inflammatory properties that can soothe the skin and reduce itching.
    • How to Use: Apply a small amount of honey directly to the mosquito bite.
  4. Apple Cider Vinegar:
    • How it Works: Apple cider vinegar can help reduce itching and inflammation due to its acidity.
    • How to Use: Dab a small amount of apple cider vinegar onto the bite using a cotton ball. If you have sensitive skin, dilute the vinegar with water before applying.
  5. Oatmeal:
    • How it Works: Oatmeal contains compounds that have anti-irritant properties, which can help soothe the skin.
    • How to Use: Make an oatmeal paste by mixing equal parts oatmeal and water. Apply the paste to the bite and let it sit for 10-15 minutes before rinsing off. Alternatively, you can add oatmeal to a warm bath and soak in it.
  6. Tea Tree Oil:
    • How it Works: Tea tree oil has antiseptic and anti-inflammatory properties that can help reduce itching and prevent infection.
    • How to Use: Dilute tea tree oil with a carrier oil (such as coconut or olive oil) before applying it to the bite. Use a ratio of 1 part tea tree oil to 9 parts carrier oil.
  7. Witch Hazel:
    • How it Works: Witch hazel is an astringent that can reduce inflammation and soothe the skin.
    • How to Use: Apply witch hazel to the bite using a cotton ball or swab.
  8. Basil:
    • How it Works: Basil contains compounds such as camphor and thymol that can relieve itching.
    • How to Use: Crush fresh basil leaves and apply them directly to the bite. You can also boil basil leaves in water, let the mixture cool, and then apply it to the skin with a cloth.
  9. Lemon or Lime Juice:
    • How it Works: The citric acid in lemon or lime juice can act as an anti-inflammatory and antimicrobial agent.
    • How to Use: Apply lemon or lime juice to the bite using a cotton ball. Avoid using this remedy if you plan to be in the sun, as it can make your skin more sensitive to sunlight.
  10. Peppermint Oil:
    • How it Works: Peppermint oil has a cooling effect and can reduce itching and inflammation.
    • How to Use: Dilute peppermint oil with a carrier oil before applying it to the bite. Use a ratio of 1 part peppermint oil to 9 parts carrier oil.
  11. Onion:
    • How it Works: Onions have natural anti-inflammatory and antimicrobial properties that can help reduce itching and prevent infection.
    • How to Use: Cut a slice of onion and apply it directly to the bite. Leave it on for a few minutes before rinsing off.
  12. Garlic:
    • How it Works: Garlic has anti-inflammatory and antibacterial properties that can help soothe the bite.
    • How to Use: Crush a clove of garlic and apply the juice to the bite. Be cautious, as garlic can cause skin irritation in some people.

Mosquitoes and Population Control

Mosquitoes also play a role in regulating the populations of other species through their interactions as prey and as vectors of diseases. This regulation can have cascading effects on the ecosystem.

As Prey: The predation of mosquito larvae and adults by various predators helps control mosquito populations naturally. This predatory pressure ensures that mosquito populations do not grow unchecked, which would otherwise lead to overpopulation and increased competition for resources among mosquitoes and other aquatic organisms.

Disease Vector Impact: Mosquitoes are well-known vectors for numerous diseases, affecting not only humans but also wildlife. By transmitting diseases such as malaria, dengue fever, and West Nile virus, mosquitoes can influence the population dynamics of their hosts. For example, disease outbreaks can reduce the population of certain species, thereby impacting the availability of these species as prey for other predators. This indirect form of population control helps maintain a balance within the ecosystem.

Inter-species Relationships: The presence of mosquitoes and their role in disease transmission can shape the behavior and distribution of wildlife. Animals may develop behaviors to avoid mosquito-rich areas, or evolve traits that make them less susceptible to mosquito-borne diseases. These adaptations contribute to the evolutionary arms race between hosts and parasites, driving biodiversity and ecosystem resilience.

Ecological Impact: The role of mosquitoes in population control underscores their importance in maintaining ecological balance. By influencing the populations of various species, mosquitoes help ensure that no single species dominates the ecosystem, promoting biodiversity and stability.

Control and Prevention of Mosquitoes in Rural Areas

Effective control and prevention of mosquito populations are important for minimizing their impact on human health and comfort, particularly in rural areas where mosquitoes can thrive. A combination of environmental management, chemical control, biological control, physical barriers, and natural methods can significantly reduce mosquito populations and their associated risks.


Environmental Management

Environmental management is a key strategy in mosquito control, focusing on altering the habitat to make it less suitable for mosquito breeding.

Removing Standing Water: Mosquitoes require stagnant water to lay their eggs. Eliminating standing water around the home and community can drastically reduce mosquito breeding sites. This includes:

  • Draining: Emptying containers like buckets, barrels, and flower pots that collect water.
  • Covering: Using lids or screens to cover water storage containers.
  • Maintaining: Keeping gutters clean and ensuring that water flows freely.
  • Filling: Filling in low-lying areas and depressions where water can accumulate.

Proper Drainage: Ensuring proper drainage in areas prone to water accumulation is essential. This involves:

  • Ditch Maintenance: Regularly cleaning ditches and drains to prevent blockages.
  • Landscaping: Grading the land to facilitate the flow of water away from populated areas.
  • Rainwater Management: Installing rainwater harvesting systems to collect and store runoff for productive use.

Introduction of Natural Predators: Encouraging the presence of natural predators can help control mosquito populations. This includes:

  • Fish: Introducing mosquito-eating fish such as guppies or goldfish into ponds and water gardens.
  • Birds and Bats: Providing habitats that attract birds and bats, such as birdhouses and bat boxes, to encourage these natural predators to inhabit the area.

Natural Methods of Repelling Mosquitoes

Using natural methods to repel mosquitoes is an environmentally friendly approach that avoids the use of chemicals and insecticides. These methods can be highly effective, especially when combined with other mosquito control strategies.

Plant-Based Repellents: Certain plants have natural mosquito-repelling properties. Planting these around your home can help deter mosquitoes. Some effective plants include:

  • Citronella: The most well-known natural mosquito repellent, citronella grass can be planted in gardens or pots. The oil from citronella plants is also used in candles, sprays, and lotions.
  • Lavender: Lavender plants not only repel mosquitoes but also add a pleasant fragrance to your garden. The essential oil from lavender can be applied to the skin or used in diffusers.
  • Marigolds: Marigolds contain pyrethrum, a natural insect repellent. Planting marigolds around your garden or near entry points can help keep mosquitoes at bay.
  • Basil: This herb can be grown in pots or garden beds. Its strong aroma deters mosquitoes, and it can also be used in cooking.
  • Peppermint: Peppermint plants have a strong scent that mosquitoes dislike. The essential oil can also be used as a natural repellent.
  • Lemon Balm: Also known as horsemint, this plant repels mosquitoes and attracts pollinators like bees and butterflies.

Essential Oils: Essential oils derived from plants can be used to make natural mosquito repellents. These oils can be applied to the skin, diffused in the air, or used to make homemade sprays. Some effective essential oils include:

  • Eucalyptus Oil: Known for its strong scent, eucalyptus oil is a powerful mosquito repellent. It can be mixed with a carrier oil and applied to the skin or added to a diffuser.
  • Tea Tree Oil: This oil has antiseptic and anti-inflammatory properties and can repel mosquitoes effectively. It can be mixed with water to make a spray or added to lotions and creams.
  • Lemongrass Oil: Lemongrass oil contains citral, a natural mosquito repellent. It can be applied to the skin with a carrier oil or used in diffusers and candles.
  • Clove Oil: The strong scent of clove oil can deter mosquitoes. It can be used in diluted form as a spray or mixed with other oils for skin application.
  • Neem Oil: Neem oil has been used traditionally for its insect-repelling properties. It can be mixed with coconut oil and applied to the skin to repel mosquitoes.

Homemade Mosquito Repellents: Creating homemade mosquito repellents using natural ingredients is an effective and safe way to keep mosquitoes at bay. Here are some recipes:

  • Essential Oil Spray: Mix 10-20 drops of essential oil (such as lavender, eucalyptus, or peppermint) with 2 tablespoons of a carrier oil (like coconut or olive oil) and 2 tablespoons of witch hazel in a spray bottle. Fill the rest with water and shake well before use.
  • Vinegar and Essential Oil Spray: Combine equal parts apple cider vinegar and water in a spray bottle, and add 10-20 drops of essential oil. Shake well and spray on exposed skin and around living areas.
  • Herb Bundles: Create bundles of fresh or dried mosquito-repelling herbs such as rosemary, lavender, and sage. Hang these bundles around outdoor living areas or burn them to release their natural oils and scents.


How Mosquito Sprays Work to Deter Mosquitoes

Mosquito sprays are formulated to either repel mosquitoes or kill them. They contain active ingredients that affect mosquitoes in various ways, preventing them from landing on or biting humans. Here’s how they work:

Types of Mosquito Sprays

  1. Repellents:
    • Mechanism: Repellent sprays contain chemicals that create a barrier on the skin or in the air that mosquitoes find unpleasant. These chemicals interfere with the mosquitoes’ sensory receptors, making it difficult for them to detect the carbon dioxide and body odors that attract them to humans.
    • Common Active Ingredients:
      • DEET (N,N-diethyl-meta-toluamide): One of the most widely used and effective repellents, DEET confuses the mosquito’s olfactory receptors.
      • Picaridin (KBR 3023): A synthetic compound that mimics the natural compound piperine, found in black pepper, picaridin is effective and less irritating than DEET.
      • Oil of Lemon Eucalyptus (OLE) or PMD (para-menthane-3,8-diol): A natural repellent derived from the leaves of the lemon eucalyptus tree, it provides long-lasting protection similar to DEET.
      • IR3535 (Ethyl butylacetylaminopropionate): A synthetic repellent with a safety profile similar to DEET but less potent.
  2. Insecticides:
    • Mechanism: Insecticide sprays contain chemicals that kill mosquitoes on contact or after ingestion. These chemicals target the nervous system of the mosquito, leading to paralysis and death.
    • Common Active Ingredients:
      • Pyrethroids (e.g., Permethrin, Deltamethrin): Synthetic chemicals similar to the natural pyrethrins found in chrysanthemum flowers. They are widely used due to their effectiveness and quick action.
      • Organophosphates (e.g., Malathion): Chemicals that inhibit enzymes essential for nerve function in mosquitoes, leading to their death.
      • Carbamates (e.g., Carbaryl): Similar to organophosphates in their mode of action but generally less toxic to mammals.

What Makes a Mosquito Spray Effective

The effectiveness of a mosquito spray depends on several factors:

  1. Active Ingredient:
    • The choice of active ingredient plays a crucial role in determining the spray’s effectiveness. DEET, picaridin, and OLE are known for their high efficacy in repelling mosquitoes.
  2. Concentration of Active Ingredient:
    • Higher concentrations of active ingredients generally provide longer-lasting protection. For example, a higher percentage of DEET can offer protection for several hours compared to lower concentrations.
  3. Application Method:
    • Proper application of the spray is essential for effectiveness. Repellents should be applied evenly on all exposed skin, while insecticides should be sprayed on surfaces where mosquitoes rest or breed.
  4. Duration of Effectiveness:
    • The duration of protection varies by product and concentration. Some sprays may offer protection for a few hours, while others can last all day. Long-lasting products are more convenient and reduce the need for frequent reapplication.
  5. Environmental Conditions:
    • Weather conditions can affect the performance of mosquito sprays. High temperatures, sweating, and swimming can reduce the effectiveness of repellents, necessitating more frequent application.
  6. Mosquito Species:
    • Different mosquito species may respond differently to various active ingredients. A spray effective against one species might be less effective against another.
  7. User Preferences and Sensitivities:
    • The choice of mosquito spray can also depend on individual preferences and sensitivities. For example, some users may prefer natural repellents over synthetic ones due to concerns about chemical exposure.


Primary Species of Mosquitos

Mosquito Species Region Diseases Transmitted Preferred Habitat Appearance
Aedes aegypti Tropical and subtropical regions worldwide Dengue fever, Zika virus, Chikungunya, Yellow fever Urban and suburban areas, often near human habitation Small, dark with white lyre-shaped markings and white banded legs
Aedes albopictus Native to Southeast Asia; now found in Americas, Europe, Africa Dengue fever, Zika virus, Chikungunya Urban, suburban, and rural areas; containers with stagnant water Black with distinctive white stripes on legs and body
Anopheles gambiae Sub-Saharan Africa Malaria Freshwater habitats such as swamps, marshes, and puddles Slender, dark brown with paler markings on wings
Anopheles stephensi South Asia, Middle East Malaria Urban and peri-urban areas, often in clean water sources Brown with spotted wings and palps as long as the proboscis
Culex pipiens Temperate regions worldwide West Nile virus, Japanese encephalitis Polluted water sources such as drains, sewage, and stagnant water Brown with white bands across the abdomen
Culex quinquefasciatus Tropical and subtropical regions West Nile virus, Lymphatic filariasis Urban and suburban areas, polluted water, and septic tanks Brown with white markings and banded legs
Culex tarsalis Western North America West Nile virus, Western equine encephalitis Freshwater habitats such as marshes, ponds, and irrigation ditches Black with white bands on legs and a white band around the proboscis
Culex tritaeniorhynchus Asia Japanese encephalitis Rice paddies, freshwater swamps, and ponds Dark brown with distinctive white banding on legs
Mansonia spp. Tropical and subtropical regions Lymphatic filariasis Vegetation-rich aquatic habitats like swamps and lakes with floating vegetation Large, dark with speckled wings and distinctive scale patterns
Ochlerotatus (Aedes) sollicitans Eastern North America Eastern equine encephalitis Salt marshes, coastal areas, and brackish water habitats Medium-sized, brown with white bands on the proboscis and legs

Additional Details:

  • Aedes aegypti and Aedes albopictus are highly adaptable and have spread globally due to international trade and travel. They are known for their aggressive daytime biting behavior.
  • Anopheles gambiae is one of the most efficient vectors of malaria due to its strong preference for human blood and its ability to breed in diverse freshwater habitats.
  • Culex pipiens and Culex quinquefasciatus are prolific breeders in polluted waters and are known for their role in spreading diseases in urban environments.
  • Culex tarsalis is an important vector in agricultural areas where irrigation provides abundant breeding sites.
  • Mansonia species are unique in that their larvae and pupae attach to aquatic plants for oxygen, making them less susceptible to surface treatments.

Mosquito Species Most Common in the United States

Mosquito Species Region Diseases Transmitted Preferred Habitat Appearance
Aedes aegypti Southern United States Dengue fever, Zika virus, Chikungunya, Yellow fever Urban and suburban areas, often near human habitation Small, dark with white lyre-shaped markings and white banded legs
Aedes albopictus Widespread, especially in the Eastern and Southeastern United States Dengue fever, Zika virus, Chikungunya Urban, suburban, and rural areas; containers with stagnant water Black with distinctive white stripes on legs and body
Culex pipiens Northern United States West Nile virus, Japanese encephalitis Polluted water sources such as drains, sewage, and stagnant water Brown with white bands across the abdomen
Culex quinquefasciatus Southern United States West Nile virus, Lymphatic filariasis Urban and suburban areas, polluted water, and septic tanks Brown with white markings and banded legs
Culex tarsalis Western United States West Nile virus, Western equine encephalitis Freshwater habitats such as marshes, ponds, and irrigation ditches Black with white bands on legs and a white band around the proboscis
Anopheles quadrimaculatus Eastern United States Malaria (historically significant) Freshwater habitats such as marshes, ponds, and slow-moving streams Dark brown with four dark spots on the wings
Ochlerotatus sollicitans Eastern United States Eastern equine encephalitis Salt marshes, coastal areas, and brackish water habitats Medium-sized, brown with white bands on the proboscis and legs
Aedes vexans Throughout the United States West Nile virus (potential vector) Floodwater habitats such as temporary pools and marshes Brown with pale bands on the abdomen and legs
Psorophora columbiae Southern United States Potential vector of encephalitis viruses Floodwater habitats such as rice fields and temporary pools Large, dark with white scales and banded legs

Additional Details:

  • Aedes aegypti and Aedes albopictus are invasive species that have become well-established in the southern and eastern United States, respectively. They are known for their aggressive daytime biting behavior and ability to transmit several viral diseases.
  • Culex pipiens and Culex quinquefasciatus are common in urban areas and are major vectors for West Nile virus.
  • Culex tarsalis is primarily found in the western United States and is an important vector for encephalitis viruses.
  • Anopheles quadrimaculatus was historically a significant vector of malaria in the United States before the disease was eradicated from the country.
  • Ochlerotatus sollicitans and Aedes vexans are known for their aggressive biting and are found in a variety of habitats, from coastal areas to floodplains.

Mosquito Species Most Common in Canada

Mosquito Species Region Diseases Transmitted Preferred Habitat Appearance
Aedes vexans Throughout Canada West Nile virus (potential vector) Floodwater habitats such as temporary pools and marshes Brown with pale bands on the abdomen and legs
Culex pipiens Southern Canada West Nile virus, Japanese encephalitis Polluted water sources such as drains, sewage, and stagnant water Brown with white bands across the abdomen
Culex restuans Throughout Canada West Nile virus (potential vector) Polluted water, stagnant water, and artificial containers Brown with white bands on the abdomen
Culex tarsalis Western Canada West Nile virus, Western equine encephalitis Freshwater habitats such as marshes, ponds, and irrigation ditches Black with white bands on legs and a white band around the proboscis
Aedes canadensis Eastern and Central Canada La Crosse encephalitis (potential vector) Woodland pools, swamps, and marshes Dark with white scales and banding on legs
Aedes triseriatus Southern Canada La Crosse encephalitis Tree holes, containers, and artificial habitats Dark with silvery white scales and stripes on the thorax
Anopheles punctipennis Throughout Canada Malaria (historically significant) Freshwater habitats such as ponds, marshes, and slow-moving streams Dark brown with spotted wings
Anopheles quadrimaculatus Southern Canada Malaria (historically significant) Freshwater habitats such as marshes, ponds, and slow-moving streams Dark brown with four dark spots on the wings
Coquillettidia perturbans Throughout Canada Eastern equine encephalitis (potential vector) Marshes and wetlands with emergent vegetation Medium-sized, dark with speckled wings and banded legs
Ochlerotatus sollicitans Eastern Canada Eastern equine encephalitis Salt marshes, coastal areas, and brackish water habitats Medium-sized, brown with white bands on the proboscis and legs

Additional Details:

  • Aedes vexans is one of the most widespread and abundant mosquitoes in Canada, thriving in floodwater habitats and known for its aggressive biting behavior.
  • Culex pipiens and Culex restuans are common in urban areas and are significant vectors for West Nile virus.
  • Culex tarsalis is primarily found in western Canada and is an important vector for encephalitis viruses.
  • Aedes canadensis and Aedes triseriatus are woodland mosquitoes that can be found in forested areas and are potential vectors for La Crosse encephalitis.
  • Anopheles punctipennis and Anopheles quadrimaculatus were historically significant vectors of malaria before the disease was eradicated from Canada.
  • Coquillettidia perturbans is notable for its unique larval behavior of attaching to aquatic plants for oxygen, making it less susceptible to surface treatments.

Diseases Transmitted by Mosquitoes

Mosquitoes are not just a nuisance; they are also vectors for a variety of serious diseases that affect millions of people and animals worldwide. Understanding the diseases transmitted by mosquitoes is essential for implementing effective prevention and control measures. This section covers some of the most significant mosquito-borne diseases, their symptoms, and methods of prevention.

Malaria

Cause and Transmission: Malaria is caused by Plasmodium parasites, which are transmitted to humans through the bites of infected female Anopheles mosquitoes. There are five species of Plasmodium that can infect humans, with Plasmodium falciparum being the most deadly.

Symptoms: Malaria symptoms typically appear 10-15 days after being bitten and can include:

  • Fever and chills
  • Headache
  • Muscle pain and fatigue
  • Nausea and vomiting
  • Anemia and jaundice (due to the destruction of red blood cells)

If left untreated, malaria can cause severe complications such as cerebral malaria, organ failure, and death.

Prevention:

  • Use insecticide-treated bed nets (ITNs) to protect against mosquito bites during sleep.
  • Apply mosquito repellents containing DEET, picaridin, or oil of lemon eucalyptus.
  • Take antimalarial medications as prescribed when traveling to malaria-endemic areas.
  • Implement environmental management strategies to reduce mosquito breeding sites.

Dengue Fever

Cause and Transmission: Dengue fever is caused by the dengue virus, which is transmitted by Aedes mosquitoes, primarily Aedes aegypti and Aedes albopictus. Dengue is prevalent in tropical and subtropical regions worldwide.

Symptoms: Dengue fever symptoms typically appear 4-10 days after being bitten and can include:

  • High fever
  • Severe headache
  • Pain behind the eyes
  • Joint and muscle pain
  • Rash
  • Mild bleeding (such as nose or gum bleeding, or easy bruising)

Severe dengue, also known as dengue hemorrhagic fever, can cause severe bleeding, organ damage, and death.

Prevention:

  • Use mosquito repellents and wear protective clothing.
  • Ensure that windows and doors are fitted with screens to keep mosquitoes out.
  • Eliminate standing water around the home to reduce mosquito breeding sites.
  • Participate in community efforts to control mosquito populations.

Zika Virus

Cause and Transmission: The Zika virus is transmitted by Aedes mosquitoes, particularly Aedes aegypti. Zika virus outbreaks have occurred in Africa, the Americas, Asia, and the Pacific.

Symptoms: Zika virus symptoms typically appear 3-14 days after being bitten and can include:

  • Mild fever
  • Rash
  • Joint pain
  • Conjunctivitis (red eyes)
  • Muscle pain and headache

While Zika virus infection is usually mild, it can cause serious birth defects if a pregnant woman becomes infected. The most notable birth defect is microcephaly, a condition where a baby’s head is significantly smaller than expected.

Prevention:

  • Use mosquito repellents and wear long-sleeved shirts and long pants.
  • Stay in places with air conditioning or use window and door screens to keep mosquitoes outside.
  • Reduce mosquito breeding sites by emptying, cleaning, or covering containers that hold water.
  • Pregnant women should avoid traveling to areas with Zika virus outbreaks.

West Nile Virus

Cause and Transmission: West Nile virus is transmitted by Culex mosquitoes. It is found in Africa, Europe, the Middle East, North America, and West Asia.

Symptoms: Most people infected with West Nile virus do not develop symptoms. However, about 20% of infected people may experience:

  • Fever
  • Headache
  • Body aches
  • Joint pains
  • Vomiting and diarrhea
  • Rash

In rare cases, severe illness can occur, affecting the central nervous system and causing encephalitis or meningitis, which can be life-threatening.

Prevention:

  • Use insect repellents containing DEET, picaridin, or IR3535.
  • Wear long sleeves, long pants, and socks to reduce skin exposure.
  • Ensure that windows and doors are screened to prevent mosquitoes from entering.
  • Eliminate standing water around the home to reduce mosquito breeding habitats.

Yellow Fever

Cause and Transmission: Yellow fever is caused by the yellow fever virus, which is transmitted by Aedes or Haemagogus mosquitoes. It is endemic in tropical areas of Africa and Central and South America.

Symptoms: Yellow fever symptoms typically appear 3-6 days after being bitten and can include:

  • Fever
  • Chills
  • Severe headache
  • Back pain
  • General body aches
  • Nausea and vomiting
  • Fatigue and weakness

In severe cases, yellow fever can cause jaundice (yellowing of the skin and eyes), bleeding, organ failure, and death.

Prevention:

  • Get vaccinated against yellow fever if traveling to or living in areas where the disease is endemic.
  • Use mosquito repellents and wear protective clothing.
  • Stay in accommodations with screened windows and doors.
  • Participate in public health initiatives to control mosquito populations.

Chikungunya

Cause and Transmission: Chikungunya is caused by the chikungunya virus, which is transmitted by Aedes mosquitoes, primarily Aedes aegypti and Aedes albopictus. It is found in Africa, Asia, Europe, and the Americas.

Symptoms: Chikungunya symptoms typically appear 3-7 days after being bitten and can include:

  • High fever
  • Severe joint pain, often in the hands and feet
  • Headache
  • Muscle pain
  • Rash
  • Joint swelling

The joint pain can be debilitating and may last for weeks or months.

Prevention:

  • Use mosquito repellents and wear long-sleeved shirts and long pants.
  • Ensure that windows and doors have screens to keep mosquitoes out.
  • Reduce mosquito breeding sites by emptying containers that hold water.
  • Support community-wide efforts to control mosquito populations.

Japanese Encephalitis

Cause and Transmission: Japanese encephalitis is caused by the Japanese encephalitis virus, which is transmitted by Culex mosquitoes. It is found in rural and agricultural areas of Asia and the Western Pacific.

Symptoms: Most people infected with Japanese encephalitis do not develop symptoms. However, severe cases can occur, leading to:

  • High fever
  • Headache
  • Neck stiffness
  • Disorientation
  • Seizures
  • Coma

Severe cases can result in permanent neurological damage or death.

Prevention:

  • Get vaccinated against Japanese encephalitis if traveling to or living in endemic areas.
  • Use insect repellents and wear protective clothing.
  • Stay in accommodations with air conditioning or screens on windows and doors.
  • Participate in efforts to reduce mosquito breeding sites, particularly in agricultural areas.

Additional Reading

https://www.nih.gov/news-events/nih-research-matters/how-mosquitoes-distinguish-people-animals


The Difference Between Determinate and Indeterminate potatoes

Many homesteaders and gardeners don’t give a lot of thought to the growth cycle of potatoes and their harvesting times.   Yes most of us know that there are numerous varieties of potatoes such Yukon Gold or Kennebec – but few are aware that these are both classified separately from each other in what is called ” determinate ” and ” Indeterminate ” potatoes.

The difference between determinate and indeterminate potatoes lies primarily in their growth patterns and harvesting schedules which will have an impact on your harvest size and annual success.

Let’s look closer at the two types then.

Determinate potatoes, also known as “early” potatoes, grow in a compact manner and produce all their tubers at once. Here are some popular determinate potato varieties:

  • Yukon Gold – Known for its yellow flesh and smooth skin, great for boiling and mashing.
  • Red Pontiac – Has deep red skin and white flesh, excellent for roasting and boiling.
  • Norland – Typically has red skin with white flesh, good for early harvest.
  • Irish Cobbler – An early variety, known for its distinct flavor, good for boiling and baking.

These varieties are generally preferred for smaller gardens or where uniform harvest is desired, as they allow for a single, complete harvest.

  • Harvest Time: Determinate potatoes, often called “early” potatoes, produce all their tubers at once. This means that they have a single, concentrated harvest period.
  • Growth Habit: They generally have a more compact growth habit, which makes them ideal for smaller spaces or for growing in containers.  These varieties are typically harvested earlier in the season.

Indeterminate Potatoes:

Indeterminate potatoes, also known as “late” potatoes, grow and produce tubers continuously throughout the growing season. Here are some popular indeterminate potato varieties:

  • Russet Burbank – A classic variety known for its large, starchy tubers perfect for baking and frying.
  • Kennebec – Versatile for cooking and resistant to some diseases; great for frying and mashing.
  • Butte – Known for its russeted skin and excellent storage qualities.
  • Desiree – Features red skin and yellow flesh, good for boiling and making potato salads.
  • Pontiac – Deep red skin with white flesh, good for most cooking methods.

These varieties are suitable for longer growing seasons as they can be harvested at different times depending on the size and maturity of the potatoes desired.

  • Harvest Time: Indeterminate potatoes, or “late” potatoes, produce tubers continuously throughout the growing season. This allows for staggered harvesting, where you can selectively harvest mature tubers while allowing smaller ones to continue growing.
  • Growth Habit: They tend to have a more sprawling growth pattern and can benefit from being “hilled” (piling soil around the stem as they grow) to encourage more tuber production along the buried stem.  These are often harvested later in the season and are suitable for various culinary uses.

A Complete List of Determinate and Indeterminate Varieties of Potatoes

Potato Variety Type (Determinate/Indeterminate) Time to Harvest
Adirondack Blue Indeterminate 90-110 days
Adirondack Red Indeterminate 90-110 days
All Blue Indeterminate 90-110 days
All Red Determinate 70-90 days
Alturas Indeterminate 90-110 days
Bintje Indeterminate 100-120 days
Burbank Russet Indeterminate 90-110 days
Butte Indeterminate 120-135 days
Cal White Determinate 90-110 days
Caribe Determinate 70-90 days
Carola Indeterminate 90-110 days
Chieftain Determinate 80-100 days
Desiree Indeterminate 90-110 days
Elba Determinate 80-100 days
Fingerling (various) Indeterminate 90-110 days
French Fingerling Indeterminate 90-110 days
German Butterball Indeterminate 110-135 days
Goldrush Indeterminate 90-110 days
Huckleberry Gold Indeterminate 90-110 days
Katahdin Determinate 80-100 days
Kennebec Indeterminate 80-100 days
Kerr’s Pink Determinate 80-100 days
King Edward Indeterminate 90-110 days
Kipfler Indeterminate 90-110 days
La Ratte Indeterminate 90-110 days
Lady Christl Determinate 70-90 days
Marcy Determinate 70-90 days
Maris Piper Indeterminate 90-110 days
Nicola Determinate 90-110 days
Norland Red Determinate 70-90 days
Onaway Determinate 70-90 days
Orla Determinate 70-90 days
Pontiac Indeterminate 80-100 days
Purple Majesty Indeterminate 90-110 days
Ranger Russet Indeterminate 90-110 days
Red Bliss Determinate 70-90 days
Red Gold Determinate 70-90 days
Red Pontiac Determinate 70-90 days
Russet Burbank Indeterminate 90-110 days
Shepody Indeterminate 80-100 days
Sierra Gold Indeterminate 90-110 days
Superior Determinate 70-90 days
Swedish Peanut Indeterminate 90-110 days
Upstate Abundance Determinate 70-90 days
Vivaldi Indeterminate 90-110 days
Yukon Gem Indeterminate 90-110 days
Yukon Gold Determinate 70-90 days
Yukon Verna Determinate 70-90 days
Yukon Viking Indeterminate 90-110 days
Zebra Chip Indeterminate 90-110 days


Understanding Deer Behavior Patterns

Deer, as members of the Cervidae family, are among the most iconic and extensively studied mammals globally. Their elegant presence in natural settings symbolizes the beauty of wilderness, yet comprehending their behaviors and ecological roles is vital for effective wildlife management and reducing human-wildlife conflicts. This article explores the complex lives of deer, focusing on their mating cycles, diet, travel habits, and territorial behaviors.

Deer Mating Cycles

Deer mating cycles, commonly referred to as the rut, are intricately linked to seasonal changes. The timing of the rut varies among species and regions but typically occurs in the fall.

White-Tailed Deer: The rut for white-tailed deer peaks in November. During this period, bucks (male deer) exhibit heightened activity, seeking out does (female deer) for mating. This time is marked by increased aggression among bucks, who compete for mating opportunities through displays of dominance and physical confrontations. The rut can last from late October to early December, with most does being receptive for about 24 to 48 hours during this period.

Elk and Red Deer: The rut for elk and red deer occurs slightly earlier, from mid-September to mid-October. Bulls (male elk and red deer) engage in vocal displays and bugling to attract females and assert dominance over other males. These vocalizations can be heard over long distances and serve to establish territory and breeding rights.

Moose: Moose experience a rut from late September to early October. Bull moose engage in vocalizations and physical displays, such as antler wrestling, to attract cows (female moose). The competition can be intense, with larger bulls generally dominating breeding opportunities.

During the rut, deer exhibit behaviors driven by the need to reproduce. Bucks increase their movements, often covering large areas to find receptive does, making them more visible and sometimes more vulnerable to predators and hunters.

Deer Mating and Young

After the rut, the focus shifts to the birth and care of the young.

Gestation and Birth: The gestation period for most deer species is around 200 to 250 days. For instance, white-tailed deer have a gestation period of approximately 200 days, leading to the birth of fawns in late spring or early summer. This timing ensures that the young are born when food is abundant, increasing their chances of survival.

Fawns: At birth, fawns are typically spotted, which provides camouflage against predators. They are born relatively precocial, meaning they are able to stand and walk shortly after birth. For the first few weeks, fawns remain hidden in vegetation while their mothers forage nearby. Does return frequently to nurse their young, who rely on their mother’s milk for nutrition during the early stages of life.

Weaning and Independence: Fawns are weaned at around two to three months of age. By this time, they begin to accompany their mothers and learn to forage for solid food. As they grow, their spots fade, and they start to develop the behavior and skills necessary for survival.

Parental Care: Does are highly protective of their young, using various strategies to avoid predation. They often lead predators away from their hiding fawns by diverting attention to themselves. The bond between mother and fawn remains strong until the next breeding season, when the cycle begins anew.

Deer Eating Habits and Diet

Deer are herbivores with a diet that varies seasonally and geographically. Their foraging habits are influenced by the availability of food sources, affecting their health and population dynamics.

Spring and Summer: In the warmer months, deer have access to abundant fresh vegetation. Their diet primarily includes:

  • Forbs: Broad-leaved herbaceous plants like clover, chicory, and dandelions are a staple.
  • Grasses: Although not a primary food source, grasses provide nutritional value, especially for species like the white-tailed deer.
  • Leaves and Shoots: Deer browse on leaves, shoots, and stems of shrubs and trees, favoring species such as maples, aspens, and willows.
  • Agricultural Crops: Near farmlands, deer often feed on crops like corn, soybeans, and alfalfa, leading to conflicts with farmers.

Fall: As seasons change, deer adjust their diet to prepare for winter, including:

  • Acorns and Nuts: Mast, such as acorns from oak trees, becomes crucial for building fat reserves.
  • Fruits: Fallen fruits like apples and persimmons are readily consumed.
  • Hardwood Browse: Deer shift to woody browse as soft vegetation becomes scarce.

Winter: During harsh winters, food is scarce, and deer rely on more resilient sources:

  • Woody Browse: Twigs, bark, and buds of trees and shrubs, including dogwood, sumac, and cedar, become primary food sources.
  • Evergreen Plants: Evergreen plants like hemlocks and pines provide sustenance when other options are limited.

Deer are adaptable foragers, switching diets based on seasonal availability, which is key to their survival. However, this adaptability can lead to conflicts with human activities, particularly agriculture and horticulture.

Deer Travel Habits

Deer are known for extensive travel habits, driven by factors such as food availability, mating, and seasonal changes.

Daily Movement: Deer are crepuscular, being most active during dawn and dusk. Their daily movements are influenced by the need for food, water, and shelter, traveling several miles a day depending on habitat and environmental conditions.

Seasonal Migration: In some regions, deer undertake seasonal migrations between summer and winter ranges. For example:

  • Mule Deer: In the western United States, mule deer migrate up to 50 miles from high-elevation summer ranges to lower-elevation winter ranges.
  • Elk: Elk migrate between higher elevations in the summer for lush meadows and cooler temperatures, and lower elevations in winter for more accessible food.

Territoriality: While not strictly territorial, deer exhibit some territorial behaviors, especially during the breeding season. Bucks establish home ranges that overlap with several does. These ranges can vary from a few hundred acres to several square miles, depending on species and habitat quality.

Travel Corridors: Deer utilize well-established travel corridors dictated by terrain features such as ridges, valleys, and river bottoms, providing safe passage between feeding and bedding areas.

Understanding deer travel habits is essential for managing their populations and minimizing human-wildlife conflicts. Effective management strategies include creating wildlife corridors and preserving critical habitats to ensure deer access to necessary resources.

Territory

Deer establish and maintain territories providing essential resources for survival, including food, water, and shelter. The size and characteristics of these territories vary widely among species and are influenced by environmental factors.

Home Range: A deer’s home range includes core areas for food and shelter and peripheral areas used less frequently. Home ranges are dynamic, changing seasonally as deer adjust to resource availability.

Bedding Areas: Within their home range, deer have specific bedding areas for resting and ruminating, typically located in dense cover for protection from predators and harsh weather. Bedding sites are often reused, although deer may change locations based on environmental conditions and disturbance.

Feeding Areas: Deer select feeding areas based on forage availability and quality, including open meadows, agricultural fields, and forest edges. During the growing season, deer feed in areas with abundant vegetation, while in winter, they rely more on woody browse.

Social Structure: Deer social structure influences territorial behavior. Female deer (does) live in family groups of related individuals, maintaining overlapping home ranges. Bucks are more solitary outside the breeding season, with young bucks forming bachelor groups that disband as the rut approaches.

Marking Territory: During the breeding season, bucks establish dominance and attract does through behaviors such as:

  • Rubbing: Bucks rub their antlers against trees to remove velvet, mark territory, and strengthen neck muscles, with rubs serving as visual and scent markers.
  • Scraping: Bucks create scrapes by pawing the ground and urinating in the cleared area, serving as communication hubs for scent signals.
  • Vocalizations: Bucks use vocalizations, like grunts and snorts, to assert dominance and communicate with mates and rivals.

Displacement: Territorial disputes can lead to displacement, with bucks being forced out of prime territories by more dominant individuals, influencing movement patterns and increasing human interactions as they seek new habitats.

Human-Wildlife Conflict

Interactions between deer and human activities often lead to conflicts, particularly where urbanization and agriculture encroach on natural habitats.

Agricultural Damage: Deer can cause significant crop damage, leading to economic losses for farmers. Strategies to mitigate this include fencing, repellents, and regulated hunting.

Vehicle Collisions: Deer-vehicle collisions are a major concern, especially during the fall rut. These accidents can result in injury or death for both deer and humans, as well as property damage. Measures to reduce collisions include road signage, wildlife crossings, and speed management in high-risk areas.

Garden and Landscape Damage: In suburban and rural areas, deer browse on ornamental plants and gardens, frustrating homeowners. Strategies to protect gardens include using deer-resistant plants, fencing, and repellents.

Lyme Disease: Deer are hosts for ticks carrying Lyme disease, a concern in many areas of North America and Europe. Managing deer populations and reducing tick habitat near human dwellings are crucial for minimizing Lyme disease transmission.

Conservation and Management

Effective deer management requires balancing deer population conservation with mitigating the impacts of overabundance. Wildlife agencies use various strategies to achieve this balance.

Population Monitoring: Regular surveys and population assessments estimate deer numbers and assess their health and ecosystem impact, informing management decisions and hunting quotas.

Regulated Hunting: Hunting is a primary tool for managing deer populations. Adjusting hunting regulations helps control deer numbers, preventing overpopulation and reducing conflicts. Hunting seasons are timed to align with deer biology and conservation goals.

Habitat Management: Preserving and enhancing deer habitat is crucial for healthy populations. This involves managing forests and grasslands for diverse food sources and cover, creating wildlife corridors, and protecting critical habitats.

Community Involvement: Engaging local communities in deer management efforts is essential. Public education campaigns, stakeholder meetings, and community-based initiatives build support for management practices and foster human-deer coexistence.


7 Natural Homemade Fertilizers for Your Garden

Any gardener knows that fertilizers are important to maximize growth, but for those concerned about what’s in consumer fertilizers, there are numerous methods for creating your own fertilizer that will equal if not out perform products like Miracle Grow and other chemical laced products.

Natural liquid fertilizers are nutrient-rich solutions made from organic materials that can be easily absorbed by plants. These fertilizers often use common household and garden waste products, making them cost-effective and environmentally friendly alternatives to chemical fertilizers.

Why Make Your Own Natural Liquid Fertilizers

Sustainability: Natural liquid fertilizers are a cornerstone of sustainable gardening. By repurposing organic waste materials, such as kitchen scraps and garden clippings, these fertilizers minimize reliance on synthetic chemicals. This reduction in synthetic input decreases the carbon footprint of your garden and helps preserve natural ecosystems by reducing chemical runoff and soil degradation. Incorporating natural liquid fertilizers into your gardening routine supports a closed-loop system that benefits both your plants and the environment.

Nutrient-Rich: These fertilizers are packed with essential macronutrients and micronutrients. They provide nitrogen, phosphorus, and potassium in balanced proportions, ensuring comprehensive nutrition for your plants. Additionally, they supply trace elements like calcium, magnesium, and iron, which are important for various plant physiological functions. This rich nutrient profile promotes vigorous growth, enhances flowering and fruiting, and strengthens plants’ resistance to diseases and pests.

Easy Absorption: The liquid form of these fertilizers allows for rapid absorption and assimilation by plants. Unlike granular or solid fertilizers, which need to break down in the soil, liquid fertilizers deliver nutrients directly to the plant roots and foliage. This immediate availability accelerates nutrient uptake, leading to quicker visible results such as greener foliage, stronger stems, and more abundant blooms. This efficiency makes natural liquid fertilizers an excellent choice for both foliar feeding and soil drenching.

Soil Health: Beyond nourishing plants, natural liquid fertilizers improve soil health. They enhance soil structure by increasing its organic matter content, which improves aeration, water retention, and root penetration. Moreover, these fertilizers foster a healthy soil microbiome by providing food for beneficial microorganisms. These microbes, in turn, decompose organic matter, release nutrients, and form symbiotic relationships with plant roots. The result is a dynamic and fertile soil environment that supports long-term garden productivity and resilience.

Common Types of Natural Liquid Fertilizers

  1. Seaweed Fertilizer: Seaweed or kelp provides a broad spectrum of nutrients and growth hormones that enhance plant vigor and stress resistance. Seaweed fertilizer is especially beneficial during the early stages of plant growth and for helping plants recover from transplant shock​ (Misfit Gardening)​.
  2. Manure Tea: Aged manure from herbivores like cows, horses, and chickens steeped in water creates a nutrient-dense fertilizer high in nitrogen and other essential nutrients. Manure tea is excellent for heavy-feeding plants like corn and tomatoes during their vegetative growth stage​ (Epic Gardening)​.
  3. Banana Peel Fertilizer: Soaking banana peels in water releases potassium and other micronutrients beneficial for plant growth. This fertilizer is ideal during the flowering and fruiting stages of plants like tomatoes, peppers, and cucumbers​ (Misfit Gardening)​.
  4. Grass Clippings Tea: Fresh grass clippings are rich in nitrogen, making them perfect for leafy green vegetables. Steeping grass clippings in water creates a liquid fertilizer that boosts foliage growth early in the growing season​ (Misfit Gardening)​.
  5. Fish Emulsion: Made from fish waste, fish emulsion is high in nitrogen and other nutrients. It is excellent for all-purpose fertilizing and can be particularly beneficial for seedlings and young plants to support robust early growth​ (Epic Gardening)​.
  6. Coffee Ground Fertilizer:
    • Ingredients: Used coffee grounds, water.
    • Instructions: Mix used coffee grounds with water and let sit for a few days. Strain and use the liquid as a nitrogen-rich feed for acid-loving plants like blueberries and roses​ (Epic Gardening)​.
  7. Molasses Fertilizer:
    • Ingredients: Molasses, water.
    • Instructions: Dissolve 1-2 tablespoons of molasses in a gallon of water. Use this mixture to feed plants, providing them with a quick source of energy and boosting beneficial microbial activity in the soil​ (Epic Gardening)​.

DIY Methods for Making Natural Liquid Fertilizers

  1. Seaweed Fertilizer:
    • Ingredients: Fresh or dried seaweed, water.
    • Instructions: Rinse seaweed to remove salt, then soak in a bucket of water for 2-3 weeks. Strain and dilute 1 part seaweed solution to 5 parts water​ (Misfit Gardening)​.
  2. Manure Tea:
    • Ingredients: Aged manure, water, mesh bag.
    • Instructions: Place manure in a mesh bag and submerge in water for 4-8 weeks. Stir occasionally. Strain and dilute 1 part manure tea to 10 parts water before applying​ (Epic Gardening)​.
  3. Banana Peel Fertilizer:
    • Ingredients: Banana peels, water.
    • Instructions: Place chopped banana peels in a jar, fill with water, and let sit for 1-2 weeks. Use the liquid as a nutrient-rich feed diluted at a 1:5 ratio​ (Misfit Gardening)​.
  4. Grass Clippings Tea:
    • Ingredients: Fresh grass clippings, water.
    • Instructions: Fill a bucket with fresh grass clippings and cover with water. Let it steep for 1-2 weeks. Strain and dilute at a 1:10 ratio before use​ (Misfit Gardening)​.
  5. Fish Emulsion:
    • Ingredients: Fish scraps, water.
    • Instructions: Place fish scraps in a container, cover with water, and let sit for 2-3 weeks. Stir occasionally. Strain and dilute 1 part fish emulsion to 5 parts water​ (Epic Gardening)​.
  6. Coffee Ground Fertilizer:
    • Ingredients: Used coffee grounds, water.
    • Instructions: Mix used coffee grounds with water and let sit for a few days. Strain and use the liquid as a nitrogen-rich feed for acid-loving plants like blueberries and roses​ (Epic Gardening)​.
  7. Molasses Fertilizer:
    • Ingredients: Molasses, water.
    • Instructions: Dissolve 1-2 tablespoons of molasses in a gallon of water. Use this mixture to feed plants, providing them with a quick source of energy and boosting beneficial microbial activity in the soil​ (Epic Gardening)​.

Best Practices for Application

  1. Dilution: Always dilute concentrated fertilizers to prevent root burn and ensure even distribution. A common dilution ratio is 1 part fertilizer to 10-15 parts water.
  2. Timing: Apply liquid fertilizers during the early morning or late evening to reduce evaporation and maximize absorption.
  3. Frequency: Depending on the type and plant needs, apply natural liquid fertilizers every 1-2 weeks.
  4. Life Cycle Stage: Tailor the fertilizer to the plant’s growth stage. For example, use nitrogen-rich fertilizers like grass clippings tea during vegetative growth and potassium-rich fertilizers like banana peel fertilizer during flowering and fruiting stages.
  5. Storage: Store prepared liquid fertilizers in a cool, dark place. Use within a few weeks to prevent fermentation and loss of nutrient potency.