Attracting Bats to Your Homestead
Bats are often misunderstood and overlooked creatures, yet they offer many benefits to homesteaders, cabin owners and farms. Unfortunately there are many misconceptions about bats including the beliefs that they are blind, prone to getting tangled in hair, or commonly carry diseases – not to mention Hollywood’s role in portraying them as blood sucking vampires.
In reality though , bats are vital components of healthy ecosystems and provide numerous benefits. From effective insect control to pollination and seed dispersal, bats play a crucial role in maintaining a balanced and healthy environment. This article explores the various benefits bats provide, practical steps for attracting and maintaining a bat-friendly environment on your property, plans for a bat simple bat house construction that you can do in a few hours, and insights into their migration and mating cycles.
Understanding these aspects will help you harness the full range of benefits that bats can offer to your homestead.
Why are Bats Valuable for Insect Control on a Homestead?
Bats are nocturnal insectivores, meaning they feed on insects during the night. Their diet includes a variety of pests that can damage crops and gardens, such as mosquitoes, beetles, moths, and flies. A single bat can consume up to 500 t0 1,200 insects in an hour, drastically reducing the insect population in a given area. As a method for mosquito control, an adult bat can eat an astounding number of mosquitoes in a single night. Depending on the species and the availability of mosquitoes, a bat can consume between 1,000 to 3,000 mosquitoes per night.
The impact of bats on pest populations is particularly valuable for homesteaders seeking organic and sustainable pest control methods. By reducing the number of pests, bats minimize the need for chemical pesticides, which can harm the environment and non-target species. This natural form of pest control promotes a healthier ecosystem, benefiting both the plants and animals on your homestead.
Beyond insect control, bats contribute to the environment in several other ways:
Pollination of Night-Blooming Plants: Certain bat species are vital pollinators for a variety of plants, including those that bloom at night. This is particularly important for crops such as agave and various fruit trees, which rely on bats for pollination. By facilitating the pollination process, bats help ensure the production of fruits and seeds, which are essential for plant reproduction and agricultural yield.
Seed Dispersal and Forest Regeneration: Bats play a crucial role in seed dispersal, especially in tropical and subtropical regions. By spreading seeds over large areas, bats help in forest regeneration and maintaining biodiversity. This natural reforestation process supports the health of entire ecosystems, promoting the growth of diverse plant species that provide habitat and food for other wildlife.
Biodiversity Indicators: Bats are considered bioindicators, meaning their presence and health can reflect the overall health of the environment. A healthy bat population suggests a balanced and thriving ecosystem, which is beneficial for all forms of life on your homestead. Monitoring bat populations can provide valuable insights into environmental changes and the effectiveness of conservation efforts.
What Types of Bats are Most Beneficial for Homesteaders ?
In the USA and Canada, several bat species are particularly beneficial for homesteaders due to their insect-eating habits and ecological roles. Understanding these species can help you attract the right types of bats to your property, maximizing their benefits.
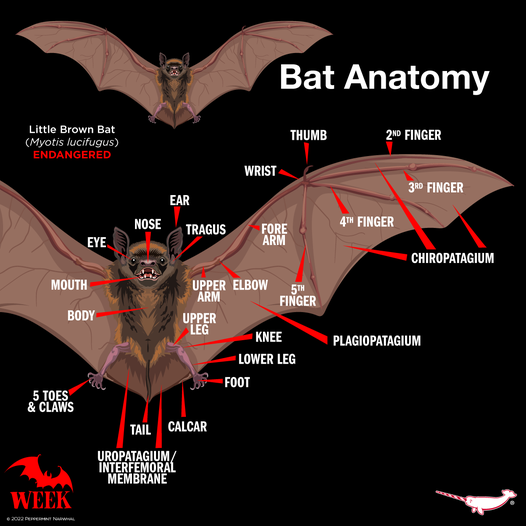
Little Brown Bat (Myotis lucifugus):
- Description: One of the most common bat species in North America, the Little Brown Bat is small, with a wingspan of 8-11 inches and a body length of about 3-4 inches. It has glossy brown fur and a relatively long life span of up to 10 years.
- Habitat: Prefers roosting in buildings, bat houses, and tree cavities. They are often found near water sources like lakes and rivers.
- Diet: Primarily feeds on insects such as mosquitoes, moths, beetles, and flies, consuming up to 50% of its body weight in insects each night.
Big Brown Bat (Eptesicus fuscus):
- Description: Larger than the Little Brown Bat, with a wingspan of 12-16 inches and a body length of about 4-5 inches. It has dark brown fur and a robust build.
- Habitat: Adaptable to various environments, including urban areas. Commonly roosts in buildings, under bridges, and in bat houses.
- Diet: Feeds on larger insects such as beetles, moths, and wasps, making it an effective pest controller for gardens and agricultural areas.
Eastern Red Bat (Lasiurus borealis):
- Description: Known for its striking reddish-orange fur, the Eastern Red Bat has a wingspan of 11-13 inches and a body length of about 3.5-4.5 inches.
- Habitat: Prefers forested areas and is often found roosting in tree foliage. It is a solitary bat, unlike many other species that form colonies.
- Diet: Eats a variety of insects, including moths, beetles, and flies. It is an agile flier, capable of catching insects mid-air.
Hoary Bat (Lasiurus cinereus):
- Description: The Hoary Bat is one of the largest bats in North America, with a wingspan of 14-16 inches and a body length of about 5-6 inches. It has distinctive frosted, dark brown fur.
- Habitat: Prefers roosting in tree foliage, often in dense forests. It is a migratory species, traveling long distances between summer and winter habitats.
- Diet: Feeds on large insects such as moths, beetles, and dragonflies. Its powerful flight enables it to cover large areas while foraging.
Mexican Free-Tailed Bat (Tadarida brasiliensis):
- Description: Recognizable by its long, narrow wings and tail that extends beyond the tail membrane. It has a wingspan of 11-14 inches and a body length of about 3.5 inches.
- Habitat: Roosts in large colonies in caves, under bridges, and in buildings. It is found in the southern United States and migrates to Mexico for the winter.
- Diet: Consumes a wide variety of flying insects, including moths, beetles, and flies. It is known for its high-speed flight, reaching speeds of over 60 mph.
Pallid Bat (Antrozous pallidus):
- Description: A medium-sized bat with a wingspan of 14-16 inches and a body length of about 4-5 inches. It has pale, sandy-colored fur.
- Habitat: Found in arid and semi-arid regions, often roosting in rock crevices, caves, and buildings. It is known for its ability to walk on the ground.
- Diet: Prefers ground-dwelling insects and arthropods such as beetles, crickets, and scorpions. It is also known to eat small vertebrates like lizards and mice.
Silver-Haired Bat (Lasionycteris noctivagans):
- Description: A medium-sized bat with a wingspan of 10-12 inches and a body length of about 3.5-4 inches. It has black fur with silver-tipped hairs, giving it a frosted appearance.
- Habitat: Prefers forested areas and often roosts in tree cavities or under loose bark. It is found across much of North America.
- Diet: Feeds on a variety of insects, including moths, flies, and beetles, making it a valuable pest controller.
Tricolored Bat (Perimyotis subflavus):
- Description: One of the smallest bats in North America, with a wingspan of 8-10 inches and a body length of about 3-3.5 inches. It has distinctively tricolored fur (dark at the base, yellowish in the middle, and dark at the tips).
- Habitat: Found in a variety of habitats, including forests and near water bodies. It often roosts in foliage and tree cavities.
- Diet: Feeds on small insects such as flies, moths, and beetles, contributing to insect control.
Townsend’s Big-Eared Bat (Corynorhinus townsendii):
- Description: Recognized by its large ears, this bat has a wingspan of 12-14 inches and a body length of about 3.5-4 inches. It has brown fur and a distinctive facial appearance.
- Habitat: Prefers roosting in caves, abandoned mines, and buildings. It is sensitive to disturbance and often found in protected areas.
- Diet: Feeds primarily on moths, but also consumes other insects. It is an important species for controlling nocturnal insect populations.
Table of Beneficial Bat Species
| Bat Species | Wingspan | Body Length | Fur Color | Habitat | Diet | Region |
|---|---|---|---|---|---|---|
| Little Brown Bat (Myotis lucifugus) | 8-11 inches | 3-4 inches | Glossy brown | Buildings, bat houses, tree cavities, near water sources | Mosquitoes, moths, beetles, flies | Throughout North America |
| Big Brown Bat (Eptesicus fuscus) | 12-16 inches | 4-5 inches | Dark brown | Buildings, under bridges, bat houses | Beetles, moths, wasps | Throughout North America |
| Eastern Red Bat (Lasiurus borealis) | 11-13 inches | 3.5-4.5 inches | Reddish-orange | Forested areas, tree foliage | Moths, beetles, flies | Eastern and Central North America |
| Hoary Bat (Lasiurus cinereus) | 14-16 inches | 5-6 inches | Frosted dark brown | Tree foliage, dense forests | Moths, beetles, dragonflies | Throughout North America |
| Mexican Free-Tailed Bat (Tadarida brasiliensis) | 11-14 inches | 3.5 inches | Dark brown | Caves, under bridges, buildings | Moths, beetles, flies | Southern United States, migrates to Mexico |
| Pallid Bat (Antrozous pallidus) | 14-16 inches | 4-5 inches | Pale sandy | Rock crevices, caves, buildings | Beetles, crickets, scorpions, small vertebrates | Western North America |
| Silver-Haired Bat (Lasionycteris noctivagans) | 10-12 inches | 3.5-4 inches | Black with silver tips | Forested areas, tree cavities | Moths, flies, beetles | Throughout North America |
| Tricolored Bat (Perimyotis subflavus) | 8-10 inches | 3-3.5 inches | Tricolored (dark, yellowish, dark) | Forests, near water bodies, foliage, tree cavities | Flies, moths, beetles | Eastern and Central North America |
| Townsend’s Big-Eared Bat (Corynorhinus townsendii) | 12-14 inches | 3.5-4 inches | Brown | Caves, abandoned mines, buildings | Moths, various insects | Western and Southwestern North America |
Bat Houses: Attracting Bats to Your Homestead Yard
Bat houses are specially designed structures that provide bats with safe, secure roosting sites. These artificial roosts can significantly enhance the appeal of your homestead yard to bats, offering them a place to rest, breed, and rear their young. This section explores the benefits of installing bat houses, how they help attract bats, and best practices for their placement and maintenance.
Benefits of Bat Houses Bat houses offer numerous benefits, both for bats and for homesteaders. Here are some of the key advantages:
- Safe Roosting Sites: Bat houses provide a safe and secure environment for bats to roost, free from predators and human disturbances.
- Support for Maternity Colonies: Female bats seek out safe, warm, and stable roosting sites to give birth and rear their pups. Bat houses can serve as ideal maternity roosts, supporting the next generation of bats.
- Increased Bat Populations: By providing additional roosting sites, bat houses can help increase the local bat population, enhancing their natural pest control benefits.
- Educational Opportunities: Installing bat houses can provide educational opportunities for observing bats and learning about their behavior and ecological roles.
How Bat Houses Attract Bats Bats are attracted to roosting sites that meet their specific needs for safety, warmth, and proximity to food and water sources. Here are some ways bat houses help attract bats to your homestead yard:
- Mimicking Natural Roosts: Bat houses are designed to mimic the characteristics of natural roosts, such as tree cavities, under loose bark, or within caves. They provide the crevices and spaces bats seek for shelter.
- Protection from Predators: Elevated bat houses protect bats from ground-based predators like cats, raccoons, and snakes. The enclosed structure also keeps birds and other potential predators at bay.
- Temperature Regulation: Bat houses are built to retain heat, providing a warm environment that is especially important for maternity colonies. Bats prefer roosts that maintain temperatures between 80-100°F.
- Proximity to Food and Water: Placing bat houses near water sources, such as ponds or streams, and in areas rich in insect life, makes them more attractive to bats looking for convenient access to food and hydration.
Best Practices for Installing Bat Houses To maximize the effectiveness of bat houses and attract bats to your homestead yard, follow these best practices for installation and maintenance:
Placement:
- Height: Install bat houses at least 15-20 feet off the ground to keep them out of reach of predators and provide a suitable environment for roosting.
- Sunlight Exposure: Place bat houses in areas that receive plenty of sunlight, ideally 6-8 hours per day. South or southeast-facing locations are best, as they ensure the bat house stays warm.
- Open Areas: Mount bat houses on poles or buildings rather than trees. This minimizes the risk of predators and provides bats with easy access to the house.
- Proximity to Water: Position bat houses near natural or artificial water sources, such as ponds, streams, or birdbaths. Water is essential for bats, especially during the breeding season.
Design Features:
- Chambers: Multi-chamber bat houses are preferable as they provide more space and better thermal regulation, accommodating larger colonies.
- Ventilation: Proper ventilation is crucial to prevent overheating and maintain a stable internal environment. Ensure your bat house has vents or slits for airflow.
- Interior Texture: The interior surfaces of bat houses should be roughened or covered with mesh to provide bats with a secure grip for roosting.
Maintenance:
- Regular Inspections: Check bat houses regularly for damage or signs of wear. Repair any cracks or other issues promptly to ensure the house remains habitable.
- Cleaning: Clean bat houses during the winter when bats are less likely to be present. Remove any debris or droppings to maintain a healthy environment.
- Monitoring: Monitor bat activity to assess the success of your bat house. Look for signs such as droppings below the house or visible bats during the evening.
Creating a Bat Colony for Your Property
Creating and maintaining a bat colony on your homestead can significantly enhance the local ecosystem. Understanding the dynamics of bat colonies, including their typical size and the factors influencing their establishment, is essential for fostering a thriving bat population.
Size of a Bat Colony
The size of a bat colony can vary widely depending on the species, availability of roosting sites, and environmental conditions. Here are some key points about bat colony sizes:
- Small Colonies: Some bat species, such as the Eastern Red Bat (Lasiurus borealis), are solitary or form small colonies. These colonies typically consist of a few individuals and are often found in tree foliage or under loose bark. Solitary bats prefer secluded, well-hidden roosts.
- Medium Colonies: Species like the Little Brown Bat (Myotis lucifugus) and the Big Brown Bat (Eptesicus fuscus) form medium-sized colonies ranging from a few dozen to a few hundred individuals. These colonies are commonly found in natural settings like tree cavities or human-made structures such as attics, barns, or bat houses.
- Large Colonies: Certain bat species, such as the Mexican Free-Tailed Bat (Tadarida brasiliensis), can form very large colonies comprising thousands or even millions of bats. These large colonies are typically found in extensive roosting sites like caves or large man-made structures, such as bridges or old buildings. The Brazilian Free-Tailed Bat colonies in Carlsbad Caverns are famous for housing millions of bats.
Bat House Capacity
While bat houses are smaller and cannot accommodate the enormous colonies found in caves, they can still support substantial bat populations. Here are the typical capacities:
- Single-Chamber Bat Houses: These basic structures can house 20-50 bats, making them suitable for smaller colonies or individual bats.
- Multi-Chamber Bat Houses: Larger and more complex, these bat houses can support 50-200 bats or more. They are designed to provide more space and better thermal regulation.
- Rocket Boxes: These cylindrical houses can accommodate several hundred bats, offering excellent ventilation and temperature regulation.
Factors Influencing Bat Colony Size on Your Homestead
Several factors influence the size of a bat colony that can establish itself on your homestead:
- Availability of Roosting Sites: The number and quality of roosting sites directly impact colony size. Providing multiple, well-designed bat houses can support larger colonies.
- Food Supply: A plentiful and diverse insect population is crucial for supporting a large bat colony. Ensuring your homestead has rich insect habitats, such as gardens with night-blooming plants, can attract and sustain more bats.
- Water Sources: Proximity to water sources like ponds, streams, or birdbaths is vital as bats need water for drinking and foraging.
- Climate and Environment: Bats prefer warm, stable environments. Areas that provide adequate sunlight and protection from wind and predators will attract more bats.
- Minimal Disturbance: Bats require quiet, undisturbed roosting sites. Avoiding frequent disturbances around bat houses will help maintain and grow your bat colony.
Creating an Optimal Environment for Bat Colonies
To encourage the establishment and growth of bat colonies on your homestead, consider the following strategies:
- Install Multiple Bat Houses: Providing a variety of roosting options can attract different species and support larger colonies. Ensure houses are well-spaced and positioned to receive adequate sunlight.
- Enhance Food Supply: Cultivate a garden that attracts nocturnal insects. Avoid using pesticides that can reduce the insect population bats rely on.
- Maintain Water Sources: Ensure that water features are clean and accessible year-round.
- Protect Roosting Sites: Limit human activity around bat houses and natural roosting sites to avoid disturbing the bats.
- Regular Maintenance: Inspect and clean bat houses regularly to ensure they remain in good condition and free from pests or damage.
Conclusion
Understanding the typical size of bat colonies and the factors influencing their establishment can help you create a supportive environment for these beneficial creatures. By providing adequate roosting sites, a rich food supply, and maintaining a disturbance-free zone, you can attract and sustain a healthy bat colony on your homestead. This proactive approach will ensure that bats continue to thrive, contributing to the ecological balance and health of your property.
Bats and Their Eyesight
Bats are often misunderstood creatures, with many myths and misconceptions surrounding their abilities, particularly their eyesight. One common myth is that bats are blind. In reality, bats have varying levels of eyesight depending on their species, and they often have excellent vision adapted to their nocturnal lifestyle. This section explores the truth about bats’ eyesight and how they use it in conjunction with other senses to navigate and hunt.
Myth: Bats Are Blind
The phrase “blind as a bat” is a misnomer. Bats are not blind; in fact, their eyesight is quite functional and adapted to their specific needs. The level of visual acuity in bats varies among species and is suited to their environment and feeding habits.
Types of Bat Eyesight
- Megabats (Fruit Bats):
- Excellent Vision: Megabats, also known as fruit bats or flying foxes, generally have large eyes and excellent vision. These bats are primarily diurnal or crepuscular, meaning they are active during the day or at twilight.
- Color Vision: Many megabats can see in color and have good depth perception, which helps them locate and identify fruits and flowers.
- Use of Sight: Megabats rely heavily on their vision for navigation and foraging. Their large eyes are well-suited for seeing in low-light conditions, which is essential for their crepuscular activities.
- Microbats:
- Moderate Vision: Microbats, which are smaller and primarily nocturnal, have relatively smaller eyes compared to megabats. Their eyesight ranges from good to adequate, depending on the species.
- Echolocation: While microbats do use their vision, they rely more heavily on echolocation to navigate and hunt insects in the dark. Echolocation involves emitting high-frequency sound waves and listening for the echoes that bounce back from objects.
- Night Vision: Microbats’ eyes are adapted to low-light conditions, allowing them to see at night. Their vision helps them detect large objects and navigate their roosts.
Adaptations for Nocturnal Vision
Bats have several adaptations that enhance their night vision:
- Tapetum Lucidum: Some bats have a reflective layer behind their retinas called the tapetum lucidum. This layer improves their night vision by reflecting light that passes through the retina back into their eyes, increasing the light available for photoreceptors.
- Rod Cells: Bats have a high concentration of rod cells in their retinas, which are more sensitive to low light levels than cone cells. This adaptation allows them to see better in dim conditions.
- Wide Field of View: The positioning of their eyes gives bats a wide field of view, which is beneficial for detecting predators and navigating through complex environments.
The Role of Echolocation
While bats have functional eyesight, echolocation is a crucial sense for many species, especially microbats. This sophisticated biological sonar system allows bats to:
- Navigate: Echolocation helps bats avoid obstacles and find their way through dark environments, such as forests or caves.
- Hunt: By emitting sound waves and interpreting the returning echoes, bats can detect and capture prey, such as insects, with remarkable precision.
- Communicate: Some bats use echolocation calls for communication within their species, helping them coordinate movements and locate each other.
Why Bats Can’t See Well During the Day
While bats are not blind, their eyesight is adapted primarily for low-light conditions, making it less effective during the day. This adaptation is a result of their nocturnal lifestyle, which has shaped their visual system to be more efficient at night. Here’s a detailed look at why bats struggle with daylight vision and how their eyes are optimized for darkness.
Nocturnal Adaptations
Bats are primarily nocturnal, meaning they are active during the night and rest during the day. Several adaptations help them thrive in low-light environments:
- Rod-Dominated Retinas: Bats have retinas that are rich in rod cells, which are more sensitive to light and motion but do not detect color well. Rod cells are excellent for seeing in dim light but are less effective in bright light conditions.
- Limited Cone Cells: Cone cells are responsible for color vision and function best in bright light. Bats have fewer cone cells compared to diurnal animals, limiting their ability to see clearly and in color during the day.
- Tapetum Lucidum: Some bats have a reflective layer behind their retinas called the tapetum lucidum, which enhances night vision by reflecting light back through the retina. While this helps in low light, it can cause glare and reduce visual acuity in bright light.
Daytime Vision Challenges
During the day, bats face several challenges that affect their vision:
- Glare and Overexposure: The abundance of rod cells and the presence of the tapetum lucidum can make bats more susceptible to glare and overexposure to bright light. This can overwhelm their visual system, causing discomfort and reduced clarity.
- Limited Color Vision: With fewer cone cells, bats have limited color vision. This is less of a problem at night, where light is scarce, but during the day, it can make it harder for them to differentiate objects based on color.
- Pupil Constriction: In bright light, bat pupils constrict to reduce the amount of light entering the eye. However, their eyes are not as adept at handling rapid changes in light levels, which can further impair their vision in daylight.
Behavioral Adaptations
Bats have developed several behavioral strategies to cope with their less effective daytime vision:
- Roosting Habits: Bats typically roost in dark, secluded places during the day, such as caves, tree cavities, or man-made structures like attics and bat houses. These environments provide protection from predators and reduce the impact of bright light on their sensitive eyes.
- Avoiding Daylight Activity: By being active primarily at night, bats minimize their exposure to bright light. This nocturnal behavior aligns with their visual strengths and helps them avoid the challenges associated with daylight vision.
- Echolocation Reliance: Even though echolocation is primarily used for navigation and hunting in the dark, it can also help bats orient themselves in dimly lit roosts during the day. Echolocation provides a supplementary sensory input that does not rely on light conditions.
The Migration Cycles of Bats
Bats are fascinating creatures with complex behaviors, including seasonal migration patterns. These migration cycles can significantly impact their presence on your homestead. Understanding these patterns can help you better prepare to attract and support bats year-round.
Why Do Bats Migrate? Bats migrate primarily in response to changes in temperature and food availability. During the warmer months, bats reside in areas abundant in insects, their primary food source. As temperatures drop in the fall and insect populations decrease, many bat species migrate to warmer climates where food is more plentiful.
Migration Patterns in North America In North America, bat migration typically occurs between late summer and early fall, with bats returning to their summer roosts in the spring. The specific timing and distance of migration can vary significantly among species:
Hoary Bat (Lasiurus cinereus):
- Migration Distance: Hoary Bats undertake some of the longest migrations of any bat species in North America, traveling thousands of miles between their summer and winter habitats.
- Migration Path: These bats migrate from Canada and the northern United States to warmer regions in the southern United States and Central America.
- Behavior: Hoary Bats often migrate in small groups and are known for their powerful flight, which allows them to cover large distances.
Mexican Free-Tailed Bat (Tadarida brasiliensis):
- Migration Distance: This species is known for its extensive migration, traveling up to 1,000 miles.
- Migration Path: Mexican Free-Tailed Bats migrate from the southwestern United States to Mexico and Central America for the winter.
- Behavior: They form large colonies and migrate in massive groups, which can be an impressive sight.
Silver-Haired Bat (Lasionycteris noctivagans):
- Migration Distance: Silver-Haired Bats typically migrate shorter distances compared to Hoary Bats, often traveling several hundred miles.
- Migration Path: They move from northern regions, including Canada and the northern United States, to more temperate areas in the southern United States.
- Behavior: These bats are known to migrate individually or in small groups and prefer forested areas for both roosting and migration.
Eastern Red Bat (Lasiurus borealis):
- Migration Distance: Eastern Red Bats also migrate relatively long distances, often traveling several hundred to over a thousand miles.
- Migration Path: They migrate from the northeastern United States and Canada to southeastern United States and Mexico.
- Behavior: These solitary bats migrate alone or in small groups, often using tree foliage for roosting during their journey.
Local and Regional Migratory Patterns Not all bats in North America migrate over long distances. Some species, such as the Big Brown Bat (Eptesicus fuscus) and the Little Brown Bat (Myotis lucifugus), exhibit more regional migration patterns. These bats might move to nearby caves or mines to hibernate during the winter months, rather than undertaking extensive migrations.
Big Brown Bat (Eptesicus fuscus):
- Migration Distance: Generally migrates short distances to suitable hibernation sites.
- Behavior: Big Brown Bats often remain within the same general region year-round, moving to underground sites like caves and abandoned mines for hibernation.
Little Brown Bat (Myotis lucifugus):
- Migration Distance: Similar to Big Brown Bats, Little Brown Bats migrate short distances.
- Behavior: They seek out hibernacula within a few hundred miles of their summer roosts, often choosing sites with stable temperatures and high humidity.
Implications for Homesteaders Understanding bat migration patterns can help homesteaders create environments that support bats throughout the year:
Seasonal Roosting Sites: Provide a variety of roosting sites that can cater to bats’ needs during different seasons. For example, bat houses can serve as summer roosts, while natural caves or specially designed hibernacula can offer winter shelter.
Water and Food Sources: Ensure that water sources and insect-rich habitats are available to attract migrating bats. Night-blooming plants that attract nocturnal insects can be particularly beneficial.
Monitoring and Maintenance: Regularly monitor and maintain bat houses and roosting sites to ensure they remain attractive to bats. Clean and repair bat houses during the off-season to prepare for the return of migratory bats.
Bat Mating Cycles
The mating cycles of bats are an essential aspect of their life history and have significant implications for their behavior, population dynamics, and the strategies homesteaders can use to attract and support them. This section provides a detailed overview of bat mating cycles, including timing, behaviors, and how these cycles impact their presence on your property.
Mating Season Timing Bat mating seasons vary depending on the species and geographical location, but they generally occur in late summer and early autumn. This timing allows females to prepare for the energy-intensive processes of pregnancy and lactation when insect prey is still abundant. Here are some key points about the timing of bat mating cycles:
- Late Summer to Early Autumn: Most North American bat species, such as the Little Brown Bat (Myotis lucifugus), Big Brown Bat (Eptesicus fuscus), and Hoary Bat (Lasiurus cinereus), mate during this period.
- Delayed Fertilization: Many female bats store sperm through the winter and delay fertilization until the spring. This strategy ensures that the birth of pups coincides with peak insect abundance, maximizing the chances of offspring survival.
Mating Behaviors Bat mating behaviors can be complex and vary widely among species. These behaviors include courtship displays, vocalizations, and competition among males. Here are some common mating behaviors observed in bats:
- Swarming: During the mating season, many bat species engage in swarming behavior, where large numbers of males and females gather at specific sites. Swarming typically occurs near hibernation sites and provides an opportunity for bats to mate and assess potential hibernation locations.
- Vocalizations: Males often use vocalizations to attract females and establish their presence. These vocalizations can include a variety of sounds, such as clicks, trills, and buzzes.
- Territorial Displays: Some male bats establish territories within swarming sites and defend them from other males. They may use physical displays, vocalizations, and even aggressive interactions to maintain their territory.
Reproductive Cycle The reproductive cycle of bats involves several stages, from mating to birth and rearing of young. Here is an overview of the key stages:
- Mating: As mentioned, mating typically occurs in late summer to early autumn. Females may mate with multiple males, ensuring genetic diversity among their offspring.
- Hibernation: After mating, many bats enter hibernation for the winter. During hibernation, females store sperm and delay fertilization.
- Fertilization: In the spring, as bats emerge from hibernation and food becomes more abundant, females fertilize their eggs. This timing ensures that pups are born when food is plentiful.
- Gestation: Gestation periods vary by species but typically last 40 to 60 days. During this time, females seek out maternity roosts that provide a safe and stable environment for giving birth and rearing young.
- Birth and Rearing: Most bat species give birth to a single pup, although some may have twins. Pups are born hairless and blind, relying entirely on their mothers for warmth, nutrition, and protection. The mother nurses her pup for several weeks until it is capable of flight and independent foraging.
Impact on Homestead Presence Understanding bat mating cycles can help homesteaders create environments that attract and support bats during critical times of the year. Here are some strategies:
- Maternity Roosts: Provide safe and stable roosting sites for pregnant females and nursing mothers. Bat houses, tree cavities, and attic spaces can serve as suitable maternity roosts.
- Habitat Stability: Ensure that roosting sites remain undisturbed, particularly during the critical periods of pregnancy, birth, and pup rearing. Avoid tree felling or significant habitat changes during these times.
- Insect-Rich Environment: Maintain a habitat rich in insects, particularly during the late spring and early summer when females need abundant food to support pregnancy and lactation.
- Education and Awareness: Educate family members and neighbors about the importance of bats and their mating cycles. Encourage practices that protect and support bat populations, such as reducing pesticide use and preserving natural habitats.
The Life Cycle of a Bat
Bats, like all mammals, have a complex and fascinating life cycle that includes several distinct stages: birth, development, adulthood, and reproduction. Understanding the life cycle of bats can help homesteaders create supportive environments that cater to their needs at each stage, ensuring a healthy and thriving bat population on their property.
Birth and Early Development
- Mating and Gestation: Bats typically mate in late summer or early autumn. Female bats often practice delayed fertilization, storing sperm throughout the winter and fertilizing their eggs in the spring. This strategy ensures that pups are born during a time of abundant food resources.
- Birth: Most bats give birth to a single pup, although some species may have twins. Births usually occur in early summer. Newborn bats are born hairless, blind, and entirely dependent on their mothers for warmth and nutrition.
- Nursing: The mother bat nurses her pup for several weeks. During this period, the pup clings to its mother or remains in the maternity roost while the mother forages for food. Bat milk is rich in fat and protein, providing the pup with the nutrients needed for rapid growth.
Development and Juvenile Stage
- Growth: Bat pups grow quickly, developing fur and opening their eyes within a few days to weeks after birth. As they mature, they begin to flap their wings and practice short flights within the roost.
- Learning to Fly: At about three to six weeks old, depending on the species, juvenile bats start to fly and forage for insects. This is a critical learning period where they develop the skills necessary for independent survival.
- Weaning: As juvenile bats become more proficient at flying and hunting, they gradually reduce their dependence on their mother’s milk. By the end of the summer, most young bats are fully weaned and capable of foraging on their own.
Adulthood and Maturity
- Independence: Once weaned, young bats continue to grow and hone their foraging skills. They join the adult population in their nightly hunting activities and roosting habits.
- Sexual Maturity: Bats typically reach sexual maturity at one to two years of age. This can vary depending on the species and environmental conditions. Once mature, they participate in mating activities during the breeding season.
- Life Span: The life span of bats varies widely among species. Small bat species often live around five to ten years, while some larger species, like the Little Brown Bat (Myotis lucifugus), can live up to 20 years or more under ideal conditions. Some bats, such as the Brandt’s bat (Myotis brandtii), have been known to live over 40 years in the wild.
Reproduction and the Cycle Continues
- Breeding Season: During the breeding season, which occurs in late summer to early autumn, bats engage in mating behaviors such as swarming, vocalizing, and courtship displays. Females mate with multiple males to ensure genetic diversity in their offspring.
- Hibernation or Migration: After mating, many bat species prepare for hibernation or migration. Those that hibernate do so in caves, mines, or other sheltered environments where they can survive the winter months with minimal energy expenditure. Migratory species travel to warmer climates to continue foraging during the winter.
Hibernation and Survival
- Hibernation: In regions with cold winters, many bat species enter a state of hibernation to conserve energy. During hibernation, bats lower their metabolic rate, body temperature, and heart rate, allowing them to survive on stored body fat until spring.
- Emergence: In the spring, hibernating bats emerge from their hibernacula as temperatures rise and food becomes available. This is also when females fertilize their stored sperm and begin the gestation process, continuing the cycle of life.
The life of a bat is a remarkable journey of growth, development, and adaptation. From their early days as vulnerable pups to becoming skilled flyers and efficient insect hunters, bats undergo significant transformations. Bats typically live for five to ten years, but some species can live over 20 years, and certain individuals, such as Brandt’s bats, have been documented living over 40 years.
Health Risks to Humans from Bats
While bats are incredibly beneficial to ecosystems and homesteaders, they can pose certain health risks to humans. Understanding these risks and taking appropriate precautions can ensure a safe and healthy coexistence with these fascinating creatures. This section will cover the primary health risks associated with bats and provide guidance on how to mitigate these risks effectively.
Rabies
Rabies is one of the most well-known diseases associated with bats. Although only a small percentage of bats carry rabies, the virus is almost always fatal if untreated.
- Transmission: Rabies is transmitted through the saliva of an infected animal, typically via bites or scratches. The virus can also be transmitted if saliva comes into contact with mucous membranes or an open wound.
- Symptoms: Early symptoms in humans include fever, headache, and general weakness. As the disease progresses, more severe symptoms such as agitation, hallucinations, and hydrophobia (fear of water) can occur.
- Prevention: Avoid handling bats directly. If you must handle a bat, wear thick gloves and other protective gear. Ensure pets are vaccinated against rabies. If bitten or scratched, wash the wound thoroughly and seek medical attention immediately.
Histoplasmosis
Histoplasmosis is a fungal infection caused by inhaling spores of the fungus Histoplasma capsulatum, which can be found in bat droppings (guano).
- Transmission: The fungus thrives in environments with bird and bat droppings. When these droppings dry out and become airborne, the spores can be inhaled.
- Symptoms: Symptoms can range from mild flu-like symptoms to severe respiratory issues. In severe cases, it can affect other organs and be life-threatening.
- Prevention: Avoid disturbing areas where bat droppings accumulate. If you need to clean such areas, wear a mask and gloves to prevent inhaling spores. Ensure proper ventilation when cleaning enclosed spaces with bat droppings.
Other Zoonotic Diseases
Bats can carry various other pathogens that may pose health risks to humans, including viruses, bacteria, and parasites. While direct transmission of these pathogens to humans is rare, it is essential to be aware of the potential risks.
- Leptospirosis: This bacterial disease can be transmitted through contact with water or soil contaminated with the urine of infected animals, including bats.
- Salmonella: Though more commonly associated with birds and reptiles, Salmonella bacteria can also be found in bat droppings.
- Prevention: Maintain good hygiene practices, such as washing hands thoroughly after cleaning bat droppings or handling bats. Avoid drinking or coming into contact with contaminated water.
Rabies Awareness and Safety Precautions
Rabies is a viral disease that affects the central nervous system and is almost always fatal once symptoms appear. Although the incidence of rabies transmission from bats to humans is low, it is a serious concern that requires careful attention and preventative measures. Here’s how you can protect yourself and your pets while fostering a safe environment for bats:
Understanding Rabies in Bats
- Prevalence: Only a small percentage of bats carry rabies. Studies suggest that less than 1% of bats are infected. However, the risk should not be ignored, as rabies is a severe and fatal disease.
- Transmission: Rabies is transmitted through the saliva of an infected animal, typically via bites or scratches. Bats can also transmit the virus if their saliva comes into contact with mucous membranes or an open wound.
Preventative Measures
- Avoid Direct Contact: The most effective way to prevent rabies is to avoid direct contact with bats. Educate family members, especially children, about the importance of not handling bats or any other wild animals.
- Use Protective Gear: If you must handle a bat, always use thick gloves and other protective gear to avoid bites or scratches. This is particularly important for situations such as rescuing a bat or moving it from an indoor area.
- Safe Bat Removal: If a bat enters your home, do not try to catch it with your bare hands. Instead, close off the room, open windows or doors to the outside, and allow the bat to leave on its own. If necessary, contact local wildlife control for assistance.
Rabies Vaccination
- Pets: Ensure that all pets, including dogs, cats, and ferrets, are up to date on their rabies vaccinations. Pets are more likely to come into contact with bats, and vaccinating them is a crucial line of defense.
- Humans: Consider rabies pre-exposure vaccination if you have frequent contact with bats, such as in professional or research settings. This vaccination can provide an added layer of protection.
Response to Bites and Scratches
- Immediate Action: If you are bitten or scratched by a bat, wash the wound thoroughly with soap and water for at least 15 minutes. This helps remove some of the virus from the wound.
- Seek Medical Attention: Contact a healthcare provider immediately, even if the wound seems minor. Post-exposure prophylaxis (PEP) is highly effective at preventing rabies if administered promptly after exposure.
- Report the Incident: Notify local health authorities or animal control about the incident. They may want to capture the bat for testing, which can determine whether it was rabid and guide further medical treatment.
Monitoring Bat Health
- Signs of Rabies in Bats: Be aware of signs that a bat might be rabid. These include unusual behavior such as activity during the day, difficulty flying, paralysis, or aggression. Do not approach or handle bats showing these symptoms.
- Reporting: Report any bats displaying signs of illness to local wildlife authorities. They can assess the situation and take appropriate action, which may include testing the bat for rabies.
Creating a Safe Environment
- Bat House Maintenance: Regularly inspect and maintain bat houses to ensure they are clean and free from disease. This includes removing droppings and ensuring that the structure is intact and safe for bats.
- Education and Awareness: Educate your family and community about the importance of bat conservation and the steps to take to safely coexist with bats. Reducing fear and misconceptions about bats can help prevent unnecessary harm to both humans and bats.
Additional Reading
Download a Bat House Plan
https://cwf-fcf.org/en/resources/downloads/booklets-handouts/canadianwildlife-bathouse-v4-MASTER.pdf
https://www.thespruce.com/bat-house-plans-4775009